Tuesday, December 20, 2016
email setup notes
notes on setting up mail server from scratch. migrate imap2 to new server
http://www.tecmint.com/setup-postfix-mail-server-in-ubuntu-debian
Sunday, November 20, 2016
Index of other blogs
Collections Blog http://jimsoldtoys.blogspot.com/
Jim Restaurants https://jim-restaurants.blogspot.com
Technical Notes http://jim-st.blogspot.com/
Recipes: http://jim-shirley.blogspot.com/
Restaurants: http://jimsocfood.blogspot.com/
Radxa board: http://my-radxa-rock.blogspot.com/
************************************
other interesting blogs.
Aviation Archives https://aviationarchives.blogspot.com/
Technical Notes http://jim-st.blogspot.com/
Recipes: http://jim-shirley.blogspot.com/
Restaurants: http://jimsocfood.blogspot.com/
Radxa board: http://my-radxa-rock.blogspot.com/
************************************
other interesting blogs.
Aviation Archives https://aviationarchives.blogspot.com/
Monday, November 14, 2016
xfce4 background, and linux command line xml parse example
http://unix.stackexchange.com/questions/131238/where-is-the-current-wallpaper-stored
xml script example
#!/bin/bash -# taken from
# http://unix.stackexchange.com/questions/131238/where-is-the-current-wallpaper-stored
# must install xmllint
# /usr/bin/xmllint libxml2-utils#
# define xfce4 xml file that holds info about desktops
#
DESKTOP="/home/$(id -un)/.config/xfce4/xfconf/xfce-perchannel-xml/xfce4-desktop.xml"
#
# define xpath that will extract current desktop background file name
# (NB I am no expert in xpaths and there is probably a much more elegant way
# to do this but this works for me)
#
XPATH='(//property[@name="workspace0"]/property[@name="last-image"])[last()]/@value'
#
# use xmllint utility to apply xpath to file and extract file path and name
#
IMAGE=$(xmllint --xpath "string(${XPATH})" "${DESKTOP}")
#
# display the file info extracted
#
echo Current Wallpaper File = ${IMAGE}
#
# rest of script........
#xx
Friday, November 11, 2016
windows 10 miracast remote display on other device
maybe able to use the laptop as a remote display for the compute stick. Not much different than using RDP, but it would remote the actual desktop if it works, not the remote connect, which would allow a reboot rather than a disconnect on the power button.
http://www.laptopmag.com/articles/turn-windows-10-pc-into-wirelss-display
Thursday, November 10, 2016
enable ping and other fine tuning on windows 10
windows 10 ping etc. link
May not be enabled by default, which is a PITA
http://www.sysprobs.com/enable-ping-reply-and-ftp-traffic-in-windows-10-and-server
Wednesday, November 9, 2016
Windows 7 system font size issues (tiny for display)
Windows 7 font size problem link
http://superuser.com/questions/425449/how-do-i-fix-the-tiny-font-in-my-windows-7-system-dialog-boxes
Go to
Control Panel -> Personalization -> Window Color -> Advanced appearance settings
Go through each item in the Item drop-down and see if anything has a very low Size set in the Font section. Windows 10 font size problem solution search
https://www.google.com/search?q=windows+10+font+size+system&ie=utf-8&oe=utf-8
xx
Windows 10 tablet keyboard, adding arrow keys.
http://superuser.com/questions/1001053/windows-10-tablet-onscreen-keyboard-arrows
To enable this layout:
- From the Start screen, open Settings (hidden behind the “hamburger” icon in the tablet mode). Another way to start the Settings app is the “All Settings” action icon in the notification center.
- In the Settings app, select Devices → Typing.
- Turn on the “Add the standard keyboard layout as a touch keyboard option” switch.

the standard keyboard has up and down arrow keys, useful for scrollback. should be in the menu, but guess they don't use the keyboard and omitted them.
Wednesday, October 26, 2016
Windows 10 performance measurement tools
There are tools in windows 10 to measure some system performance.
The simple one that you will find that was included in the system health report on the system page, or a system experience report in the Games page in windows seem to be missing, maybe being removed.
these tools and measures do seem to be present.
To do some tests, hit windows button, then type powershell. Before hitting enter or clicking, right click and run as adminstrator for all these tests.
http://answers.microsoft.com/en-us/windows/forum/windows_7-performance/winsat-error-this-system-does-not-have-multi-media/fced6087-0e8e-4c4c-b07c-1927996b97c5
Memory:
winsat memformal
PS C:\Windows\system32> winsat memformal
Windows System Assessment Tool
> Running: Feature Enumeration ''
> Run Time 00:00:00.00
> Running: System memory performance assessment ''
> Run Time 00:00:05.06
> Memory Performance 15379.05 MB/s
> Total Run Time 00:00:05.72
xx
The simple one that you will find that was included in the system health report on the system page, or a system experience report in the Games page in windows seem to be missing, maybe being removed.
these tools and measures do seem to be present.
To do some tests, hit windows button, then type powershell. Before hitting enter or clicking, right click and run as adminstrator for all these tests.
http://answers.microsoft.com/en-us/windows/forum/windows_7-performance/winsat-error-this-system-does-not-have-multi-media/fced6087-0e8e-4c4c-b07c-1927996b97c5
Memory:
winsat memformal
PS C:\Windows\system32> winsat memformal
Windows System Assessment Tool
> Running: Feature Enumeration ''
> Run Time 00:00:00.00
> Running: System memory performance assessment ''
> Run Time 00:00:05.06
> Memory Performance 15379.05 MB/s
> Total Run Time 00:00:05.72
winsat diskformal
PS C:\Windows\system32> winsat diskformal
Windows System Assessment Tool
> Running: Feature Enumeration ''
> Run Time 00:00:00.00
> Running: Storage Assessment '-seq -read -n 0'
> Run Time 00:00:02.80
> Running: Storage Assessment '-ran -read -n 0'
> Run Time 00:00:00.25
> Disk Sequential 64.0 Read 230.51 MB/s 7.4
> Disk Random 16.0 Read 153.33 MB/s 7.5
> Total Run Time 00:00:03.11
winsat dwmformal
took a long time, canceled it.
winsat cpuformal did not run
windows version N has no windows media support, and the cpu performance assessment
is calculated from encoding a file from wmv format to prx format with a command line
passed to the measurement utility.
Here are a few extra links found as well with hints, still to be evaluated.
Using powershell:
Get-WmiObject -class Win32_WinSAT will fetch up the raw WEI figure. Seems to be
dead or missing on development Windows 10 systems.
Winsat prepop is supposed to fill in the information, but does not, for the above info
fetch.
PS C:\Windows\system32> Get-WmiObject -class Win32_WinSAT
__GENUS : 2
__CLASS : Win32_WinSAT
__SUPERCLASS :
__DYNASTY : Win32_WinSAT
__RELPATH : Win32_WinSAT.TimeTaken="MostRecentAssessment"
__PROPERTY_COUNT : 8
__DERIVATION : {}
__SERVER : DESKTOP-KAMVAGD
__NAMESPACE : root\cimv2
__PATH : \\DESKTOP-KAMVAGD\root\cimv2:Win32_WinSAT.TimeTaken="MostRecentAssessment"
CPUScore : 0
D3DScore : 0
DiskScore : 0
GraphicsScore : 0
MemoryScore : 0
TimeTaken : MostRecentAssessment
WinSATAssessmentState : 3
WinSPRLevel : 0
PSComputerName : DESKTOP-KAMVAGD
Older platforms with System page Windows experience index (WEI) figure.
Another youtube video suggest using Shell:games to get to the games search.
That has been deleted on the development copies of Windows 10, so there is
no calculated WEI index. other utilities show how that is calculated.
Saturday, October 22, 2016
SVChost in a loop eating the cpu
microsoft blog entry on how to diagnose or attack svchost service processes eating the cpu problems
https://blogs.technet.microsoft.com/askperf/2009/04/10/prf-high-cpu-svchost-exe/
svchost is a process that has many services run as an aggregate inside each of the svchost processes you see in taskmanager.
There is no internal accounting for the services attached to the svchost process, so other means are required if one of them is eating the cpu. The means is to use a shell command for each service to force it into a separate svchost bucket on startup.
The Blog entry link has analysis and troubleshooting methods outlined as well. The commands to break out the processes is copied from the blot into this entry below for future reference. Looking @ what svchost arises in the reconfigured system when rebooted will usually tell you what service is broken, and either the full blog entry will suggest a fix, or you can google for that service eating the cpu and see if there is a remedy.
Be sure to run cmd.exe as administrator, that isn't mentioned in this, unless other means are used. sc command must be admin or have authority to reconfigure the service (if not admin owned) or you won't get far.
Some services won't reconfigure, in which case you will have to remove all the services from that svchost (as determined by using the taskmanager) and run what is left.
Description: SVCHOST.EXE is a generic host process for services. There can be multiple SVCHOST.EXE running on a system and each SVCHOST.EXE can also hold multiple services. Troubleshooting high CPU usage with SVCHOST.EXE can difficult since Task Manager or Performance Monitor cannot show which service inside the SVCHOST.EXE is causing the issue.
Scoping the Issue: The first step is to identify the Process ID (PID) of the SVCHOST.EXE that is pegging the CPU. This can be done through Task Manager->Processes tab. If the PID column is not present, you can add it by selecting View->Select Columns and check the PID checkbox. Once the PID is identified, the next step is to determine which services are running under the PID. From a Command Prompt, type:
TASKLIST.EXE /SVC
TASKLIST.EXE will list all the processes and PID’s running on the system. Look for the PID in question and check the Services column. This will give you a list of Services to start investigating. If it is not clear which Service inside the SVCHOST.EXE process is causing high CPU usage, the next step is to isolate the service into its own SVCHOST.exe container. You can use ‘SC CONFIG’ to do this. From a Command Prompt type:
sc config <service name> type= own
Do this for each service inside the SVCHOST.EXE in question. Restart the service and it will start in its own SVCHOST.EXE.
To revert the service back to its original state, type the command:
sc config <service name> type= share
Please note that resetting SVCHOST.EXE configuration via the share command will require a system reboot.
xx
Saturday, October 15, 2016
Thursday, October 13, 2016
Vmware ESXI 5.5 on core i5 Nuc
This page has some interesting notes employed in installing vmware esxi 5.5 on core i5 NUC. Though that is an older than the latest release, this has some good techniques for esxi, including package installation.
http://www.virten.net/2015/02/how-to-install-esxi-on-5th-gen-intel-nuc-nic-and-ahci-workaround/
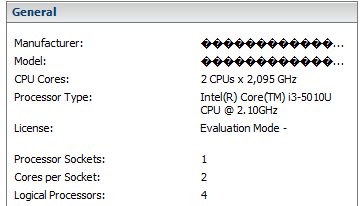
Intel has begun to deliver their 5th Gen Broadwell NUCs. At the moment, only NUCs with i3 CPUs are available. NUCs with faster CPUs are available in the next few weeks. I could get my hands on the NUC5i3MYHE. That’s the version with a 2.5″ HDD slot and without integrated WLAN. This post quickly explains how to get ESXi running on the 5th Gen NUC. As known from 3th and 4th gen NUCs, it is not possible to use the ESXi Installer provided by VMware.
I’m confident that this guide will also work for i5 and i7 NUCs, as from what I’ve seen in the documentation they have identical controllers:
- Intel NUC5i7RYH
- Intel NUC5i5RYH
- Intel NUC5i5MYHE
- Intel NUC5i5RYK
- Intel NUC5i3RYH
- Intel NUC5i3MYHE
- Intel NUC5i3RYK
- NUC5i3MYHE ($300,-)
- Crucial 16GB Kit DDR3 1600 1.35V ($110,-)
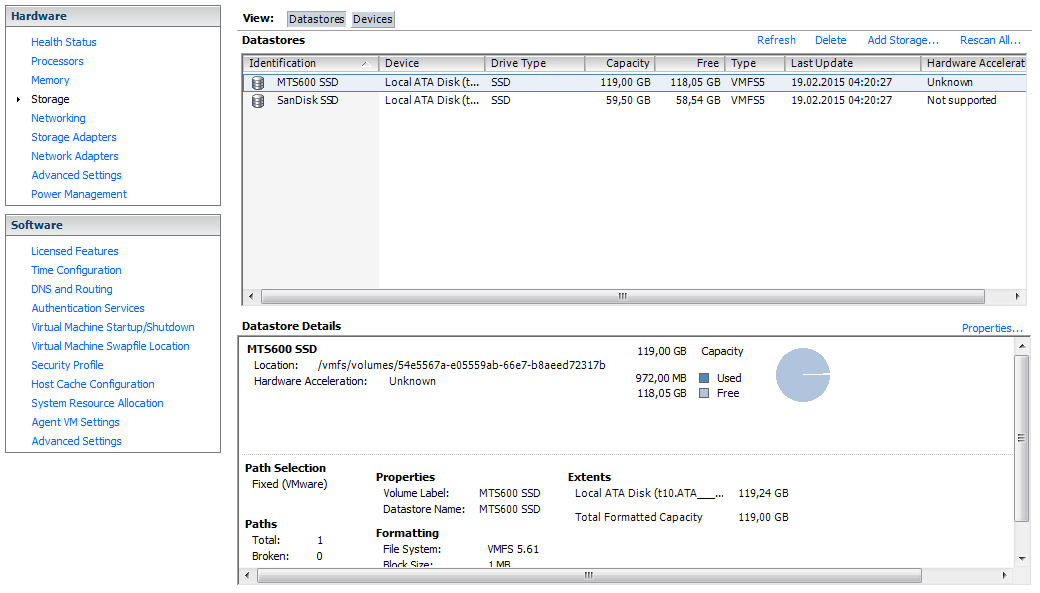
- Transcend MTS600 M.2 SSD 128GB ($60,-)
- 2.5″ SanDisk SSD (Reused from older tests)
- 8GB Kingston Digital DataTraveler
- NUC has a Mini HDMI and Mini DisplayPort. Make sure to have an adapter.
- Supported M.2 SSD sizes are 22×24, 22×60 and 22×80
- NUC requires 1.35V SODIMM Memory
No Network AdaptersYou have to create a customized ESXi Image. The custom driver has been created about a year ago by GLRoman and is available at VMware Community or at the vibsdepot from VMware Front Experience.
No network adapters were detected. Either no network adapters are physically connected to the system, or a suitable driver could not be located. A third party driver may be required.
Ensure that there is at least one network adapter physically connected to the system before attempting installation. If the problem persists, consult the VMware Knowledge Base.
You can either download ESXi and the e1000 driver manually, or simply use the following PowerCLI commands to create a customized ISO. This will download all required files automatically.
Add-EsxSoftwareDepot https://hostupdate.vmware.com/software/VUM/PRODUCTION/main/vmw-depot-index.xml
Add-EsxSoftwareDepot http://vibsdepot.v-front.de
New-EsxImageProfile -CloneProfile "ESXi-5.5.0-20150204001-standard" -name "ESXi-5.5.0-20150204001-NUC" -Vendor "virten.net" -AcceptanceLevel "CommunitySupported"
Add-EsxSoftwarePackage -ImageProfile "ESXi-5.5.0-20150204001-NUC" -SoftwarePackage "net-e1000e"
Add-EsxSoftwarePackage -ImageProfile "ESXi-5.5.0-20150204001-NUC" -SoftwarePackage "sata-xahci"
Export-ESXImageProfile -ImageProfile "ESXi-5.5.0-20150204001-NUC" -ExportToISO -filepath ESXi-5.5.0-20150204001-NUC.iso
If you are unfamiliar with PowerCLI, read this post for a more detailed guide.
With this image you should be able to install ESXi 5.5 on a USB flash drive connected to the NUC.

No problem, we can fix that. First step is to determine the PCI ID:
~ # lspci -v | grep storage -A 1
0000:00:1f.2 SATA controller Mass storage controller: Intel Corporation Wildcat Point-LP SATA Controller [AHCI Mode]
     Class 0106: 8086:9c83
The numbers we are looking for are 8086:9c83. We
have to add that to the AHCI driver map
(/etc/vmware/driver.map.d/ahci.map). Unfortunately we can’t edit this
file while ESXi is running. The changes have to be made to the file that
is loaded during ESXi startup (/bootbank/sata_ahc.v00). Convert the
file with vmtar, extract it, change the driver map and rebuild it to
/bootbank/. To do that, SSH to the ESXi and run the following commands:cd /tmp mkdir ahci cd ahci vmtar -x /bootbank/sata_ahc.v00 -o sata_ahc.tar tar xvf sata_ahc.tar rm sata_ahc.tar echo "regtype=linux,bus=pci,id=8086:9c83 0000:0000,driver=ahci,class=storage" >> etc/vmware/driver.map.d/ahci.map tar cvf sata_ahc.tar etc usr vmtar -c sata_ahc.tar -o sata_ahc.vgz mv sata_ahc.vgz /bootbank/sata_ahc.v00
Reboot ESXi and have fun with your 5th Gen NUC running ESXi 5.5
Additional Note: I’ve also tried to install ESXi 6.0 RC to the NUC. It was not required to create a custom ISO. The network card was detected during installation with the ISO provided by VMware. The AHCI workaround was still required. Please note that this was tested with beta software and might change when 6.0 is GA
Friday, October 7, 2016
Setting up a google account with fetchmail
These are notes on what is required to set up pop3 fetching of gmail.
su as fetchmail id. /usr/bin/fetchmail won't run as root.
/usr/bin/fetchmail -a -k -f /etc/fetchmailrc
This will force running of all the rules in fetchmailrc
tail /var/log/mail.log will show the progress.
It wouldn't hurt to kill fetchmail with /etc/init.d/fetchmail stop
This debian doesn't support service fetchmail stop, so use the direct script to stop and start fetchmail
Verified 11/4/2014 jws
You must also log onto the gmail account, and in settings Forwarding and POP3/IMAP tab set Pop3 on.
On google mail with a newly setup account, you will get a message such as:
Review blocked sign-in attempt
By default, Google gmail will block an attempted login to their POP3 port, even with ssl and correct credentials, till you approve the access. There are ways to find these queries as third party applications, but the easiest way if you have control of the fetchmail demon is to just go ahead and launch the fetchmail (via /etc/init.d/fetchmail) and let it fail.
A failure AUTH should be logged in the /var/log/mail.info
If there are any problems that you want to see more information about, up the verbosity of fetchmail's messages by editing
/etc/default/fetchmail
and adding
OPTIONS="-v"
after a restart of fetchmail with /etc/init.d/fetchmail restart, the mail.info file will be full of all sorts of details. Remember to comment this back out and restart fetchmail once problems are solved. The increase in data in mail.info is at least 20 fold.
verified 10/7/2016 jws
***************************
setting up for imap mode fetch from gmail
http://daemonforums.org/showthread.php?t=5590
--30--
Monday, October 3, 2016
Upload Youtube videos from Linux command line
This might be handy for uploading surveillance videos or the like, generated on a system.
From Jean-Luc
http://www.cnx-software.com/2014/02/09/how-to-upload-youtube-videos-with-the-command-line-in-linux/
mkdir youtube-upload
cd youtube-upload
wget https://github.com/youtube/api-samples/raw/master/python/upload_video.py
Google API download
wget https://google-api-python-client.googlecode.com/files/google-api-python-client-1.2.tar.gz
tar xzvf google-api-python-client-1.2.tar.gz
cd google-api-python-client-1.2/
mv apiclient/ oauth2client/ uritemplate/ ..
cd ..
Sunday, October 2, 2016
Multiple Notepad++ instances
Notepad will allow multiple instances to be present. This isn't a huge problem with windows prior to 10 with workspaces, but with windows 10, you get workspaces, and want to edit things on each workspace.
this is a simple fix to the shortcut on launch.
On Windows 10, there is a "pin to start' capability, so the trick is to copy the notepad++ shortcut, rename it, and add the shortcut option to the copy.
option is: -multiInst
Pin that one to the start menu.
http://superuser.com/questions/549782/want-2-instances-windows-of-notepad
- Create a new shortcut to your notepad++.exe
- Go to Properties of the shortcut (Right-click on it)
- Append -multiInst to the target line. It should look like this

Viewing Foscam FI9803P stream with VLC
Use VLC stream viewing to view cameras: how to construct URLs
Model FI9803P camera
http://foscam.us/media/mconnect_uploadfiles/f/i/fi9803p%20user%20manual.pdf
2.4 Using the VLC player This camera supports RTSP streaming, here you can
view the camera using VLC player.
RTSP URL
rtsp:// [user name][:password]@IP: RTSP port number/videosream
The part in the square bracket s may be omitted. user name & password:
The user name and password to access the camera.
This part can be omitted.
IP: WAN or LAN IP address.
Videostream: Here support some mode .
When the network speed is bad, here you had better select videoSub.
For example: IP: 192.168.1.11
RTSP Port number : 554
User name : admin
Password : 123
Here I can enter one of the following URLs in the VLC.
1) rtsp://admin: 123 @192.168.1.11: 554 /videoMain
2) rtsp:// @192.168.1.11: 554 /videoMain
3) rtsp://: 123 @192.168.1.11: 554 /videoMain
4) rtsp://admin@192.168.1.11: 554 /videoMain
Open the VLC, and go to Media Open Network Stream option, then enter the
URL into VLC
Shortcuts:
Create windows shortcut by copying the VLC shortcut, and add it to the "target:" fieldof the shortcut
On linux create a shortcut on the desktop by whatever means and add the rstp URL
to the target address as well.
xx
Monday, September 26, 2016
vmware esxi 6 on Intel NUC
Just some notes for now, later will detail how install worked out
http://www.virten.net/2015/03/esxi-6-0-image-for-intel-nuc/
xx
install notes:
http://www.ivobeerens.nl/2016/02/24/intel-nuc-6th-generation-as-home-server/
http://www.ivobeerens.nl/2011/09/17/create-a-bootable-vmware-esxi-5-usb-stick-in-windows-and-perform-a-scripted-installation/
xx
http://tekhead.it/blog/category/nanolab/
xx
technique I used, rufus
http://www.virten.net/2016/01/vmware-homeserver-esxi-on-6th-gen-intel-nuc/
Installation
No customization is required to install the latest ESXi 5.5 and ESXi 6.0 versions on 6th Gen NUCs. You can use the images provided by VMware to Install ESXi:The simplest way to install ESXi is by using the original ISO and Rufus to create a bootable ESXi Installer USB Flash Drive.
****
Download Rufus. I have 2.9.934
http://rufus.akeo.ie/

Set the above options, and remember to select the disk image next to
"Create a bootable disk using" and select the iso file to be bootable.
Vmware ISO 6.0 was downloaded from here:
Vmware FREE-ESXI6
A link to the current vmware may have to be gotten by following links to get an evaluation version. The above is for reference, and is the version my systems run.
xx
Saturday, September 24, 2016
find / cpio directory copy / move / archive info
http://bradthemad.org/tech/notes/cpio_directory.php
https://www.computerhope.com/unix/ucpio.htm
Create a cpio archive:
localhost% find path/ -depth -print | cpio -oaV > archive.cpio
localhost% find path/ -depth -print | cpio -oaV -O archive.cpio
Create a cpio archive and compress it:
localhost% find path/ -depth -print | cpio -oaV | gzip -c > archive.cpio.gz
Extract a compressed cpio archive:
cd to parent directory of location to install.
gzip -cd path-to-cpio-gz | cpio -idmv
<uncompress to stdout> pipe <cpio install stream from stdin>
http://superuser.com/questions/31078/cpio-basic-extract-command-tar-xzvf-equivalent
Extract a cpio archive:
localhost% cpio -imVd < archive.cpio
localhost% cpio -imVd -I archive.cpio
List the contents of a cpio archive:
localhost% cpio -it < archive.cpio
localhost% cpio -it -I archive.cpio
Use cpio copy-pass to copy a directory structure to another location:
localhost% find path/ -depth -print | cpio -pamVd /new/parent/dir
cpio over ssh
To cpio a local directory, send the output to ssh and feed it to cpio on a remote host:localhost% find path/ -depth -print | cpio -oaV | ssh user@host 'cpio -imVd'Ssh to a remote host, cpio a remote directory, and get its output locally:
localhost% ssh user@host "find path/ -depth -print | cpio -oaV" | cpio -imVd
**************
Another reference
https://docs.oracle.com/cd/E23824_01/html/821-1459/bkupsavefiles-21.html
- Change to the appropriate directory.
# cd filesystem1
- Copy the directory tree from filesystem1 to filesystem2 by using a combination of the
find and cpio commands.
# find . -print -depth | cpio -pdm filesystem2
- .
- Starts in the current working directory.
- Prints the file names.
- -depth
- Descends the directory hierarchy and prints file names from the bottom up.
- -p
- Creates a list of files.
- -d
- Creates directories as needed.
- -m
- Sets the correct modification times on directories.
The files from the directory name you specify are copied. The symbolic links are preserved.
You might also specify the -u option. This option forces an unconditional copy. Otherwise, older files do not replace newer files. This option might be useful if you want an exact copy of a directory, and some of the files being copied might already exist in the target directory.
xx
Ubuntu / rsync backup
https://www.digitalocean.com/community/tutorials/how-to-upgrade-ubuntu-12-04-lts-to-ubuntu-14-04-lts
The
aAX flags tell rsync to preserve important
file attributes like permissions, ownerships, and modification times.
If you are using Docker or another virtualization tool, you should add
the S flag so that rsync properly handles sparse files, like virtual storage.sudo rsync -aAXv --exclude={"/dev/*","/proc/*","/sys/*","/tmp/*","/run/*","/mnt/*","/media/*","/lost+found"} -e 'ssh -i /path/to/private_key' root@SERVER_IP_ADDRESS:/* ~/backup/ sudo rsync -aAXv --exclude={"/dev/*","/proc/*","/sys/*","/tmp/*","/run/*", \"/mnt/*","/media/*","/lost+found"} -e 'ssh -i /path/to/private_key' \root@SERVER_IP_ADDRESS:/* ~/backup/
If you need to restore parts of your server files later on, you can use rsync
again with the source and destination parameters reversed, like so:
sudo rsync -aAXv -e 'ssh -i /path/to/private_key' ~/backup/ root@SERVER_IP_ADDRESS:/*
xx How to deal with "/path/to/private_key"
http://www.cyberciti.biz/faq/force-ssh-client-to-use-given-private-key-identity-file/
example:
ssh -i /path/to/id_rsa user@server.nixcraft.com
ssh -i /path/to/id_dsa user@server2.nixcraft.net.in

To use /backup/home/user/.ssh/id_dsa, enter:

ssh -i /backup/home/user/.ssh/id_dsa user@unixserver1.nixcraft.com
xx
Tuesday, September 20, 2016
Windows 7 setup notes
set up printers:
HP 4500 printer, need hp driver:
http://support.hp.com/us-en/drivers/selfservice/HP-Officejet-4500-All-in-One-Printer-Series---G5/3919445/model/3919446
HP 2015 printer installs from the ip of the printer on 7, 8.1 and win 10
Install firefox extensions
Install Putty, games, firefox, set up remote desktops
Install vmware client manager 5, or 6 for appropriate host for install.
Sunday, September 18, 2016
possible workaround to readynas windows 10 share problem. (relevant to developer win 10 installs)
Note on removing credential (If I understand it), as a workaround fix for broken Windows 10 fix.
Windows 10 upgrades to the developer releases seem to be invalidating stored credentials with each update with some regularity. if you have a drive share mount with stored credentials, or on another front though not with the readynas nas, stored logins for say remote desktop, you have to reinput them.
That was working up to the latest 9/14 or 9/16 set of updates. now it seems to retain the credential and not let you easily reinput the login, or share.
And it was not accepting any password on other shares, even valid ones.
A fellow on the Readynas forum (where this became a topic) suggested a workaround worth documenting.
Thanks to Readynas forum user nayadn for this.
nayadn (Aspirant) posted a new reply in R6000 Series AC WiFi Routers on 2016-09-17 07:32 AM :
Re: Can no longer access ReadyShare drives on Windows 10
i googled again the error and i came up with a sideway solution
go into user account in control panel
if you're in windows 10 select manage your credentials this will open 2 options
web credentials and windows credentials
head to windows credentials and add a new windows credential
enter the location of the drive \\readyshare on the first line
your windows user name in the second line
your windows password in the third line
and you're done, you should see the drive under network and be able to access it as before
good luck
Friday, September 16, 2016
Block updates on Windows 10
Have to remove updates to make Readynas and shares work again. Microsoft Windows 10 update this week fucked it completely up, with some update, so have to identify and remove updates till they work again, then ban the update that is causing it.
http://www.howtogeek.com/223864/how-to-uninstall-and-block-updates-and-drivers-on-windows-10/
Open the Settings app and select “Update & security.” Under Windows Update, scroll down and select “Advanced options,” and then select “View your update history.”
Open Settings and navigate to Update & security > Windows Update > Advanced options > View your update history. You’ll see a link reading “Uninstall updates” at the top of the update history list.
This link takes you to the “Uninstall an update” dialog, where you can uninstall an individual Windows Update if it’s causing problems on your system.
Prevent a Driver or Update From Being Installed from Windows Update
https://support.microsoft.com/en-us/kb/3073930When you run this troubleshooter, it will search for available updates and allow you to “hide” them, preventing Windows from automatically installing them. In the future, you can run this troubleshooter again and unhide the updates when you want to install them.
If you want to temporarily prevent Windows from automatically downloading and installing any updates, you can do it without using the above tool to block updates. Just set your current Internet connection as “metered” and Windows won’t download updates while connected to it — at least until you tell Windows the connection isn’t metered anymore.
Extra, to do a blanket uninstall if possible:
Restore to system restore point, remove all updates after that point:
- Right-click (or press and hold) the Start button, and then select Control Panel.
- Search Control Panel for Recovery.
- Select Recovery > Open System Restore > Next.
- Choose the restore point related to the problematic app, driver, or update, and then select Next > Finish.
Thursday, September 15, 2016
windows group policy editing
https://support.microsoft.com/en-us/kb/968264
This is a note about a specific polity, but shows how to get into policy editing
To work around this behavior, follow these steps:
- On the Management Server, click Start, click Run, type gpedit.msc, and then click OK.
- Under Computer Configuration, expand Windows Settings, expand Security Settings, expand Local Policies, and then expand Security Options.
- In the Policy pane, right-click Network access: Do not allow storage of credentials or .NET Passports for network authentication, click Properties, click Disabled, and then click OK.
Monday, September 12, 2016
Freya OS notes
Freya is a modified Ubuntu. Some notes on changing the desktop and adding tools to make it useful are here.
Chrome:
https://johnsdeveloperblog.wordpress.com/2015/04/22/some-things-to-do-after-installing-elementary-os-freya/
XRDP setup:
sudo apt-get update
sudo apt-get install xfce4
echo xfce4-session >~/.xsession
sudo service xrdp restart
xx
xx
Chrome:
https://johnsdeveloperblog.wordpress.com/2015/04/22/some-things-to-do-after-installing-elementary-os-freya/
XRDP setup:
sudo apt-get update
sudo apt-get install xfce4
echo xfce4-session >~/.xsession
sudo service xrdp restart
xx
xx
Thursday, September 8, 2016
Output from installing Chrome Browser on Rasbian
Rather than clutter the instructional notes, pasting the mess that came out of the install here.
There are a number of recommended installs called out by the install procedure at the end as the browser is installed. Need to see if any of them are needed as a followup.
wget -qO - http://bintray.com/user/downloadSubjectPublicKey?username=bintray | sudo apt-key add -
echo "deb http://dl.bintray.com/kusti8/chromium-rpi jessie main" | sudo tee -a /etc/apt/sources.list
sudo apt-get update
sudo apt-get install chromium-browser rpi-youtube -y
pi@raspberrypi:~/work/chrome $ sudo apt-get update
Ign http://dl.bintray.com jessie InRelease
Get:1 http://dl.bintray.com jessie Release.gpg [821 B]
Get:2 http://dl.bintray.com jessie Release [5,186 B]
Hit http://mirrordirector.raspbian.org jessie InRelease
Get:3 http://dl.bintray.com jessie/main armhf Packages [5,182 B]
Hit http://mirrordirector.raspbian.org jessie/main armhf Packages
Hit http://archive.raspberrypi.org jessie InRelease
Hit http://mirrordirector.raspbian.org jessie/contrib armhf Packages
Hit http://archive.raspberrypi.org jessie/main armhf Packages
Hit http://mirrordirector.raspbian.org jessie/non-free armhf Packages
Hit http://archive.raspberrypi.org jessie/ui armhf Packages
Hit http://mirrordirector.raspbian.org jessie/rpi armhf Packages
Ign http://dl.bintray.com jessie/main Translation-en_GB
Ign http://dl.bintray.com jessie/main Translation-en
Ign http://archive.raspberrypi.org jessie/main Translation-en_GB
Ign http://archive.raspberrypi.org jessie/main Translation-en
Ign http://archive.raspberrypi.org jessie/ui Translation-en_GB
Ign http://archive.raspberrypi.org jessie/ui Translation-en
Ign http://mirrordirector.raspbian.org jessie/contrib Translation-en_GB
Ign http://mirrordirector.raspbian.org jessie/contrib Translation-en
Ign http://mirrordirector.raspbian.org jessie/main Translation-en_GB
Ign http://mirrordirector.raspbian.org jessie/main Translation-en
Ign http://mirrordirector.raspbian.org jessie/non-free Translation-en_GB
Ign http://mirrordirector.raspbian.org jessie/non-free Translation-en
Ign http://mirrordirector.raspbian.org jessie/rpi Translation-en_GB
Ign http://mirrordirector.raspbian.org jessie/rpi Translation-en
Fetched 11.2 kB in 14s (756 B/s)
Reading package lists... Done
pi@raspberrypi:~/work/chrome $ sudo apt-get install chromium-browser rpi-youtube -y
Reading package lists... Done
Building dependency tree
Reading state information... Done
The following extra packages will be installed:
chromium-browser-l10n chromium-codecs-ffmpeg-extra geoclue-2.0 kweb libjavascriptcoregtk-1.0-0 libmbim-glib4
libmbim-proxy libmm-glib0 libqmi-glib1 libwebkitgtk-1.0-0 libwebkitgtk-1.0-common menu modemmanager
Suggested packages:
webaccounts-chromium-extension unity-chromium-extension adobe-flashplugin menu-l10n
The following NEW packages will be installed:
chromium-browser chromium-browser-l10n chromium-codecs-ffmpeg-extra geoclue-2.0 kweb libjavascriptcoregtk-1.0-0
libmbim-glib4 libmbim-proxy libmm-glib0 libqmi-glib1 libwebkitgtk-1.0-0 libwebkitgtk-1.0-common menu modemmanager
rpi-youtube
0 upgraded, 15 newly installed, 0 to remove and 73 not upgraded.
Need to get 74.5 MB of archives.
After this operation, 243 MB of additional disk space will be used.
Get:1 http://mirrordirector.raspbian.org/raspbian/ jessie/main libjavascriptcoregtk-1.0-0 armhf 2.4.9-1~deb8u1+rpi1 [1,190 kB]
Get:2 http://dl.bintray.com/kusti8/chromium-rpi/ jessie/main chromium-codecs-ffmpeg-extra armhf 51.0.2704.79-0ubuntu0.14.04.1.1121 [801 kB]
Get:3 http://mirrordirector.raspbian.org/raspbian/ jessie/main libmbim-glib4 armhf 1.10.0-2.1 [53.5 kB]
Get:4 http://mirrordirector.raspbian.org/raspbian/ jessie/main libmm-glib0 armhf 1.4.0-1 [135 kB]
Get:5 http://mirrordirector.raspbian.org/raspbian/ jessie/main libqmi-glib1 armhf 1.10.2-2 [302 kB]
Get:6 http://mirrordirector.raspbian.org/raspbian/ jessie/main libwebkitgtk-1.0-common all 2.4.9-1~deb8u1+rpi1 [451 kB]
Get:7 http://dl.bintray.com/kusti8/chromium-rpi/ jessie/main chromium-browser armhf 51.0.2704.79-0ubuntu0.14.04.1.1121 [58.3 MB]
Get:8 http://mirrordirector.raspbian.org/raspbian/ jessie/main libwebkitgtk-1.0-0 armhf 2.4.9-1~deb8u1+rpi1 [6,262 kB]
Get:9 http://mirrordirector.raspbian.org/raspbian/ jessie/main geoclue-2.0 armhf 2.1.10-2 [61.4 kB]
Get:10 http://mirrordirector.raspbian.org/raspbian/ jessie/main libmbim-proxy armhf 1.10.0-2.1 [6,464 B]
Get:11 http://mirrordirector.raspbian.org/raspbian/ jessie/main menu armhf 2.1.47 [358 kB]
Get:12 http://mirrordirector.raspbian.org/raspbian/ jessie/main modemmanager armhf 1.4.0-1 [465 kB]
Get:13 http://dl.bintray.com/kusti8/chromium-rpi/ jessie/main chromium-browser-l10n all 51.0.2704.79-0ubuntu0.14.04.1.1121 [3,246 kB]
Get:14 http://dl.bintray.com/kusti8/chromium-rpi/ jessie/main kweb armhf 1.7.4-1 [2,869 kB]
Get:15 http://dl.bintray.com/kusti8/chromium-rpi/ jessie/main rpi-youtube armhf 5.1.0-1 [2,562 B]
Fetched 74.5 MB in 27s (2,668 kB/s)
Selecting previously unselected package chromium-codecs-ffmpeg-extra.
(Reading database ... 126549 files and directories currently installed.)
Preparing to unpack .../chromium-codecs-ffmpeg-extra_51.0.2704.79-0ubuntu0.14.04.1.1121_armhf.deb ...
Unpacking chromium-codecs-ffmpeg-extra (51.0.2704.79-0ubuntu0.14.04.1.1121) ...
Selecting previously unselected package chromium-browser.
Preparing to unpack .../chromium-browser_51.0.2704.79-0ubuntu0.14.04.1.1121_armhf.deb ...
Unpacking chromium-browser (51.0.2704.79-0ubuntu0.14.04.1.1121) ...
Selecting previously unselected package chromium-browser-l10n.
Preparing to unpack .../chromium-browser-l10n_51.0.2704.79-0ubuntu0.14.04.1.1121_all.deb ...
Unpacking chromium-browser-l10n (51.0.2704.79-0ubuntu0.14.04.1.1121) ...
Selecting previously unselected package libjavascriptcoregtk-1.0-0:armhf.
Preparing to unpack .../libjavascriptcoregtk-1.0-0_2.4.9-1~deb8u1+rpi1_armhf.deb ...
Unpacking libjavascriptcoregtk-1.0-0:armhf (2.4.9-1~deb8u1+rpi1) ...
Selecting previously unselected package libmbim-glib4:armhf.
Preparing to unpack .../libmbim-glib4_1.10.0-2.1_armhf.deb ...
Unpacking libmbim-glib4:armhf (1.10.0-2.1) ...
Selecting previously unselected package libmm-glib0:armhf.
Preparing to unpack .../libmm-glib0_1.4.0-1_armhf.deb ...
Unpacking libmm-glib0:armhf (1.4.0-1) ...
Selecting previously unselected package libqmi-glib1:armhf.
Preparing to unpack .../libqmi-glib1_1.10.2-2_armhf.deb ...
Unpacking libqmi-glib1:armhf (1.10.2-2) ...
Selecting previously unselected package libwebkitgtk-1.0-common.
Preparing to unpack .../libwebkitgtk-1.0-common_2.4.9-1~deb8u1+rpi1_all.deb ...
Unpacking libwebkitgtk-1.0-common (2.4.9-1~deb8u1+rpi1) ...
Selecting previously unselected package libwebkitgtk-1.0-0:armhf.
Preparing to unpack .../libwebkitgtk-1.0-0_2.4.9-1~deb8u1+rpi1_armhf.deb ...
Unpacking libwebkitgtk-1.0-0:armhf (2.4.9-1~deb8u1+rpi1) ...
Selecting previously unselected package geoclue-2.0.
Preparing to unpack .../geoclue-2.0_2.1.10-2_armhf.deb ...
Unpacking geoclue-2.0 (2.1.10-2) ...
Selecting previously unselected package libmbim-proxy.
Preparing to unpack .../libmbim-proxy_1.10.0-2.1_armhf.deb ...
Unpacking libmbim-proxy (1.10.0-2.1) ...
Selecting previously unselected package menu.
Preparing to unpack .../archives/menu_2.1.47_armhf.deb ...
Unpacking menu (2.1.47) ...
Selecting previously unselected package modemmanager.
Preparing to unpack .../modemmanager_1.4.0-1_armhf.deb ...
Unpacking modemmanager (1.4.0-1) ...
Selecting previously unselected package kweb.
Preparing to unpack .../kweb_1.7.4-1_armhf.deb ...
Unpacking kweb (1.7.4-1) ...
Selecting previously unselected package rpi-youtube.
Preparing to unpack .../rpi-youtube_5.1.0-1_armhf.deb ...
Unpacking rpi-youtube (5.1.0-1) ...
Processing triggers for gnome-menus (3.13.3-6) ...
Processing triggers for desktop-file-utils (0.22-1) ...
Processing triggers for mime-support (3.58) ...
Processing triggers for man-db (2.7.0.2-5) ...
Processing triggers for hicolor-icon-theme (0.13-1) ...
Processing triggers for dbus (1.8.20-0+deb8u1) ...
Processing triggers for install-info (5.2.0.dfsg.1-6) ...
Setting up chromium-codecs-ffmpeg-extra (51.0.2704.79-0ubuntu0.14.04.1.1121) ...
Setting up chromium-browser (51.0.2704.79-0ubuntu0.14.04.1.1121) ...
Setting up chromium-browser-l10n (51.0.2704.79-0ubuntu0.14.04.1.1121) ...
Setting up libjavascriptcoregtk-1.0-0:armhf (2.4.9-1~deb8u1+rpi1) ...
Setting up libmbim-glib4:armhf (1.10.0-2.1) ...
Setting up libmm-glib0:armhf (1.4.0-1) ...
Setting up libqmi-glib1:armhf (1.10.2-2) ...
Setting up libwebkitgtk-1.0-common (2.4.9-1~deb8u1+rpi1) ...
Setting up libwebkitgtk-1.0-0:armhf (2.4.9-1~deb8u1+rpi1) ...
Setting up geoclue-2.0 (2.1.10-2) ...
Setting up libmbim-proxy (1.10.0-2.1) ...
Setting up menu (2.1.47) ...
Setting up modemmanager (1.4.0-1) ...
Processing triggers for menu (2.1.47) ...
Setting up kweb (1.7.4-1) ...
Preparing kweb environment ...
... looking for programs needed by or recommended for Minimal Kiosk Browser
found: lxterminal
found: xpdf for better PDF support (recommended: evince!)
found: omxplayer
for use with omxplayerGUI you should always get the latest version
from http://omxplayer.sconde.net/
youtube-dl not found. It is needed for web video support.
you will be asked for automatic installation of the optimal version later on
uget download manager not found. It is highly recommended for downloads.
Install it with:
sudo apt-get install uget
if you want to use Minimal Kiosk Browser without starting the desktop,
you need the light weight task bar tint2. Install it with:
sudo apt-get install tint2
xterm not found. It can be optionally used for playing video full screen without GUI.
If you want to make use of this option, you must install it with:
sudo apt-get install xterm
Some programs needed to use all features of Minimal Kiosk Browser are not installed.
Follow the install recommendations above.
You do not have youtube-dl from github installed.
It is needed for best web video support.
Do you want to install it now? (y)ycloning git version of youtube-dl ...
Cloning into 'youtube-dl'...
remote: Counting objects: 72550, done.
remote: Compressing objects: 100% (68/68), done.
remote: Total 72550 (delta 38), reused 0 (delta 0), pack-reused 72482
Receiving objects: 100% (72550/72550), 39.98 MiB | 4.57 MiB/s, done.
Resolving deltas: 100% (52730/52730), done.
Checking connectivity... done.
creating symbolic link
compiling modules ...
Done. To update youtube-dl run update-ytdl (there are new updates almost daily)
Setting up rpi-youtube (5.1.0-1) ...
Processing triggers for libc-bin (2.19-18+deb8u4) ...
Processing triggers for dbus (1.8.20-0+deb8u1) ...
Processing triggers for menu (2.1.47) ...
pi@raspberrypi:~/work/chrome $
Chrome on Raspberry pi
notes for now to pass links over to the pi session. rdp doesn't pass links
https://www.raspberrypi.org/forums/viewtopic.php?t=121195
Essence is to pull the binary for chrome from another site:
wget -qO - http://bintray.com/user/downloadSubjectPublicKey?username=bintray | sudo apt-key add -
echo "deb http://dl.bintray.com/kusti8/chromium-rpi jessie main" | sudo tee -a /etc/apt/sources.list
sudo apt-get update
sudo apt-get install chromium-browser rpi-youtube -ya later version here: http://kusti8.github.io/RPi-chromium/ Here is the output of the install included in this posthttp://jim-st.blogspot.com/2016/09/output-from-installing-chrome-browser.html
Wednesday, September 7, 2016
Add printer to Raspian / Debian with CUPS
This is handy because it has instructions on how to open up the CUPS management page to your lan.
http://www.howtogeek.com/169679/how-to-add-a-printer-to-your-raspberry-pi-or-other-linux-computer/
Already on one of my pi boxes.
Steps:
sudo apt-get install cups
sudo usermod -a -G lpadmin pi
sudo vi /etc/cups/cupsd.conf
Edit lines to remove localhost, allow local access, file it.
# Only listen for connections from the local machine
# Listen localhost:631
Port 631
< Location / >
# Restrict access to the server...
Order allow,deny
Allow @local
< /Location >
< Location /admin >
# Restrict access to the admin pages...
Order allow,deny
Allow @local
< /Location >
< Location /admin/conf >
AuthType Default
Require user @SYSTEM
# Restrict access to the configuration files...
Order allow,deny
Allow @local
< /Location >
~
Restart cups
sudo /etc/init.d/cups restart
access cups from http://host:631/ from your local lan.
Tuesday, September 6, 2016
Changing search engine on Raspberry pi 3 (from duckduckgo to google)
original info from here:
http://www.lifehacker.com.au/2015/02/how-to-change-the-raspberry-pis-epiphany-browser-to-use-google/
sudo glib-compile-schemas /usr/share/glib-2.0/schemas
The original article above has you install what I am guessing is the schema compiler, but that didn't work on the raspian I'm running and the compile-schemas was already there when I ran it.
http://www.lifehacker.com.au/2015/02/how-to-change-the-raspberry-pis-epiphany-browser-to-use-google/
sudo leafpad /usr/share/glib-2.0/schemas/org.gnome.epiphany.gschema.xml
Then locate this block of XML:
- <key type="s" name="keyword-search-url">
- <default>'https://www.google.com/search?q=%s'</default>
- <summary>URL Search</summary>
- <description>Search string for keywords entered in the URL bar.</description>
- </key>
The line
Next compile the xml with this:<default>'https://duckduckgo.com/?q=%s&t=raspberrypi'</default> is what you need to change. Replace https://duckduckgo.com/?q=%s&t=raspberrypi withhttps://www.google.com.au/#q=%ssudo glib-compile-schemas /usr/share/glib-2.0/schemas
The original article above has you install what I am guessing is the schema compiler, but that didn't work on the raspian I'm running and the compile-schemas was already there when I ran it.
Monday, September 5, 2016
Raspberry pi 3 Bluetooth
https://www.cnet.com/how-to/how-to-setup-bluetooth-on-a-raspberry-pi-3/
If you're pairing a keyboard, you will need to enter a six-digit string of numbers. You will see that the device has been paired, but it may not have connected. To connect the device, type connect XX:XX:XX:XX:XX:XX
Example from local pi:
Example from local pi:
pi@raspberrypi:~ $ sudo bluetoothctl
[NEW] Controller B8:27:EB:2B:C8:3A raspberrypi [default]
[NEW] Device C6:0A:5E:74:80:9E Flex
[NEW] Device 00:18:AC:38:76:BE Bluetooth Keyboard
[bluetooth]# agent on
Agent registered
[bluetooth]# default-agent
Default agent request successful
[bluetooth]# scan on
Discovery started
[CHG] Controller B8:27:EB:2B:C8:3A Discovering: yes
[NEW] Device FC:58:FA:F7:08:36 AUVIO4000449
[bluetooth]# pair FC:58:FA:F7:08:36
Attempting to pair with FC:58:FA:F7:08:36
[CHG] Device FC:58:FA:F7:08:36 Connected: yes
[CHG] Device FC:58:FA:F7:08:36 Modalias: bluetooth:v0039p13A4d0501
[CHG] Device FC:58:FA:F7:08:36 UUIDs:
00001108-0000-1000-8000-00805f9b34fb
0000110b-0000-1000-8000-00805f9b34fb
0000110c-0000-1000-8000-00805f9b34fb
0000110e-0000-1000-8000-00805f9b34fb
0000111e-0000-1000-8000-00805f9b34fb
0000112e-0000-1000-8000-00805f9b34fb
00001200-0000-1000-8000-00805f9b34fb
[CHG] Device FC:58:FA:F7:08:36 Paired: yes
Pairing successful
[CHG] Device FC:58:FA:F7:08:36 Trusted: yes
[CHG] Device FC:58:FA:F7:08:36 Connected: no
Sunday, July 31, 2016
setting up linux system for handling outbound email
http://askubuntu.com/questions/158957/how-to-set-the-fully-qualified-domain-name-in-12-04
Set fqdn
change hostname in /etc/hostname
add fqdn in /etc/hosts
say for host foo and domain pri /etc/hosts entry is:
127.0.1.1 foo.pri foo
set up exim for mail handling (from Linode example)
https://www.linode.com/docs/email/exim/sendonly-mail-server-with-exim-on-debian-6-squeeze
reconfigure exim4 script
dpkg-reconfigure exim4-config
xx
Installation of Chrome on Ubuntu
How to install real chrome broswer on Ubuntu. Useful for automating local cloud printing to local printers.
http://www.ubuntumaniac.com/2015/10/install-google-chrome-46-on-ubuntu-1510.html
http://www.ubuntumaniac.com/2015/10/install-google-chrome-46-on-ubuntu-1510.html
Configuring exim to handle emails
starting some notes for configuring outbound email thru a host, to allow for sending internally to a local host (single one) and have it email thru the isp email host, or whatever
https://debian-administration.org/article/140/Handling_mail_for_multiple_virtual_domains_with_exim4
http://blog.bigsmoke.us/2008/08/03/configuring-a-debian-satellite-exim-server
Tidbit about dc_other_hostnames:
BTW, ‘dc_other_hostnames’ is colon (;) seperated.
Friday, July 29, 2016
A couple of good vnc setup pages for Linux Ubuntu
For VNC remote desktop access via vnc server. Most times now use xvnc and microsoft remote desktop client everywhere with windows desktop.
And remmina for remotes on ubuntu / linux desktops. Remmina will access these desktops. microsoft rdp will not.
https://www.digitalocean.com/community/tutorials/how-to-install-and-configure-vnc-on-ubuntu-16-04
https://www.howtoforge.com/how-to-install-vnc-server-on-ubuntu-14.04
Tuesday, July 26, 2016
Change Workgroup or system name windows 10, with original dialog
The new cute control panel doesn't include the original dialog which could edit the workgroup if you are not a member of a Domain.
The default WORKGROUP is not great to leave a system in if you are using home type sharing and security, so it is handy to change it.
It is possible in Windows 10 without much effort to change the hostname or rather the computer name on the Windows 10 operating system.
Please start the advanced system settings in Windows 10. The quickest way is via Run in Windows 10, open this keyboard shortcut Windows logo key + R.
In Windows 10 Run just type the command sysdm.cpl!
Tuesday, July 19, 2016
Extracting images from a PDF
This example worked well for an example created by the Android Cam Scanner app, which I use to document and scan quite a lot.
convert -verbose -density 150 -trim -sharpen 0x1.0 -quality 100 ../1103-front-panel-card-ba11.pdf 1103.jpg
http://stackoverflow.com/questions/6605006/convert-pdf-to-image-with-high-resolution
from recommended solution from above link saved to make sure it doesn't vanish
173 vote
x
convert -verbose -density 150 -trim -sharpen 0x1.0 -quality 100 ../1103-front-panel-card-ba11.pdf 1103.jpg
http://stackoverflow.com/questions/6605006/convert-pdf-to-image-with-high-resolution
from recommended solution from above link saved to make sure it doesn't vanish
173 vote
It appears that the following works:
  (To really see and appreciate the differences between the two, right-click on each and select "Open Image in New Tab...".) Also keep the following facts in mind:
-density flag. The density value 150 is weird -- trying a range of values results in a worse looking image in both directions! |
x
Tuesday, July 12, 2016
Thunderbird System setup
Thunderbird Extensions. See Tools->Add-ons and search, or use links below
The message export died. use this entry to deal with filters.
Thunderbird Message Filter Import/Export Enhanced
https://addons.mozilla.org/en-US/thunderbird/addon/password-exporter/?src=search
Get rid of double spacing format in composition (new install)
https://support.mozilla.org/en-US/questions/1118727
Go to Tools > Options > Composition > General tab.
Here you need to uncheck where it says
"When using paragraph format, the enter key creates a new paragraph."
Change location of profile
It's possible to move the location of a profile folder. This could be useful if you have a backed up profile folder somewhere on your hard drive and want to tell Thunderbird to use that as your profile. This section explains how to do this.
- Shut down Thunderbird completely (File > Exit).
- Move the profile folder to the desired location. For example, on Windows XP, move the profile from
C:\Documents and Settings\[username]\Application Data\Thunderbird\Profiles\xxxxxxxx.defaulttoD:\Stuff\MyMailProfile. If you are reading these instructions because you want to restore a previously backed up profile, this step isn't necessary. Just note the current location of the profile you want to restore. - Open up
profiles.iniin a text editor. The file is located in the application data folder for Thunderbird:- On Windows Vista/XP/2000, the path is
%AppData%\Thunderbird\ - On Windows 95/98/Me, the path is usually
C:\WINDOWS\Application Data\Thunderbird\ - On Linux, the path is
~/.thunderbird/ - On Mac OS X, the path is
~/Library/Application Support/Thunderbird/
- On Windows Vista/XP/2000, the path is
- In
profiles.ini, locate the entry for the profile you've just moved. Change thePath=line to the new location. If you are using a non-relative pathname, the direction of the slashes may be relevant (this is true for Windows XP). - Change
IsRelative=1toIsRelative=0. - Save
profiles.iniand restart Thunderbird.
Tuesday, June 21, 2016
Setting up Pi Raspian on 7" Pi screen
The Pi screen can be used in any orientation. I bought a backshell which mounts it in a nice case upside down, however, requiring a 180 degree rotation to work correctly.
do the following:
edit /boot/config.txt
add line:
display_rotate=2
value 1=90
value 2=180
value 3=270
https://www.raspberrypi.org/forums/viewtopic.php?f=108&t=120793
The default keyboard in Raspian is British english. To reconfigure do the following:
in a bash screen:
rerun the configuration for the keyboard package with dpkg-reconfigure
sudo dpkg-reconfigure keyboard-configuration
reload the configuration with:
invoke-rc.d keyboard-setup start
Monday, June 13, 2016
Ten things to turn off in Windows 10 as of 2016
Summary from article at end of this post. To get to various options, follow the tabs / screens. Some links explain more detail as a reference. This is a quick summary to make it more handy to run thru the settings for a new install, or a system which has not been adjusted.
Update sharing outside your house
Settings > Update & security > Advanced options > Choose how updates are delivered
stop-windows-10-from-using-your-pc-for-file-sharing
Advertising ID
You can turn this off by going to Settings > Privacy > General > Let my apps use my advertising ID for experiences across apps (turning this off will reset your ID).
Start menu ads:
Settings > Personalization > Start > Occasionally show suggestions in Start.
get-rid-of-ads-in-your-windows-10-start-menu
Notifications (select and turn some off)
Settings > System > Notifications & actions and turning off things like Show me tips about Windows
Cortana "getting to know you". another privacy leak to the mothership.
Settings > Privacy > Speech, inking, & typing and clicking Stop getting to know me.
Review Background Apps:
Settings > Privacy > Background apps
Disable Lock screen (where prudent)
Lock Screen
how-to-disable-the-windows-10-lock-screen
Select which syncing you want
Settings > Accounts > Sync your settings. You can turn off all settings syncing
Visual effects in interface:
System > Advanced system settings. Under the Advanced tab, go to Performance and click Settings
Select update policy:
Settings->Updates and Security->Advanced Options Automatic Updates
Original article 2016
http://www.cnet.com/how-to/10-things-to-disable-in-windows-10/
Sunday, May 22, 2016
Transfering SQL database between two linux servers
Process for moving a database between two linux servers running mysql.
Target server may or may not have the database created. example used uses phpmydmin create database to create the empty database.
Use mysqldump to create an ".sql" file with the data from the database. Example here is for an RSS reader application, and keeps track of the rss feeds for doing deltas for the read presentation.
Note for sql the password and user id are for the mysql users and the password on the mysql server. They are not linux account passwords. The commands can be performed from any userid with access to the mysql commands, since the database is worked via the mysqldump command to the mysql socket. Access to the actual files is not required, since the work is done on those files by the mysql server.
backup:
mysqldump --password=<some-password> -u <userid> rss > 2016-0522-rss-mysqldump.sql
create database in phpmyadmin:
Databases->Create new Database [enter rss in name field] (Create)
restore:
mysql -u <userid> --password=<password> rss < 2016-0522-rss-mysqldump.sql
Thursday, May 12, 2016
using ssl purchased cert with ipfire
This posting covers a problem with installing a cert and verifying it on ipfire, since the port 80 and 444 ports are used for the firewall. The service this guy used needed those ports open to do the cert install.
However it is useful to note that it names the method used for moving those ports out of the way as well from other posts here.
Also the site letsencrypt has free certs. Looks like possibly only one cert for a server is required to convert to using https regardless of how many servers one has on a site. need to investigate.
https://gpcn.org/?tag=ipfire-certificate
IPFire versus SSLCerts
so I decided to purchase a ‘real’ SSL certificate for my IPFire
installation and as it was the cheapest one I could find I went with
ssls.com… so far so good.
But, if you follow the instructions, one problem remains: if you chose to upload the verification file any confirmation will fail as IPFire uses ports 81 and 444 for the webinterface. To resolve that issue, at least temporarily we will excute the following steps:
(1) if you contact the firewall from the ‘outside world’ make sure you add exceptions for ports 80 and 443
(2) upload the provided file to /srv/web/ipfire/html/
now the fun starts…
modify the ports in
/etc/httpd/conf.d/vhosts.d/ipfire-interface.conf and ipfire-interface-ssl.conf
now our apache would not know, which ports it is configured for, however, unless you change the
/etc/httpd/conf/listen.conf
as well nothing will happen…
Now execute a /etc/init.d/apache restart
once your certificate is ready, replace the certs in /etc/httpd, change back the ports and reload the service… your purchased cert should now be used.
Update: IPfire seems to replace der server.crt sometimes when being updated… in that case you might have to overwrite the certificate again and restart apache.
Subscribe to:
Posts (Atom)