Saturday, January 28, 2017
Attachments banned by google
Routine attachment extensions banned by Google. If the are going to be attached, they will need to be renamed and hidden. Usual method is to create either a tgz or zip file containing the files, and then rename that attachment. Usual that seems to work is to reverse the spelling of the file.
So far google doesn't seem to vet the attachment with the "file" type as well as the extension, because presumably software at the receiving or download end ignores it if the extension doesn't match.
http://www.computerworld.com/article/3161898/security/gmail-will-block-javascript-attachments-a-common-source-of-malware.html
Users will no longer be able to attach .JS files to emails in Gmail, regardless of whether they attach them directly or they include them in archives like .gz, .bz2, .zip or .tgz. For those rare cases when such files need to be shared via email, users can upload them to a storage service like Google Drive and then share the link.
The .JS file extension will be added an existing list of other banned file attachments that includes: .ADE, .ADP, .BAT, .CHM, .CMD, .COM, .CPL, .EXE, .HTA, .INS, .ISP, .JAR, .JSE, .LIB, .LNK, .MDE, .MSC, .MSP, .MST, .PIF, .SCR, .SCT, .SHB, .SYS, .VB, .VBE, .VBS, .VXD, .WSC, .WSF and .WSH. Most of these file types have long been abused by cybercriminals to send malware via email.
Thursday, January 26, 2017
USB drives on VMware ESXI6 servers
http://www.virten.net/2015/10/usb-devices-as-vmfs-datastore-in-vsphere-esxi-6-0/
Information archived below:
USB Devices as VMFS Datastore in vSphere ESXi 6.0
[Update: If you are looking for USB VMFS Datastores in vSphere 6.5, read this article.]
Create VMFS Datastore on USB drives
- Connect to the ESXi host with SSH
- Stop the USB arbitrator service. This service is used to passthrough
USB device from an ESX/ESXi host to a virtual machine. (When disabling
it, you can no longer passthrough USB devices to VMs)
~ # /etc/init.d/usbarbitrator stop
- (optional) Use this command to permanently disable the USB arbitrator service after reboot.
~ # chkconfig usbarbitrator off
- Plug in the USB Device to your ESXi host
- Get the device identifier (mpx.vmhbaXX). You should see the USB Device in /dev/disks/:
~ # ls /dev/disks/
- Write a GPT label to the device (Assuming that the Device ID is mpx.vmhba36)
~ # partedUtil mklabel /dev/disks/mpx.vmhba36\:C0\:T0\:L0 gpt
- To create a partition you need to know the start sector, end sector, which depends on the device size and the GUID.
The start sector is always 2048
The GUID for VMFS is AA31E02A400F11DB9590000C2911D1B8
The end sector can be calculated with the following formula (Use the numbers from getptbl):~ # partedUtil getptbl /dev/disks/mpx.vmhba36\:C0\:T0\:L0 gpt 1947 255 63 31293440
1947 * 255 * 63 - 1 = 31278554
You can also calculate the endsector with the following command:
~ # eval expr $(partedUtil getptbl /dev/disks/mpx.vmhba36\:C0\:T0\:L0 | tail -1 | awk '{print $1 " \\* " $2 " \\* " $3}') - 1 31278554 - Create the VMFS partition (Replace with your endsector)
~ # partedUtil setptbl /dev/disks/mpx.vmhba36\:C0\:T0\:L0 gpt "1 2048 31278554 AA31E02A400F11DB9590000C2911D1B8 0"
- Format the partition with VMFS5
~ # vmkfstools -C vmfs5 -S USB-Stick /dev/disks/mpx.vmhba36\:C0\:T0\:L0:1
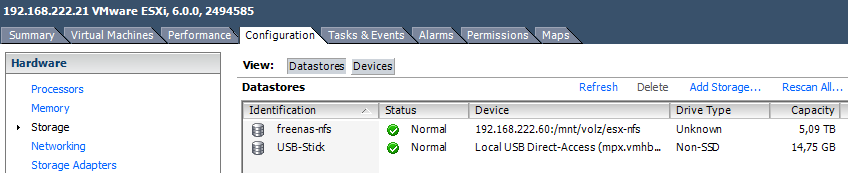
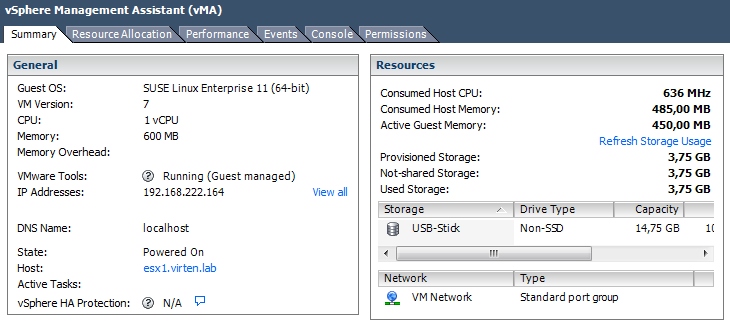
And the final proof is a virtual machine running on it:
This is how your command output should look like:
~ # partedUtil mklabel /dev/disks/mpx.vmhba43\:C0\:T0\:L0 gpt
~ # eval expr $(partedUtil getptbl /dev/disks/mpx.vmhba43\:C0\:T0\:L0 | tail -1 | awk '{print $1 " \\* " $2 " \\* " $3}') - 1
31278554
~ # partedUtil setptbl /dev/disks/mpx.vmhba43\:C0\:T0\:L0 gpt "1 2048 31278554 AA31E02A400F11DB9590000C2911D1B8 0"
gpt
0 0 0 0
1 2048 31278554 AA31E02A400F11DB9590000C2911D1B8 0
~ # vmkfstools -C vmfs5 -S USB-Stick /dev/disks/mpx.vmhba43\:C0\:T0\:L0:1
create fs deviceName:'/dev/disks/mpx.vmhba43:C0:T0:L0:1', fsShortName:'vmfs5', fsName:'USB-Stick'
deviceFullPath:/dev/disks/mpx.vmhba43:C0:T0:L0:1 deviceFile:mpx.vmhba43:C0:T0:L0:1
ATS on device /dev/disks/mpx.vmhba43:C0:T0:L0:1: not supported
.
Checking if remote hosts are using this device as a valid file system. This may take a few seconds...
Creating vmfs5 file system on "mpx.vmhba43:C0:T0:L0:1" with blockSize 1048576 and volume label "USB-Stick".
Successfully created new volume: 56226b60-118f2e3f-04ba-001b2193b3b0
[Update: October 19. 2015 - Figured out why devices are detected as USB 2. Devices now with full USB 3.0 performance. Performance test results updated.]
http://www.virten.net/2015/10/usb-3-0-devices-detected-as-usb-2-in-esxi-6-0-and-5-5/
USB 3.0 devices detected as USB 2 in ESXi 6.0 and 5.5

Within the UEFI the xHCI mode is configurable with a default of "Smart Auto". According to the documentation, in "Smart Auto" mode the USB 3.0 port acts like a 2.0 port before OS USB 3.0 drivers are loaded. For whatever reason, this does not work properly with ESXi. After setting xHCI Mode to "Enabled", all devices are correctly identified as USB 3.0.
During my tests I've use two USB 3.0 capable devices on my 5th Gen Intel NUC (NUC5i5MYHE):
- External 1TB 2.5" HDD (Seagate RSS LLC FreeAgent GoFlex USB 3.0)
- USB 3.0 to mSATA SSD Enclosure (ASMedia Technology Inc.)
Both devices are connected to "Bus 001", which is the 2.0 root hub:
~ # vmware -v VMware ESXi 6.0.0 build-3073146 ~ # lsusb Bus 001 Device 007: ID 0bc2:5031 Seagate RSS LLC FreeAgent GoFlex USB 3.0 Bus 001 Device 006: ID 174c:1153 ASMedia Technology Inc. Bus 001 Device 003: ID 0930:6545 Toshiba Corp. Kingston DataTraveler 102 Flash Drive / HEMA Flash Drive 2 GB / PNY Attache 4GB Stick Bus 001 Device 002: ID 8087:8001 Intel Corp. Bus 003 Device 001: ID 1d6b:0003 Linux Foundation 3.0 root hub Bus 002 Device 001: ID 1d6b:0002 Linux Foundation 2.0 root hub Bus 001 Device 001: ID 1d6b:0002 Linux Foundation 2.0 root hub ESXi 5.5 with xHCI Mode "Smart Auto"
Same problem here. Both devices on "Bus 001".
~ # vmware -v VMware ESXi 5.5.0 build-3116895 ~ # lsusb Bus 001 Device 008: ID 0bc2:5031 Seagate RSS LLC FreeAgent GoFlex USB 3.0 Bus 001 Device 007: ID 174c:1153 ASMedia Technology Inc. Bus 001 Device 003: ID 0930:6545 Toshiba Corp. Kingston DataTraveler 102 Flash Drive / HEMA Flash Drive 2 GB / PNY Attache 4GB Stick Bus 001 Device 002: ID 8087:8001 Intel Corp. Bus 003 Device 001: ID 1d6b:0003 Linux Foundation 3.0 root hub Bus 002 Device 001: ID 1d6b:0002 Linux Foundation 2.0 root hub Bus 001 Device 001: ID 1d6b:0002 Linux Foundation 2.0 root hub You can also use the lsusb -v command to see a verbose output containing the USB version (2.10):
~ # lsusb -v Bus 001 Device 008: ID 0bc2:5031 Seagate RSS LLC FreeAgent GoFlex USB 3.0 Device Descriptor: bLength 18 bDescriptorType 1 bcdUSB 2.10 bDeviceClass 0 (Defined at Interface level) [...] Bus 001 Device 007: ID 174c:1153 ASMedia Technology Inc. Device Descriptor: bLength 18 bDescriptorType 1 bcdUSB 2.10 [...] The problem described here applies only if you see a USB 3.0 root hub but devices are connected to the wrong hub. If you do not see the USB 3.0 hub you have to verify that the xhci module is enabled and loaded with:
~ # esxcli system module list |grep xhci Name Is Loaded Is Enabled xhci true true To enable it (Load it automatically on boot):
~ # esxcli system module set -e true -m xhci To load it while ESXi is running:
~ # vmkload_mod xhci xHCI Mode "Enabled"
After setting the xHCI Mode to "Enabled" in the UEFI, both devices are connected to the USB 3.0 hub:
~ # vmware -v VMware ESXi 5.5.0 build-3116895 ~ # lsusb Bus 002 Device 002: ID 174c:1153 ASMedia Technology Inc. Bus 002 Device 004: ID 0bc2:5031 Seagate RSS LLC FreeAgent GoFlex USB 3.0 Bus 001 Device 002: ID 0930:6545 Toshiba Corp. Kingston DataTraveler 102 Flash Drive / HEMA Flash Drive 2 GB / P Attache 4GB Stick Bus 002 Device 001: ID 1d6b:0003 Linux Foundation 3.0 root hub Bus 001 Device 001: ID 1d6b:0002 Linux Foundation 2.0 root hub ~ # vmware -v VMware ESXi 6.0.0 build-3073146 ~ # lsusb Bus 002 Device 002: ID 174c:1153 ASMedia Technology Inc. Bus 002 Device 004: ID 0bc2:5031 Seagate RSS LLC FreeAgent GoFlex USB 3.0 Bus 001 Device 002: ID 0930:6545 Toshiba Corp. Kingston DataTraveler 102 Flash Drive / HEMA Flash Drive 2 GB / PNY Attache 4GB Stick Bus 002 Device 001: ID 1d6b:0003 Linux Foundation 3.0 root hub Bus 001 Device 001: ID 1d6b:0002 Linux Foundation 2.0 root hub lsusb -v Bus 002 Device 003: ID 174c:1153 ASMedia Technology Inc. Device Descriptor: bLength 18 bDescriptorType 1 bcdUSB 3.00 [...]
Wednesday, January 25, 2017
desktop and login screen images on windows servers
Windows server desktops have to have either registry work done, or group policy editor run.
Notes on changing the desktop image, and also on changing the login screen on all windows systems
Forum discussion and one good page linked to.
https://social.technet.microsoft.com/Forums/windows/en-US/ccb40ab4-ab13-4a40-bbb2-ab7664ec59a8/windows-server-2003-r2-sp2-enterprise-group-policy-setting-desktop-configuration-client-side?forum=winserverGP
http://www.grouppolicy.biz/2011/04/best-practice-how-to-use-group-policy-to-configure-windows-7-logon-ui-background-wallpaper/
http://serverfault.com/questions/111918/changing-the-desktop-background-of-the-login-screen-win2003
Group policy edit method
http://www.techrepublic.com/forums/discussions/setting-wallpaper-on-windows-server-2003/
GPEDIT.MSC under User Configuration --> Administrative Templates--> Desktop--> Active Desktop--> Active Desktop Wallpaper
and a bug possible with above:
http://support.microsoft.com/kb/297846
Tuesday, January 17, 2017
copying with rsync and progress info
when copying there is no way with copy to show progress / performance, so one cannot tell if a link is useless or not.
Use Rsync instead
This link with some info copied below shows a method
rsync -r --info=progress2 ./path directory /containing path directory
-or-
rsync --progress -a sourceDirectory destinationDirectory
This will produce a copy, but add in progress bars showing amount complete, as well as rate information.
No notes on how to transfer a single file by this method, if including path is needed. Will add that later
http://unix.stackexchange.com/questions/65077/is-it-possible-to-see-cp-speed-and-percent-copied
xx
Thursday, January 12, 2017
Good example of how to secure mongodb internally. The server is secured from the internet in case any mischief tries to burrow in directly. Also secures inside the house paths.
https://www.cyberciti.biz/faq/how-to-secure-mongodb-nosql-production-database/
Additional link in the article with other securing tips:
https://www.cyberciti.biz/tips/linux-security.html
Info copied here in case above link dies.
MongoDB ransom attacks are in Wild. I am using it for storing data on my public facing cloud server powered by Ubuntu Linux. How do I protect and secure my MongoDB nosql server on Linux or Unix operating system?
MongoDB is a free and open-source NoSQL document database server. It is used by web application for storing data on a public facing server. Securing MongoDB is critical. Crackers and hackers are accessing insecure MongoDB for stealing data and deleting data from unpatched or badly-configured databases. In this tutorial you will learn about how to secure a MongoDB instance or server running cloud server.
MongoDB config
- The default file is located at /etc/mongodb.conf
- The default port is TCP 27017
- MongoDB server version: 3.4.1
Limit network exposure
Edit the /etc/mongodb.conf or /usr/local/etc/mongodb.conf file, enter:$ sudo vi /etc/mongodb.confIf your web-app and MongoDB (mongod server) installed on the same machine, set the IP address of MongoDB to 127.0.0.1. This cuts communication directly from the internets:
# network interfaces
net:
  port: 27017
  bindIp: 127.0.0.1
However, it is possible that you have two or more servers as follows:
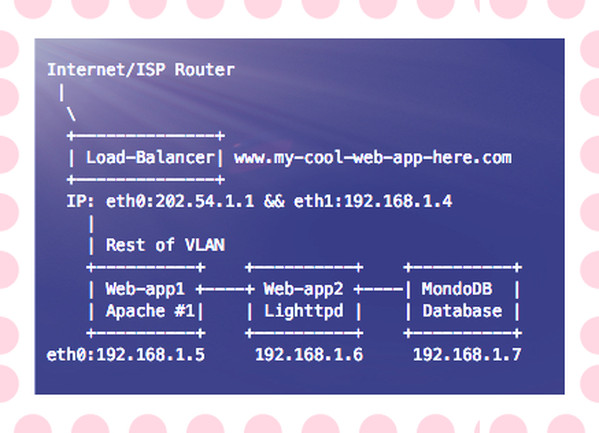
Fig.01: A sample modern web-app with MonoDB running inside your VLAN
You need to bind mongod to 192.168.1.7 so that it can be only accessed over VLAN:
bindIp: 192.168.1.7The bind_ip directive Ensure that MongoDB runs in a trusted network environment and limit the interfaces on which MongoDB instances listen for incoming connections.
Change the default port
You can also change the default port if you want. In this example set it to 2727:port: 2727Save and close the file. You need to restart MongoDB, enter:
$ sudo systemctl restart mongodOR if you are using FreeBSD Unix:
# service mongod restart Verify open ports with netstat command:
$ netstat -tulpn
 $ ss -tulpn
 $ sockstat #freebsd unix command
 $ ss -tulpn | grep 27017
 $ netstat -tulpn | grep 27017
Sample outputs:
tcp 0 0 127.0.0.1:27017 0.0.0.0:* LISTEN 6818/mongod
Setup access control
You need to add a user administrator to a MongoDB instance running without access control and then enables access control. By default anyone can connect to the MongoDB and this is not a good idea. For example:
Animated gif 01: Connect a mongo shell to the instance with any sort of authentication
Connect to the DB instance
$ mongo
 ## or ##
 $ mongo --port 2727
 MongoDB shell version: 2.6.10
 connecting to: test
Create the user administrator
Warning: Create user with strong password. For demo purpose I am using ‘mySuperSecretePasswordHere’ but you should use strong password.
You need to use admin database. Type the following command at > prompt to create your superuser:> use admin
switched to db adminNext creates the user vivek in the admin database with the userAdminAnyDatabase role:
> db.createUser({user:"vivek",pwd:"mySuperSecretePasswordHere", roles:[{role:"userAdminAnyDatabase",db:"admin"}]})Sample outputs:
Successfully added user: {
 "user" : "vivek",
 "roles" : [
  {
   "role" : "userAdminAnyDatabase",
   "db" : "admin"
  }
 ]
}
Disconnect the mongo shell by typing the following command:> exit
bye
$Re-start the MongoDB instance
Edit the /etc/mongodb.conf or /usr/local/etc/mongodb.conf file, enter:$ sudo vi /etc/mongodb.conf Turn on security:
security:
  authorization: enabled
Save and close the file. Re-start the MongoDB instance:
$ sudo systemctl restart mongodbOR if you are using FreeBSD Unix:
# service mongod restart To authenticate during connection using user vivek and password for the admin database:
$ mongo -u vivek -p mySuperSecretePasswordHere --authenticationDatabase adminAdd additional user to your DB. First create a new database called “nixcraft”:
> use nixcraft
 switched to db nixcraft
Create a user named ‘nixdbuser’ with a password named ‘myKoolPassowrd’ for nixcraft db:
db.createUser( { USER: "nixdbuser", pwd: "myKoolPassowrd", roles: [ { ROLE: "readWrite", db: "nixcraft" }, { ROLE: "read", db: "reporting" } ] } ) |
Successfully added user: {
 "user" : "nixdbuser",
 "roles" : [
  {
   "role" : "readWrite",
   "db" : "nixcraft"
  },
  {
   "role" : "read",
   "db" : "reporting"
  }
 ]
}
You can now connect to nixcraft db as follows:$ mongo --port 27017 -u "nixdbuser" -p "myKoolPassowrd" --authenticationDatabase "nixcraft"This make sure only authorized admin user named ‘vivek’ can execute commands or nixdbuser can do read/write operation on nixcraft db. You can verify it as follows by inserting records:
> use nixcraft
 > db
 > db.names.insert({"title":"Mr", "last":"Gite", "First":"Vivek"})
 > db.names.find()
 > show dbs
Sample outputs:
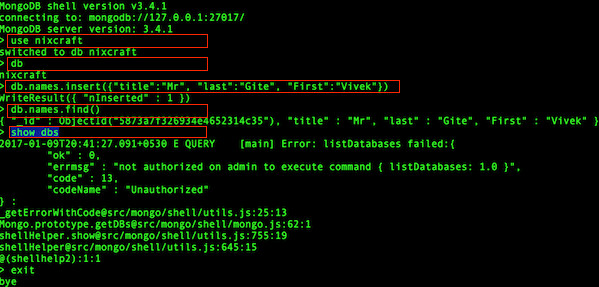
Fig.02: Enabled access control and enforce authentication
Use firewall
Use firewalls to restrict which other entities are allowed to connect to your mongodb server. In this example only allow your application servers access to the database using ufw on Ubuntu or Debian Linux:$ sudo ufw allow proto tcp from 192.168.1.5 to 192.168.1.7 port 27017
$ sudo ufw allow proto tcp from 192.168.1.6 to 192.168.1.7 port 27017Enable SSL
Use SSL between your MongoDB client and server when connecting to your Mongodb server over the internet. Otherwise your session is open for the “man in the middle” attack. My setup is as follows:mongodb-server: 127.0.0.1 mongodb-client: 127.0.0.1 Common Name (e.g. server FQDN or YOUR name) []: 127.0.0.1 The PEM pass phrase for server: mongodb_server_test_ssl The password/passphrase for client: mongodb_client_test_ssl
Type the following command the server certificate
$ sudo mkdir /etc/ssl/mongodb/
 $ cd /etc/ssl/mongodb/
 $ sudo openssl req -new -x509 -days 365 -out mongodb-server-cert.crt -keyout mongodb-server-cert.key
Sample outputs:
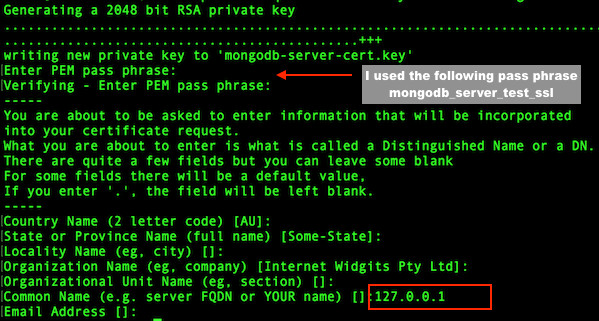
Fig.03: MongoDB SSL setup server certificate
Create the server .pem file with both key and certificate:
$ cd /etc/ssl/mongodb/
 $ sudo bash -c 'cat mongodb-server-cert.key mongodb-server-cert.crt > mongodb-server.pem'
Type the following command the client certificate
$ cd /etc/ssl/mongodb/
 $ sudo openssl req -new -x509 -days 365 -out mongodb-client-cert.crt -keyout mongodb-client-cert.key
Sample outputs:
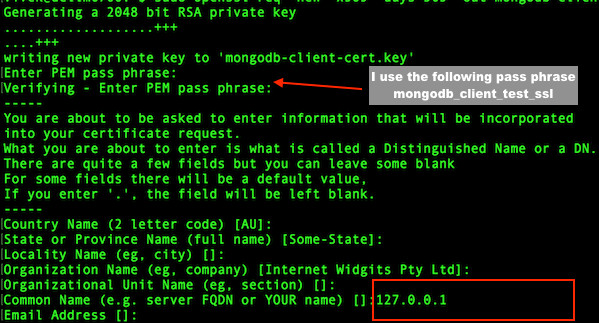
Fig.04: MongoDB SSL setup client certificate
Create the client .pem file with both key and certificate:
$ cd /etc/ssl/mongodb/
 $ sudo bash -c 'cat mongodb-client-cert.key mongodb-client-cert.crt > mongodb-client.pem'
Configure mongod and mongos for TLS/SSL server
Edit the /etc/mongodb.conf or /usr/local/etc/mongodb.conf file, enter:$ sudo vi /etc/mongodb.confUpdate the config file as follows:
# network interfaces
net:
  port: 27017
  bindIp: 127.0.0.1
  ssl:
     mode: requireSSL
     PEMKeyFile: /etc/ssl/mongodb/mongodb-server.pem
     CAFile: /etc/ssl/mongodb/mongodb-client.pem
     PEMKeyPassword: mongodb_server_test_ssl
|
$ sudo systemctl restart mongodbOR if you are using FreeBSD Unix:
# service mongod restart TLS/SSL Configuration for MongoDB clients
The syntax is as follows for mongo shell interface:$ mongo --ssl --sslCAFile /etc/ssl/mongodb/mongodb-server.pem \
--sslPEMKeyFile /etc/ssl/mongodb/mongodb-client.pem \
--sslPEMKeyPassword mongodb_client_test_ssl \
--host 127.0.0.1 --port 27017 \
--u "nixdbuser" -p "myKoolPassowrd" --authenticationDatabase "nixcraft"
Sample outputs:
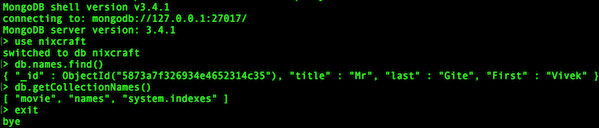
Fig.05: MongoDB SSL client connection using SSL certificate
And here is a Python client for connection to SSL enabled MongoDB:
client = pymongo.MongoClient('127.0.0.1', ssl=True) |
client = pymongo.MongoClient('127.0.0.1', ssl=True, ssl_certfile='/etc/ssl/mongodb/mongodb-client.pem', ssl_keyfile='/etc/ssl/mongodb/mongodb-server.pem', ssl_pem_passphrase=mongodb_client_test_ssl) |
Patch and run updated version of your OS and MongoDB
Applying security patches is an important part of maintaining Linux or Unix server. Linux provides all necessary tools to keep your system updated, and also allows for easy upgrades between versions. See “20 Linux Server Hardening Security Tips” for more information.Sunday, January 8, 2017
vmware convert virtual ide to virtual scsi disk image
https://kb.vmware.com/selfservice/microsites/search.do?language=en_US&cmd=displayKC&externalId=1016192
- Virtual machine contains an IDE virtual disk as the primary operating system bootable disk after conversion from physical source.
- Virtual machine has an IDE virtual disk but the additional secondary virtual disks are SCSI with an LSI or Bus Logic controller.
- Virtual machine fails to start with only a black screen after conversion with possible underscore. The primary disk is an IDE virtual disk but LSI or Bus Logic was selected during conversion.
- After conversion using P2V, the virtual machine fails to start.
- Virtual machines created after P2V fails to start between 95% and 99%.
- After powering off a virtual machine, you are unable to increase the size of its hard disk(s) when the disk is not SCSI based.
- Increasing the size of hard disk when the disk that is not SCSI based fails with the error:
Failed to extend disk : The file specified is not a virtual disk
Solution:
When converting a physical machine to a virtual machine using VMware Converter or vCenter Converter Enterprise, if an adapter type is not selected during the initial customization the resulting virtual machine may contain an IDE disk as the primary operating system disk.
You must convert the IDE disk to SCSI to get the best performance. If the primary disk is an IDE virtual disk, the newly converted virtual machine may fail to start because the guest operating system does not support the driver. This issue may occur because, in ESX 4.x the default disk type for Windows XP 32-bit virtual machine creation is IDE. This default value can be manually changed during the virtual machine creation wizard by selecting the custom option. Windows XP 64 bit will still use SCSI by default.
Note: For newer versions of Windows and
Linux operating system guests, the typical SCSI adapter types are the
LSI Logic controllers. When using LSI Logic SCSI controllers in the
Windows XP virtual machine, ensure to download and install the
appropriate LSI driver before proceeding. For more information on
downloading and installing LSI Logic SCSI drivers, see Storage Drivers for ESX 3.5.x and Microsoft Windows XP When Using the VMware LSI Logic Storage Adapter (1007035).
In situations where you are manually changing an IDE disk to a SCSI
disk that holds a Windows Operating system volume, you may need to
repair the master boot record of the disk. For more information, see Repairing boot sector problems in Windows NT-based operating systems (1006556).
To convert the IDE disk to SCSI:
To convert the IDE disk to SCSI:
- Download the driver (LSI20320-R controller) from the Avago.
Note: The preceding link was correct as of April 22, 2015. If you find the link is broken, provide a feedback and a VMware employee will update the link. - Power off the virtual machine.
- From the Edit Settings menu for this virtual machine:
- Go to Add > Hard Disk > Create New Virtual Disk.
- Change the Capacity to 1 GB and click Next.
- Ensure that the Virtual Device Node is set to SCSI.
- Complete the wizard and select the New SCSI Controller.
- If the current type is not LSI Logic Parallel Select Change Type, change the type to LSI Logic Parallel.
- Click OK.
- Choose the same controller as in Step 4 as the adapter type. The SCSI ID should read SCSI 0:0.
- Power on the virtual machine.
- Follow the Found New Hardware wizard or in the Windows device manager inside the Windows guest and select the unknown device.
- Right-click Update Driver and select the LSILogic SCSI controller driver downloaded earlier. This installs the drivers for the LSILogic SCSI controller inside the guest operating system.
- Power off the virtual machine.
- Locate the datastore path where the virtual machine resides.
For example:
# cd /vmfs/volumes/datastore_name/vm_name/
- From the ESX Service Console, open the primary disk (.vmdk) using the vi editor. For more information, see Editing files on an ESX host using vi or nano (1020302).
- Look for the line:
ddb.adapterType = "ide"
- To change the adapter type to LSI Logic change the line to:
ddb.adapterType = "lsilogic"
To change the adapter type to Bus Logic change the line to:
ddb.adapterType = "buslogic"
In some instances the entry appears as ddb.adapterType = "legacyESX". In this case change the line to:
ddb.adapterType = "lsilogic"
- Save the file.
- From VMware Infrastructure/vSphere Client:
- Click Edit Settings for the virtual machine.
- Select the IDE virtual disk.
- Choose to Remove the Disk from the virtual machine.
- Click OK.
Caution: Do not choose delete from disk.
- From the Edit Settings menu for this virtual machine:
- Go to Add > Hard Disk > Use Existing Virtual Disk.
- Navigate to the location of the disk and select to add it into the virtual machine.
- Choose the same controller as in Step 9 as the adapter type. The SCSI ID should read SCSI 0:0.
- If a CDROM device exists in the virtual machine it may need to have the IDE channel adjusted from IDE 0:1 to IDE 0:0. If this option is greyed out, remove the CD-ROM from the virtual machine and add it back. This sets it to IDE 0:0.
supporting scsi system disks on vmware for windows xp
Windows xp default drivers never supported scsi disks by default. You had to add drivers to support adaptec and the like. Seldom were systems built up in early configurations w/o some ide support, and especially the chipsets always had ide.
However if you are building up an install from scratch on vmware esxi, you may find that the ide drives are not supported.
Here is a vmware hardware support page showing how to install drivers the old fashioned way by inserting a floppy and F6 and the like during the initial phases of the install of the OS.
Haven't' found a note on how to get to a system which needs them and if it is even possible to add them after the fact on a vmware image of xp that runs on a vmware host program, such as vmware workstation or player, or on esxi 4 or esxi5 which have IDE.
https://kb.vmware.com/selfservice/microsites/search.do?language=en_US&cmd=displayKC&externalId=1000863
copying the verbiage here from vmware for safekeeping on this note.
- When installing Windows XP in a virtual machine on VMware ESX, Windows setup fails to detect hard disks in the virtual machine
- You see the error:
Setup did not find any hard disk drives installed in your computer.
To resolve this issue, supply the correct drive during setup to proceed with installation.
When installing Windows XP in a virtual machine setup is unable to
find the hard drives because no compatible disk controller driver is
shipped on the Windows XP setup disc. You must supply the correct drive
during setup to proceed with installation.
To ensure you supply the correct drive:
- When creating the new virtual machine, select the BusLogic option for the Virtual SCSI Controller mode.
- Attach the VMware SCSI driver floppy image and connect the virtual floppy drive to the virtual machine.
- If you are using an ESX host and the Virtual Infrastructure client:
- Right-click the virtual machine from the Inventory pane.
- Click Edit settings.
- Click the virtual floppy drive and select Connected.
- Select Use floppy image.
- Browse to the location /vmimages.
- Select the file vmscsi-1.2.x.x.flp.
Note: If the file is missing, download the floppy image from: http://download3.vmware.com/software/vmscsi-1.2.0.4.flp.
- If you are using VMware Lab Manager the file is available from the media library.
To insert the floppy disk into the virtual machine:
- From the virtual machine console window, move the pointer over the virtual machine name and click Insert Floppy.
- From the Media Library menu, select (LMStorage1) vmscsi-1.2.0.4.flp.
- Click Use.
- If you are using an ESX host and the Virtual Infrastructure client:
- Attach or insert the Windows XP installation media and connect it to the virtual machine.
- Power on the virtual machine and open a console view of the virtual machine.
- Click the console to assign keyboard control to the virtual machine.
- When the blue Windows setup screen appears, press F6 when prompted.
- When prompted for additional drivers, press S .
- Press Enter to select the VMware SCSI Controller driver, and then Enter again to continue setup.
- Complete Windows XP setup normally from this point.
Note: When setup has completed the first phase of installation and restarts the virtual machine, you may need to disconnect or unassign the virtual floppy drive or the virtual machine may attempt to boot from the floppy image.
For detailed instructions, see the PDF document attached to this article. For more information on installing Windows XP, see the VMware Guest Operating System Installation Guide .
Driver image stored locally with above file name on vmware download under winxp scsi driver
Subscribe to:
Posts (Atom)