Thursday, December 31, 2015

GIT notes for building and refreshing with bitbucket site


To update cloned repository, in the directory in question:

git pull origin master

To clone the directory, use

git clone master

Be sure to pull down subscriptions and subscribe to the notifications

SIMH example

https://github.com/simh/simh

git clone https://github.com/simh/simh.git


Tuesday, December 29, 2015

VMware ESXI brains surgery on bootup.


http://robwillis.info/2014/01/dell-cs24-esxi-5-5-install-stuck-relocating-modules-and-starting-up-the-kernel/

vmware forum thread referencing headless problem

https://communities.vmware.com/thread/326371?start=30&tstart=0

This has an example on how to stop ESXI boot and change options.  Later to make it persistent contains info on that.

steps:

Below are the steps to install ESXi 5.5 on a CS24:
1. Boot ISO
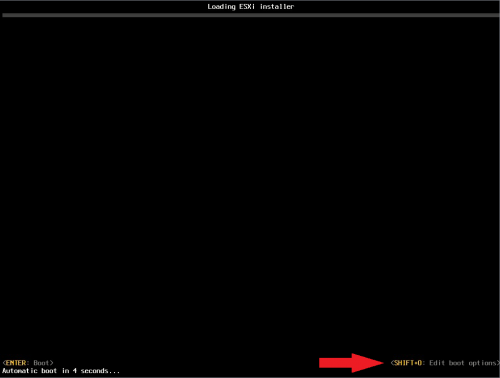
2. Press Shift + O during startup of an ESXi 5.5 installation
shift-o
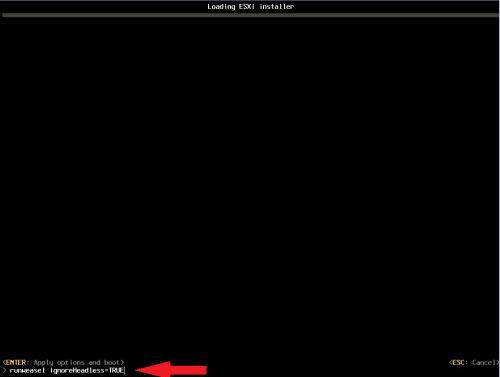
3. Append the boot option: ignoreHeadless=TRUE
ignoreheadless_install
4. Installer should now work – Install, Remove Media, Reboot
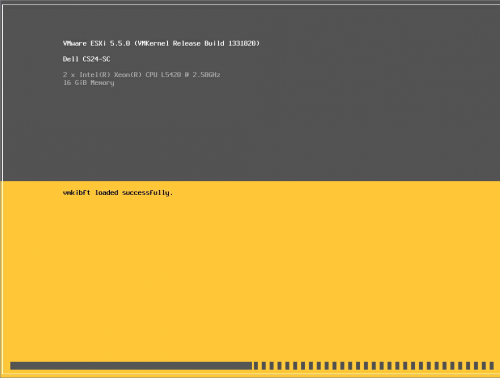
loading
5. Upon reboot repeat step 2 (Shift + O, Append the boot option: ignoreHeadless=TRUE)
6. These next few steps are to make the ignoreHeadless=TRUE setting persistent through a reboot…
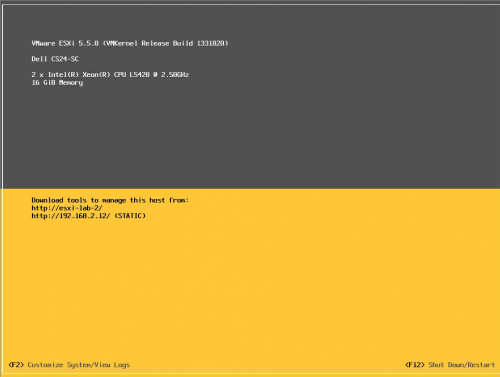
Once ESXi is booted, press F2 and login
esxi-f2
7. Under System Customization, go to Troubleshooting Options
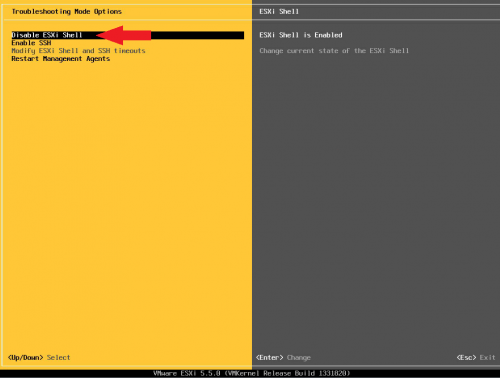
8. Enable the ESXi Shell and ESC all the way out
enable_shell
9. Back at the main console screen, hit Alt + F1 to access the shell
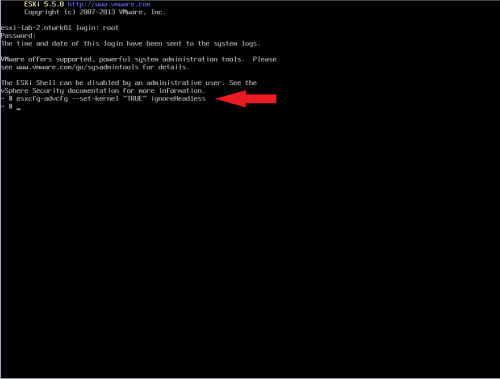
10. Login and enter the following command:
     esxcfg-advcfg --set-kernel "TRUE" ignoreHeadless
esxi_shell
11. Type exit
12. Hit Alt+F2 to go back to the main ESXi screen
13. Complete! Don’t forget to disable the ESXi Shell if you don’t want it on!

Sunday, December 27, 2015

Banana Pi sata port multiplier


Banana Pi Sata port multiplier

http://www.htpcguides.com/build-debian-image-for-banana-pi-pro-sata-port-multiplier/

following from above blog

Buildup for raid nas server using banana pi and port expander.

Build the Custom Debian Image for Banana Pi Pro SATA Port Multiplier

You are going to build a minimal Banana Pi debian image with port multiplier support enabled in the kernel as a module so it can be enabled and disabled by adding a single line to a configuration file. This requires a Ubuntu 64 bit environment, if you are on Windows you can create a virtual machine using Virtualbox or VMPlayer to create the virtual machine.
SSH into your virtual machine or run the terminal directly on it.
Make sure you have git installed
sudo apt-get install git build-essential -y
Git clone Igor’s Banana Pi build scripts
git clone https://github.com/igorpecovnik/BananaPI-Debian
Edit the main build script
cd BananaPI-Debian
sudo nano build.sh
Change BRANCH to use the mainline latest and greatest updates denoted by next
BRANCH="next"
Adjust kerneltag so it uses 3.19.7, eventually it will be able to use Kernel 4.0
KERNELTAG="v3.19.7"
Now build the kernel
sudo bash build.sh
You will eventually be prompted for some configuration options, I just accepted the defaults by pressing Enter.
You will now have a working Banana Pi Pro image that supports WiFi and non-WiFi models and modular SATA port multiplier support!
The image that you can burn to your sd card sitting inside a zip file called Bananapi_Debian_3.0_wheezy_3.19.7.zip.
When it’s done transfer the image zip onto a USB and unpack it (hint you can connect USB devices to the Virtual machine). You will see a .raw file you can rename to .img and flash with Win32Imager, Apple Pi Baker or whatever you usually use to write the image to the SD card.
For those curious, you can see the configuration file which enables the SATA port multipler, we are using the next branch so it’s this file
sudo nano lib/config/linux-sunxi-next.config
CONFIG_AHCI_SUNXI= should be set to m for modular
CONFIG_AHCI_SUNXI=m
I also set these options which enable the PMP and are meant to help with input output speeds (SCHED)
CONFIG_SATA_PMP=y
CONFIG_SCHED_MC=y
CONFIG_SCHED_SMT=y
Ctrl+X, Y and Enter to save the configuration
After running build.sh the first time you already have the kernel and image. After you make changes like the ones above, you rebuild it using the same command, this time it will go much faster (like 15 minutes) to update the image with your new kernel configuration.
sudo bash build.sh

Test Banana Pi Pro SATA Port Multiplier

SSH in to the Banana Pi with your custom image, the default username is root with password 1234
Use this command to make sure the compilation was successful in including the module we needed
zgrep CONFIG_AHCI_SUNXI /proc/config.gz
It should output
CONFIG_AHCI_SUNXI=m
To enable the module for the port multiplier open this file
nano /etc/modprobe.d/ahci-sunxi.conf
Add this line
options ahci-sunxi enable_pmp=1
Ctrl+X, Y and Enter to save
Reboot with your hard drives connected and the jmn321 or other port multipler connected to power
sudo reboot
Use blkid to see the hard drives show up
blkid
Look at those drives ready for media content
Now I can see the 4 x 2 TB Samsung drives I bought for this project.
root@bananapi:~# blkid
/dev/mmcblk0p1: UUID="a73fb24c-de15-4a1f-a4fe-b6436f8d98f3" TYPE="ext4"
/dev/sda1: LABEL="HTPC Guides 1" UUID="190D-153C" TYPE="vfat"
/dev/sdb1: LABEL="HTPC Guides 2" UUID="1917-2940" TYPE="vfat"
/dev/sdc1: LABEL="HTPC Guides 3" UUID="19E3-1C09" TYPE="vfat"
/dev/sdd1: LABEL="HTPC Guides 4" UUID="1911-0E2F" TYPE="vfat"
If you ever want to disable the port multiplier, just remove the options ahci-sunxi enable line.

Enable WiFi on Banana Pi Pro with Igor’s Image

Backup the dtb module just in case and overwrite the dtb module with the Banana Pro one
cp /boot/dtb/sun7i-a20-bananapi.dtb /boot/dtb/sun7i-a20-bananapi.dtb.bak
mv /boot/dtb/sun7i-a20-bananapipro.dtb /boot/dtb/sun7i-a20-bananapi.dtb
Enable the WiFi module
modprobe brcmfmac
Generate a hashed passphrase, replace SSID with your wireless router’s SSID and wifipassword with the actual password to access WiFi.
wpa_passphrase SSID wifpassword
You will get output like this
network={
ssid="HTPCGuidesSSID"
#psk="htpcguides"
psk=c78152ab34bbac9fa172f0572a63d313195da3763d0eeef8ee903ee9c921f8c5
}
Copy the psk line without the psk= part
Now we need to add the configuration to your network interfaces file
nano /etc/network/interfaces
Uncomment your wlan0 section and add the SSID and psk hash you generated before
# Wireless adapter #1
auto wlan0
        allow-hotplug wlan0
        iface wlan0 inet dhcp
        wpa-ssid HTPCGuidesSSID
        wpa-psk c78512ab34b3ac9f2172f0572a63d313195da3763d0e4ef8ee903ee9c921f8c5
Ctrl+X, Y and Enter to save
Reboot
reboot
Use iwconfig to show that the wireless is connected
iwconfig
You will see the wireless overview for the Banana Pi
wlan0     IEEE 802.11bgn  ESSID:"HTPCGuides"
          Mode:Managed  Frequency:2.412 GHz  Access Point: 10:7B:FF:EA:47:D5
          Bit Rate=58.5 Mb/s   Tx-Power=1496 dBm
          Retry short limit:7   RTS thr:off   Fragment thr:off
          Encryption key:off
          Power Management:on
          Link Quality=62/70  Signal level=-48 dBm
          Rx invalid nwid:0  Rx invalid crypt:0  Rx invalid frag:0
          Tx excessive retries:0  Invalid misc:0   Missed beacon:0

Banana Pi Pro Port Multiplier Image

This image will work out of the box. It will resize your sd card upon the first boot and regenerate SSH keys. The default SSH login is root with password htpcguides that you will be forced to change on the first login. There is also an Media Server Installer which I will post how to use in a day or two (it is in /root/HTPCGuides, more info here)
Saturday, December 26, 2015

Windows 10 wasted space

I have a windows 10 system with the $windows.~bt file still occupying space.

It is supposed to be the queued upgrade from 8 to 10, and hopefully can be deleted.

A page with info on it is here

http://www.thewindowsclub.com/delete-windows-bt-ws-folders-windows-10

There is an interesting bit about forcing deletion of files like this which is worth recording

Copy-paste the following and hit Enter to delete the contents of $Windows.~BT directory
takeown /F C:\$Windows.~BT\* /R /A 
icacls C:\$Windows.~BT\*.* /T /grant administrators:F 
rmdir /S /Q C:\$Windows.~BT\
Now copy-paste the following and hit Enter to delete the contents of $Windows.~WS directory
takeown /F C:\$Windows.~WS\* /R /A 
icacls C:\$Windows.~WS\*.* /T /grant administrators:F 
rmdir /S /Q C:\$Windows.~WS\


Thursday, December 17, 2015

Ubuntu Timezone change - Linux

Ubuntu Timezone change

sudo dpkg-reconfigure tzdata

z

although the idiots at stackexchange cut off this topic it is informative

http://unix.stackexchange.com/questions/110522/timezone-setting-in-linux

Notes about viewing and rendering Photospheres locally w/o google killing the feature later


These are various links to pages with attempts to locally render photospheres.  As iGoogle proves along with a lot of other things, the Big G will capriciously kill off things that it gets bored with, and having photospheres vanish is not an option.

python script
http://meestuff.blogspot.com/2013/08/google-photo-sphere-viewer-for-desktop.html

github for above:

https://github.com/paoletto/PythonPhotoSphere

http://stackoverflow.com/questions/14594934/is-there-a-method-for-displaying-an-android-photosphere-on-an-ios-device
https://developers.google.com/streetview/

http://forums.androidcentral.com/photo-spheres/296768-photo-sphere-viewer-chrome.html

http://webapps.stackexchange.com/questions/84268/how-can-i-view-photospheres-on-a-pc

https://github.com/kennydude/photosphere
http://stackoverflow.com/questions/1578169/how-can-i-read-xmp-data-from-a-jpg-with-php
https://github.com/narqo/modernizr-bl (updated for https://github.com/Modernizr/Modernizr/blob/master/feature-detects/webgl-extensions.js)


Thursday, December 10, 2015

Install Wifi on Ubuntu manually


Wifi chip must be recognized and initialized

If your Wi-Fi dongle is listed in the Adapter menu then you can connect using Wi-Fi, if not then plug in an Ethernet cable to continue.
For those that are keen to hack Wi-Fi you can create a config file by typing:
sudo leafpad /etc/wpa_supplicant/wpa_supplicant.conf
Inside the file, type the following (inserting your SSID and password in the relevant sections):
network={
     ssid="your network's ssid here"
     psk="your network's password here"
     proto=RSN
     key_mgmt=WPA-PSK
     pairwise=CCMP
     auth_alg=OPEN
}

Sunday, December 6, 2015

DELL CS 24 servers. 4 x SAS / SATA ports, dual (ESXI command line install)


https://hurtigtechnologies.com/2014/06/the-definitive-guide-to-the-dell-cs24-sc-server/

Example:
DELL-CS24-SC-2x-E5450-3-00GHZ-QUAD-CORE-CPUS-24GB-MEM-4X-HDD-TRAYS

http://www.ebay.com/itm/201405858539

I have been running ESXi 5.5 Update 2 just fine on these servers. The only issue is with the installation process, so you need to disable headless mode. Just follow these steps and you’re golden.
1. Once the ESXi install starts, IMMEDIATELY hit “SHIFT + O” (letter O, not zero) to get to the command-line install options.
2. Append “ignoreHeadless=TRUE” at the prompt. This will allow the install to finish properly for this boot ONLY. Hit “ENTER” to continue booting and installation.
3. Once the installation completes, it will need to reboot. Repeat steps 1+2 to allow bootup to complete successfully.
4. Once you have fully installed ESXi 5.5, log into it (hitting F2) and ENABLE the “ESXi Shell” and “SSH” in the troubleshooting configuration so you can remote into the interface using a utility like PUTTY. (DO NOT REBOOT SERVER YET!!)
5. Connect via PUTTY or another utility to the ESXi host and type the following command… “esxcfg-advcfg -k TRUE ignoreHeadless”. This will make this setting a permanent change allowing it to boot into the OS every time you reboot your server.
Also, it’s a good idea to use the latest Dell image of ESXi: