Thursday, December 31, 2015

GIT notes for building and refreshing with bitbucket site


To update cloned repository, in the directory in question:

git pull origin master

To clone the directory, use

git clone master

Be sure to pull down subscriptions and subscribe to the notifications

SIMH example

https://github.com/simh/simh

git clone https://github.com/simh/simh.git


Tuesday, December 29, 2015

VMware ESXI brains surgery on bootup.


http://robwillis.info/2014/01/dell-cs24-esxi-5-5-install-stuck-relocating-modules-and-starting-up-the-kernel/

vmware forum thread referencing headless problem

https://communities.vmware.com/thread/326371?start=30&tstart=0

This has an example on how to stop ESXI boot and change options.  Later to make it persistent contains info on that.

steps:

Below are the steps to install ESXi 5.5 on a CS24:
1. Boot ISO
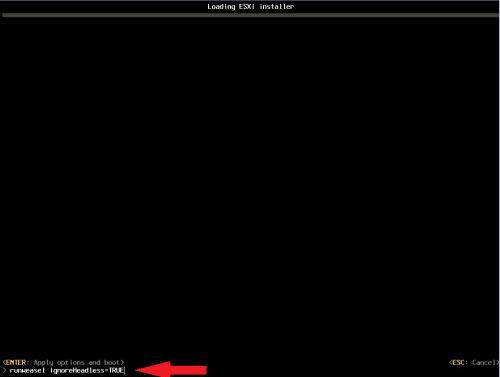
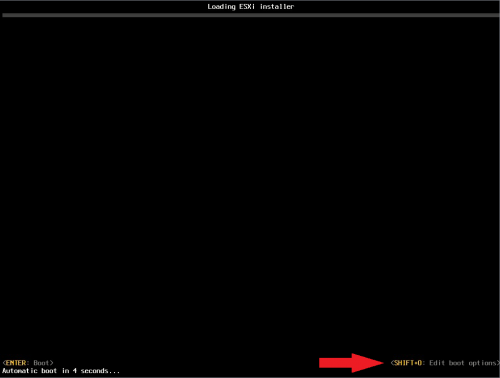
2. Press Shift + O during startup of an ESXi 5.5 installation
shift-o
3. Append the boot option: ignoreHeadless=TRUE
ignoreheadless_install
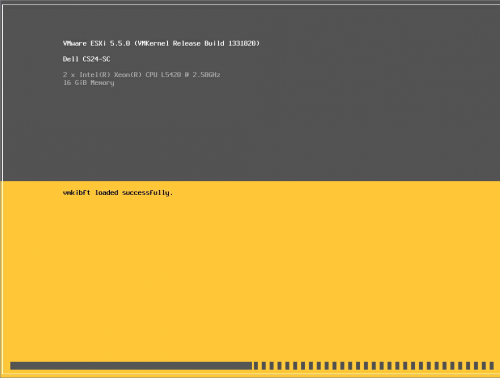
4. Installer should now work – Install, Remove Media, Reboot
loading
5. Upon reboot repeat step 2 (Shift + O, Append the boot option: ignoreHeadless=TRUE)
6. These next few steps are to make the ignoreHeadless=TRUE setting persistent through a reboot…
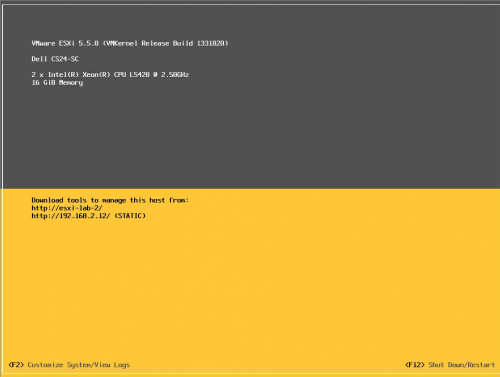
Once ESXi is booted, press F2 and login
esxi-f2
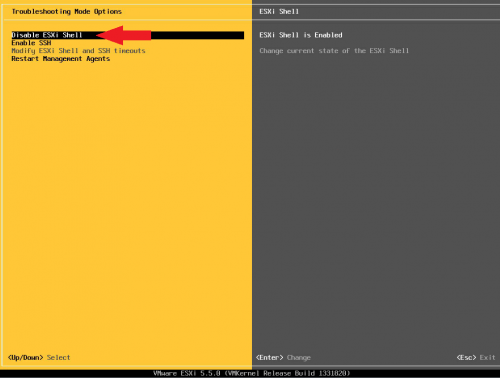
7. Under System Customization, go to Troubleshooting Options
8. Enable the ESXi Shell and ESC all the way out
enable_shell
9. Back at the main console screen, hit Alt + F1 to access the shell
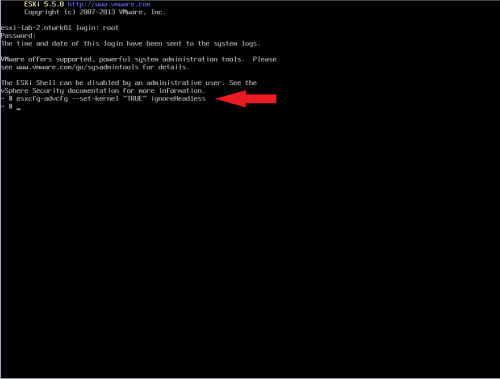
10. Login and enter the following command:
     esxcfg-advcfg --set-kernel "TRUE" ignoreHeadless
esxi_shell
11. Type exit
12. Hit Alt+F2 to go back to the main ESXi screen
13. Complete! Don’t forget to disable the ESXi Shell if you don’t want it on!

Sunday, December 27, 2015

Banana Pi sata port multiplier


Banana Pi Sata port multiplier

http://www.htpcguides.com/build-debian-image-for-banana-pi-pro-sata-port-multiplier/

following from above blog

Buildup for raid nas server using banana pi and port expander.

Build the Custom Debian Image for Banana Pi Pro SATA Port Multiplier

You are going to build a minimal Banana Pi debian image with port multiplier support enabled in the kernel as a module so it can be enabled and disabled by adding a single line to a configuration file. This requires a Ubuntu 64 bit environment, if you are on Windows you can create a virtual machine using Virtualbox or VMPlayer to create the virtual machine.
SSH into your virtual machine or run the terminal directly on it.
Make sure you have git installed
sudo apt-get install git build-essential -y
Git clone Igor’s Banana Pi build scripts
git clone https://github.com/igorpecovnik/BananaPI-Debian
Edit the main build script
cd BananaPI-Debian
sudo nano build.sh
Change BRANCH to use the mainline latest and greatest updates denoted by next
BRANCH="next"
Adjust kerneltag so it uses 3.19.7, eventually it will be able to use Kernel 4.0
KERNELTAG="v3.19.7"
Now build the kernel
sudo bash build.sh
You will eventually be prompted for some configuration options, I just accepted the defaults by pressing Enter.
You will now have a working Banana Pi Pro image that supports WiFi and non-WiFi models and modular SATA port multiplier support!
The image that you can burn to your sd card sitting inside a zip file called Bananapi_Debian_3.0_wheezy_3.19.7.zip.
When it’s done transfer the image zip onto a USB and unpack it (hint you can connect USB devices to the Virtual machine). You will see a .raw file you can rename to .img and flash with Win32Imager, Apple Pi Baker or whatever you usually use to write the image to the SD card.
For those curious, you can see the configuration file which enables the SATA port multipler, we are using the next branch so it’s this file
sudo nano lib/config/linux-sunxi-next.config
CONFIG_AHCI_SUNXI= should be set to m for modular
CONFIG_AHCI_SUNXI=m
I also set these options which enable the PMP and are meant to help with input output speeds (SCHED)
CONFIG_SATA_PMP=y
CONFIG_SCHED_MC=y
CONFIG_SCHED_SMT=y
Ctrl+X, Y and Enter to save the configuration
After running build.sh the first time you already have the kernel and image. After you make changes like the ones above, you rebuild it using the same command, this time it will go much faster (like 15 minutes) to update the image with your new kernel configuration.
sudo bash build.sh

Test Banana Pi Pro SATA Port Multiplier

SSH in to the Banana Pi with your custom image, the default username is root with password 1234
Use this command to make sure the compilation was successful in including the module we needed
zgrep CONFIG_AHCI_SUNXI /proc/config.gz
It should output
CONFIG_AHCI_SUNXI=m
To enable the module for the port multiplier open this file
nano /etc/modprobe.d/ahci-sunxi.conf
Add this line
options ahci-sunxi enable_pmp=1
Ctrl+X, Y and Enter to save
Reboot with your hard drives connected and the jmn321 or other port multipler connected to power
sudo reboot
Use blkid to see the hard drives show up
blkid
Look at those drives ready for media content
Now I can see the 4 x 2 TB Samsung drives I bought for this project.
root@bananapi:~# blkid
/dev/mmcblk0p1: UUID="a73fb24c-de15-4a1f-a4fe-b6436f8d98f3" TYPE="ext4"
/dev/sda1: LABEL="HTPC Guides 1" UUID="190D-153C" TYPE="vfat"
/dev/sdb1: LABEL="HTPC Guides 2" UUID="1917-2940" TYPE="vfat"
/dev/sdc1: LABEL="HTPC Guides 3" UUID="19E3-1C09" TYPE="vfat"
/dev/sdd1: LABEL="HTPC Guides 4" UUID="1911-0E2F" TYPE="vfat"
If you ever want to disable the port multiplier, just remove the options ahci-sunxi enable line.

Enable WiFi on Banana Pi Pro with Igor’s Image

Backup the dtb module just in case and overwrite the dtb module with the Banana Pro one
cp /boot/dtb/sun7i-a20-bananapi.dtb /boot/dtb/sun7i-a20-bananapi.dtb.bak
mv /boot/dtb/sun7i-a20-bananapipro.dtb /boot/dtb/sun7i-a20-bananapi.dtb
Enable the WiFi module
modprobe brcmfmac
Generate a hashed passphrase, replace SSID with your wireless router’s SSID and wifipassword with the actual password to access WiFi.
wpa_passphrase SSID wifpassword
You will get output like this
network={
ssid="HTPCGuidesSSID"
#psk="htpcguides"
psk=c78152ab34bbac9fa172f0572a63d313195da3763d0eeef8ee903ee9c921f8c5
}
Copy the psk line without the psk= part
Now we need to add the configuration to your network interfaces file
nano /etc/network/interfaces
Uncomment your wlan0 section and add the SSID and psk hash you generated before
# Wireless adapter #1
auto wlan0
        allow-hotplug wlan0
        iface wlan0 inet dhcp
        wpa-ssid HTPCGuidesSSID
        wpa-psk c78512ab34b3ac9f2172f0572a63d313195da3763d0e4ef8ee903ee9c921f8c5
Ctrl+X, Y and Enter to save
Reboot
reboot
Use iwconfig to show that the wireless is connected
iwconfig
You will see the wireless overview for the Banana Pi
wlan0     IEEE 802.11bgn  ESSID:"HTPCGuides"
          Mode:Managed  Frequency:2.412 GHz  Access Point: 10:7B:FF:EA:47:D5
          Bit Rate=58.5 Mb/s   Tx-Power=1496 dBm
          Retry short limit:7   RTS thr:off   Fragment thr:off
          Encryption key:off
          Power Management:on
          Link Quality=62/70  Signal level=-48 dBm
          Rx invalid nwid:0  Rx invalid crypt:0  Rx invalid frag:0
          Tx excessive retries:0  Invalid misc:0   Missed beacon:0

Banana Pi Pro Port Multiplier Image

This image will work out of the box. It will resize your sd card upon the first boot and regenerate SSH keys. The default SSH login is root with password htpcguides that you will be forced to change on the first login. There is also an Media Server Installer which I will post how to use in a day or two (it is in /root/HTPCGuides, more info here)
Saturday, December 26, 2015

Windows 10 wasted space

I have a windows 10 system with the $windows.~bt file still occupying space.

It is supposed to be the queued upgrade from 8 to 10, and hopefully can be deleted.

A page with info on it is here

http://www.thewindowsclub.com/delete-windows-bt-ws-folders-windows-10

There is an interesting bit about forcing deletion of files like this which is worth recording

Copy-paste the following and hit Enter to delete the contents of $Windows.~BT directory
takeown /F C:\$Windows.~BT\* /R /A 
icacls C:\$Windows.~BT\*.* /T /grant administrators:F 
rmdir /S /Q C:\$Windows.~BT\
Now copy-paste the following and hit Enter to delete the contents of $Windows.~WS directory
takeown /F C:\$Windows.~WS\* /R /A 
icacls C:\$Windows.~WS\*.* /T /grant administrators:F 
rmdir /S /Q C:\$Windows.~WS\


Thursday, December 17, 2015

Ubuntu Timezone change - Linux

Ubuntu Timezone change

sudo dpkg-reconfigure tzdata

z

although the idiots at stackexchange cut off this topic it is informative

http://unix.stackexchange.com/questions/110522/timezone-setting-in-linux

Notes about viewing and rendering Photospheres locally w/o google killing the feature later


These are various links to pages with attempts to locally render photospheres.  As iGoogle proves along with a lot of other things, the Big G will capriciously kill off things that it gets bored with, and having photospheres vanish is not an option.

python script
http://meestuff.blogspot.com/2013/08/google-photo-sphere-viewer-for-desktop.html

github for above:

https://github.com/paoletto/PythonPhotoSphere

http://stackoverflow.com/questions/14594934/is-there-a-method-for-displaying-an-android-photosphere-on-an-ios-device
https://developers.google.com/streetview/

http://forums.androidcentral.com/photo-spheres/296768-photo-sphere-viewer-chrome.html

http://webapps.stackexchange.com/questions/84268/how-can-i-view-photospheres-on-a-pc

https://github.com/kennydude/photosphere
http://stackoverflow.com/questions/1578169/how-can-i-read-xmp-data-from-a-jpg-with-php
https://github.com/narqo/modernizr-bl (updated for https://github.com/Modernizr/Modernizr/blob/master/feature-detects/webgl-extensions.js)


Thursday, December 10, 2015

Install Wifi on Ubuntu manually


Wifi chip must be recognized and initialized

If your Wi-Fi dongle is listed in the Adapter menu then you can connect using Wi-Fi, if not then plug in an Ethernet cable to continue.
For those that are keen to hack Wi-Fi you can create a config file by typing:
sudo leafpad /etc/wpa_supplicant/wpa_supplicant.conf
Inside the file, type the following (inserting your SSID and password in the relevant sections):
network={
     ssid="your network's ssid here"
     psk="your network's password here"
     proto=RSN
     key_mgmt=WPA-PSK
     pairwise=CCMP
     auth_alg=OPEN
}

Sunday, December 6, 2015

DELL CS 24 servers. 4 x SAS / SATA ports, dual (ESXI command line install)


https://hurtigtechnologies.com/2014/06/the-definitive-guide-to-the-dell-cs24-sc-server/

Example:
DELL-CS24-SC-2x-E5450-3-00GHZ-QUAD-CORE-CPUS-24GB-MEM-4X-HDD-TRAYS

http://www.ebay.com/itm/201405858539

I have been running ESXi 5.5 Update 2 just fine on these servers. The only issue is with the installation process, so you need to disable headless mode. Just follow these steps and you’re golden.
1. Once the ESXi install starts, IMMEDIATELY hit “SHIFT + O” (letter O, not zero) to get to the command-line install options.
2. Append “ignoreHeadless=TRUE” at the prompt. This will allow the install to finish properly for this boot ONLY. Hit “ENTER” to continue booting and installation.
3. Once the installation completes, it will need to reboot. Repeat steps 1+2 to allow bootup to complete successfully.
4. Once you have fully installed ESXi 5.5, log into it (hitting F2) and ENABLE the “ESXi Shell” and “SSH” in the troubleshooting configuration so you can remote into the interface using a utility like PUTTY. (DO NOT REBOOT SERVER YET!!)
5. Connect via PUTTY or another utility to the ESXi host and type the following command… “esxcfg-advcfg -k TRUE ignoreHeadless”. This will make this setting a permanent change allowing it to boot into the OS every time you reboot your server.
Also, it’s a good idea to use the latest Dell image of ESXi:


Thursday, November 19, 2015

lost profile on windows xp (possibly on later as well)


When you get an error logging in on windows complaining that the profile is invalid, windows will attempt to create a new temporary profile.

It appears under such as

c:\Documents and Settings\<account name> not being accessible or such.

In the case encountered it got an access error.

There is an article below which explains at length how to recover.

The short of it is that one should do a System Restore.  This is under Accessories->System Tools->System Restore.

No need to remove the temp profile, unless you are tight on space.

BTW the temporary directory / profile created is TEMP

Substitute for C: above <system root> in the general case, but for most systems hopefully people had sense enough to leave it c:\  All bets are off in the case of running multiple versions, which might necessitate using a different directory.

Link to Tech Republic

how-do-i-recover-a-damaged-windows-xp-user-profile


Changing from text boot by default to gui boot with Rabian (Debian derivative)


This is for the Radxa Rock version of Debian.  Found by Debashis De (G+ id)

To help others:

    sudo systemctl set-default multi-user.target

To start GUI from text mode:

    sudo /etc/init.d/lightdm start

To go back to GUI mode:

    sudo systemctl set-default graphical.target

To get the current run-level:

    sudo systemctl get-default


Thursday, October 8, 2015

Ubuntu Unity behavior modification


Change number of workspaces

sudo apt-get install unity-tweak-tool
 
link askubuntu 

Eliminate unwanted preview newtab panels (cause much lost bandwidth on low bandwidth systems)
Blatant shoving of an unnecessary feature down everyones throat that is unneeded and is just commercial.

newtabs override

Look for a way to be more annoying about the Search Engine feature in the future.  I can't imagine anyone choosing Yahoo / Bing results over Google, even if you don't like the Googlies.

Downloadthemall

https://addons.mozilla.org/en-US/firefox/addon/downthemall/

Download Youtube Videos as MP4

https://addons.mozilla.org/en-us/firefox/addon/download-youtube/


Tuesday, August 18, 2015

PDP 11 and PDP 8 boards


Several boards from gold scrapper.  Most are in perfect condition as far as component condition, state of etch, etc.  One had a clipped lead on it under a wire which was from another board, not a pulled jumper.

I ordered several more, and am resisting the urge to buy a couple more to add to stock.  Seldom to see sanity in listings from seller, as far as pricing.

M8043


M8028 Async with Modem

M8192 KDJ11-A
KDJ11-A (Bitsavers) PDP 11/73


M8186 PDP 11/23 KDF-11A

Includes E57, MMU chip.

A-614 PDP 8 DAC

Sunday, August 16, 2015

desktop graphic control in linux ubuntu unity

Control workspaces for desktop, and hiding of the workspace control (switch to a single space)

http://askubuntu.com/questions/38789/how-do-i-add-and-remove-the-workspace-switcher-launcher-from-the-unity-launcher/
gsettings set org.compiz.core:/org/compiz/profiles/unity/plugins/core/ hsize 1
gsettings set org.compiz.core:/org/compiz/profiles/unity/plugins/core/ vsize 1
http://askubuntu.com/questions/260510/how-do-i-turn-on-workspaces-why-do-i-only-have-one-workspace
Using the Dash or a terminal, open the dconf-editor application. Navigate to
org.compiz.profiles.unity.plugins.core
Adding Nautilus to your desktop (more than just nautilus-open-terminal)

http://www.n00bsonubuntu.net/content/add-open-terminal-here-to-file-menu-ubuntu-14-04/

sudo apt-get install nautilus-actions -y
nautilus-actions-config-tool

To add the menu item click on the Define a new action button and select the Actions tab. Enable the Display item in location menu option and in the Context label field copy+paste the following line:

Open Terminal Here

Enable Display item in the toolbar.
Copy+paste the following line into the Tooltip field

Open Terminal Here

Set icon (optional): Icon -> Themed icons tab -> Click Applications -> Select terminal icon -> click Apply -> click OK


Click on the Command tab and copy+paste the following line into the Path field:

gnome-terminal
copy+paste the following line into the Paramters field:

Parameters: --working-directory=%d/%w
When done save the action and close the config tool and reload Nautilus using the following command:

nautilus -q


Wednesday, August 5, 2015

git development notes


these are assuming using git at unix command line:

follow instructions to create an ssh id_pub and update bitbucket for that.  separate from project.

clone working instance in a directory.

git clone https://username@bitbucket.org/repository/project.git

To commit files, git checkout

git status
git add -A
git commit -am "my edits"
git push -u origin master

**

Sunday, July 19, 2015

vmesxi support on nagios or vmware esxi


monitoring python script can be had here:

https://www.thomas-krenn.com/en/wiki/VMware_ESXi_Hardware_with_Nagios_or_Icinga_Monitoring

instructions for installing it in the nagios system can be had here:

http://www.claudiokuenzler.com/nagios-plugins/check_esxi_hardware.php#CommandDefinition

Note: had a problem with minimal system install with setuptools for python environment not being installed.  This occurred on a system built up from a very minimal debian environment (ubuntu 14.10) and may happen other times.

http://stackoverflow.com/questions/7446187/no-module-named-pkg-resources

to install setuptools

sudo su
wget https://bitbucket.org/pypa/setuptools/raw/bootstrap/ez_setup.py -O - | python

Service definition for icinga command.cfg:

# Check HP Server hardware
define service{
        use generic-service
        host_name vmesxi3
        service_description Hardware
        check_command check_esxi_hardware!root!<password>
}


Saturday, July 18, 2015

enable workspaces / desktop in ubuntu 13 and above


ubuntu desktops

http://askubuntu.com/questions/260510/how-do-i-turn-on-workspaces-why-do-i-only-have-one-workspace

Monday, June 29, 2015

monitoring Cubesats with SDR dongle.


This is an interesting use for SDR, which I've wanted to look into for a while

https://plus.google.com/+hackaday/posts/KWSRTq323YB

http://hackaday.com/2015/06/29/easy-way-to-listen-to-cube-sats/

http://soldersmoke.blogspot.com/2015/06/back-with-sats-catching-cubes-with.html

https://www.arrl.org/files/file/Technology/tis/info/pdf/ab18-16.pdf

http://www.heavens-above.com/AmateurSats.aspx

https://youtu.be/fKDlVyhDnEs

http://www.funcubedongle.com/

dos environment on arm processors


I have enough arm systems around to start playing with x86 system emulation to run a few systems hosted on arm boxes.

Thinks aren't going well, so there will be some notes here.

Hard disk doesn't work for some reason with qemu

Running Dos 622 on qemu

https://h3g3m0n.wordpress.com/2007/03/17/qemu-for-dos-abandonware-under-linux/

running windows 9.x on qemu

http://www.vogons.org/viewtopic.php?t=17324

running arch linux on qemu

https://wiki.archlinux.org/index.php/QEMU

Changing floppy disks on qemu

http://lists.gnu.org/archive/html/qemu-devel/2005-08/msg00119.html


Ctrl-Alt-2 (to start the monitor screen)

  eject fda
  change fda /path/to/new/floppy_image

  Ctrl-Alt-1

xx

Thursday, June 11, 2015

tcpdump crib sheet


How to implement max file size limits and “log rotation” with tcpdump

Writing this down so I don’t forget.
The issue: You need to collect a packet capture for an extended amount of time but don’t want it to consume too much disk space.
The solution: Use the following tcpdump syntax:
tcpdump port 25 -s 0 -vvv -C 100 -W 50 -w /tmp/example.pcap
  • -s 0 tells tcpdump to collect the entire packet contents. 
  • -vvv enables verbose logging/details (which among other things will give us a running total on how many packets are captured).
  • -C 100 tells tcpdump to store up to 100 MB of packet data per file.
  • -W 50 tells tcpdump to store up to 50 rollover files (example.pcap00, example.pcap01 … example.pcap49 at which point it would start over)
  • -w /tmp/example.pcap tells tcpdump where to write the files. Important note on this: since tcpdump will be creating new files dynamically, this destination directory needs to be an area where it can create new files (for example /tmp).
So in this case, tcpdump will use a max of ~ 5 GB.

Tcpdump usage examples

October 1, 2014
In most cases you will need root permission to be able to capture packets on an interface. Using tcpdump (with root) to capture the packets and saving them to a file to analyze with Wireshark (using a regular account) is recommended over using Wireshark with a root account to capture packets on an "untrusted" interface. See the Wireshark security advisories for reasons why.
See the list of interfaces on which tcpdump can listen:
tcpdump -D
Listen on interface eth0:
tcpdump -i eth0
Listen on any available interface (cannot be done in promiscuous mode. Requires Linux kernel 2.2 or greater):
tcpdump -i any
Be verbose while capturing packets:
tcpdump -v
Be more verbose while capturing packets:
tcpdump -vv
Be very verbose while capturing packets:
tcpdump -vvv
Be verbose and print the data of each packet in both hex and ASCII, excluding the link level header:
tcpdump -v -X
Be verbose and print the data of each packet in both hex and ASCII, also including the link level header:
tcpdump -v -XX
Be less verbose (than the default) while capturing packets:
tcpdump -q
Limit the capture to 100 packets:
tcpdump -c 100
Record the packet capture to a file called capture.cap:
tcpdump -w capture.cap
Record the packet capture to a file called capture.cap but display on-screen how many packets have been captured in real-time:
tcpdump -v -w capture.cap
Display the packets of a file called capture.cap:
tcpdump -r capture.cap
Display the packets using maximum detail of a file called capture.cap:
tcpdump -vvv -r capture.cap
Display IP addresses and port numbers instead of domain and service names when capturing packets (note: on some systems you need to specify -nn to display port numbers):
tcpdump -n
Capture any packets where the destination host is 192.168.1.1. Display IP addresses and port numbers:
tcpdump -n dst host 192.168.1.1
Capture any packets where the source host is 192.168.1.1. Display IP addresses and port numbers:
tcpdump -n src host 192.168.1.1
Capture any packets where the source or destination host is 192.168.1.1. Display IP addresses and port numbers:
tcpdump -n host 192.168.1.1
Capture any packets where the destination network is 192.168.1.0/24. Display IP addresses and port numbers:
tcpdump -n dst net 192.168.1.0/24
Capture any packets where the source network is 192.168.1.0/24. Display IP addresses and port numbers:
tcpdump -n src net 192.168.1.0/24
Capture any packets where the source or destination network is 192.168.1.0/24. Display IP addresses and port numbers:
tcpdump -n net 192.168.1.0/24
Capture any packets where the destination port is 23. Display IP addresses and port numbers:
tcpdump -n dst port 23
Capture any packets where the destination port is is between 1 and 1023 inclusive. Display IP addresses and port numbers:
tcpdump -n dst portrange 1-1023
Capture only TCP packets where the destination port is is between 1 and 1023 inclusive. Display IP addresses and port numbers:
tcpdump -n tcp dst portrange 1-1023
Capture only UDP packets where the destination port is is between 1 and 1023 inclusive. Display IP addresses and port numbers:
tcpdump -n udp dst portrange 1-1023
Capture any packets with destination IP 192.168.1.1 and destination port 23. Display IP addresses and port numbers:
tcpdump -n "dst host 192.168.1.1 and dst port 23"
Capture any packets with destination IP 192.168.1.1 and destination port 80 or 443. Display IP addresses and port numbers:
tcpdump -n "dst host 192.168.1.1 and (dst port 80 or dst port 443)"
Capture any ICMP packets:
tcpdump -v icmp
Capture any ARP packets:
tcpdump -v arp
Capture either ICMP or ARP packets:
tcpdump -v "icmp or arp"
Capture any packets that are broadcast or multicast:
tcpdump -n "broadcast or multicast"
Capture 500 bytes of data for each packet rather than the default of 68 bytes:
tcpdump -s 500
Capture all bytes of data within the packet:
tcpdump -s 0

Saturday, May 23, 2015

problem with debian jesse arm on cubox. apt-get update fails [SOLVED]


putting solved on it so far

here is the error:

root@cubox4:~# apt-get update
Hit http://ftp.us.debian.org jessie InRelease
Hit http://ftp.us.debian.org jessie/main Sources
Hit http://ftp.us.debian.org jessie/contrib Sources
Hit http://ftp.us.debian.org jessie/non-free Sources
Hit http://ftp.us.debian.org jessie/main armhf Packages
Hit http://ftp.us.debian.org jessie/contrib armhf Packages
Hit http://ftp.us.debian.org jessie/non-free armhf Packages
Hit http://ftp.us.debian.org jessie/contrib Translation-en
Hit http://ftp.us.debian.org jessie/main Translation-en
Hit http://ftp.us.debian.org jessie/non-free Translation-en
Reading package lists... Done
W: There is no public key available for the following key IDs:
7638D0442B90D010

proposed solution for now is here:

http://devget.net/linux/how-to-fix-no-public-key-available-for-the-following-key-ids-in-debian/

short of it for the solution is:

apt-get install debian-keyring debian-archive-keyring
 
then do the apt-get update
 

Sunday, May 3, 2015

Adafruit Raspberry Pi displays


There are two interesting displays for the Raspberry pi that complement the HDMI and Composite video outputs.  Both are available with or without touch screen capability.

One is a 2.8" or 3.5" screen for the pi that is supported by the original 26 pin connector GPIO.  Only some portion of the GPIO is used, and the support for both the touch screen and display are all thru the connector.

Another one is a Hat which only works with the 40 pin GPIO on the Pi B+ or the Pi 2 Model B.  Almost all of the GPIO is used by the hat, and no pins remain to support the touch screen, so it is brought out via USB port as a motion event device to the Raspian system.

The latter's support compiled from a series of articles from the Raspbian / Debian system and does not apparently have versions for other OS's.  I didn't track down anything to do with the other OS's anyway for either.

The Hat version is product number 2453, and a 7" display was chosen to have 800 x 480 support.  a reasonably sized display results that can run a lot of graphical displays.

The smaller version has 320 x 240, and is quite good, but most gui dialogs will only show a very small portion on the screen.

Additionally the support for the smaller piggyback displays is via loadable modules, and they are not initialized soon enough in the scheme of things in the kernel to have much of the boot dialog.  There is a point in the normal kernel bootup where the kernel switches from the initial cached console dmesg stream to the running kernel device.

Kernel traffic comes out to the small screen versions after that point, and an X capable frame buffer results from the modules and mods to the system.

The Hat version is interfaced early enough to have the full boot, including the kernel graphic raspberry logo on displayed.  It also has a frame buffer added and supported.

Support of X on bootup is much more simple with the Hat version than with the smaller displays.  The latter require a bit of familiarity with frame buffers and following hints in the support files to get the X display to be the default display.  Doable, but was messy.

Notes:

7" display:

hat
https://www.adafruit.com/product/2453
7" Display:
https://www.adafruit.com/products/2354
Howto:
https://learn.adafruit.com/adafruit-dpi-display-kippah-ttl-tft

Original work:
http://blog.reasonablycorrect.com/raw-dpi-raspberry-pi/
Drivers for display:
https://github.com/robertely/dpi666/
Pinout for GPIO (worksheet)
https://docs.google.com/spreadsheets/d/1KtH3ogHTpWotTmeRRp8acbK6KBJvc7CvKB-R7MSeMU0/edit#gid=0

Thread about B+ addon:
https://www.raspberrypi.org/forums/viewtopic.php?f=100&t=86658&start=150

480 x 320 3.5" display:

product:
https://www.adafruit.com/products/2097

INstallation of blob over Raspian
https://learn.adafruit.com/adafruit-pitft-3-dot-5-touch-screen-for-raspberry-pi

Note that the hat, and display are integrated and only a single part is necessary.

Raspberry Pi Raspian setup


With the setup prompt screen on first boot, a number of things can be set up:

Locale  Set to US English.

Keyboard  Select 105 Generic, US layout

Expand to size of media

Enable Camera, SPI, and GPIO if need be thru special menus.

Additionally after first boot, this page shows how to enable NFS and CIFS mounting if it is not already in the default.  Originally the images did not have SMB (CIFS) file system support, and it had to be added.

Also optionally NFS and NFS server can be installed.

https://www.raspbian.org/RaspbianFAQ


Wednesday, April 22, 2015

Adafruit 2097 (and other) TFT displays


There are a bunch of issues with the Adafruit 2097 TFT preconfigured image and getting it fully up and running with X.

This applies specifically to the patched raspian image for this product.  Others may or may not be patched correctly.  This appears to be a raspian from about 12/2014, FWIW

http://www.adafruit.com/products/2097

Notes for configuring it to run completely on the TFT:

See starting X on the TFT display below

Notes for configuring wifi (since the USB on the pi boards suck completely

This should be done with an exported X environment, or with the HDMI display attached.  These are fixed mode dialogs and don't scale or scroll like they should.

run the wifi gui.  select scan on the main gui.
on the next dialog, select scan, and when the desired device shows up, double click it, and add it to the configuration.  This should bring up a large dialog, and if the thing is configured right, one can enter the wifi password in that dialog.


Notes for starting X on the TFT display

The problem is that the tutorial expects you to use startx, rather than letting lightdm start the X server (as it does when you select boot to desktop). When you select boot to desktop the greeter is started to allow you to log in. The solution is to follow this tutorial (X11 on your Display). Boils down to:-

Install xserver-xorg-video-fbdev
CODE: 
sudo apt-get install xserver-xorg-video-fbdev

Create a config file with following contents in /usr/share/X11/xorg.conf.d/99-fbdev.conf containing the following:
CODE: 
Section "Device"
  Identifier "myfb"
  Driver "fbdev"
  Option "fbdev" "/dev/fb1"
EndSection
Section "Device"  
  Identifier "myfb"
  Driver "fbdev"
  Option "fbdev" "/dev/fb1"
EndSection

Adafruit note page on point (not in tutorial)

https://learn.adafruit.com/adafruit-pitft-28-inch-resistive-touchscreen-display-raspberry-pi/extras#boot-to-x-windows-on-pitft


Monday, April 20, 2015

vmware esxi command line performance command, network tracing

Performance, or top command for esxi is esxtop


To capture network activity on esxi with command line,  one must use a different special form of the tcpdump command.

Take care to position where you will have some storage capacity.  Though logged in as root, the root fs structure may have very little storage in its default directory.  Also on systems with tcp nas, traffic will be added if one used datastores which are mounted via nfs or other protocols visible to the NIC.

notes captured from this info page

http://kb.vmware.com/selfservice/search.do?cmd=displayKC&docType=kc&docTypeID=DT_KB_1_1&externalId=1031186


Capturing network traces with tcpdump-uw

  • To list the vmkernel interfaces, use the esxcfg-vmknic command with the -l option:

    # esxcfg-vmknic -l
  • To display packets on the vmkernel interface vmk0, use the tcpdump-uw command with the -i option:

    # tcpdump-uw -i vmk0
    Note:
  • To capture the entire packet, use the tcpdump-uw command with the -s option with a value of 1514 for normal traffic and 9014 if Jumbo Frames are enabled.

    Normal traffic: # tcpdump-uw -i vmk0 -s 1514Jumbo Frames enabled: # tcpdump-uw -i vmk0 -s 9014 -B 9

    Note: By default, tcpdump-uw can only capture a maximum of 8138 bytes due to buffer constraints. The -B 9 option increases the buffer to allow the capture of up to 9014 bytes.

  • To display all of the packets on vmk0 with verbose detail,  use the tcpdump-uw command with the -vvv option:

    # tcpdump-uw -i vmk0 -s 1514 -vvv
    Note: Refer the help page for tcpdump-uw command for more -v options.

  • To display only the TCP packets on vmk0, use the tcp option with the tcpdump-uw command.

    # tcpdump-uw -i vmk0 -s 1514 tcp
  • To see traffic to/from only a single IP address, you can use the host option:

    # tcpdump-uw -i vmk0 -s 1514 host x.x.x.x

  • To avoid seeing unwanted traffic types in the tcpdump-uw output, use the not option. For example, to filter out DNS and SSH traffic, use the following command:

    # tcpdump-uw -i vmk0 -s 1514 port not 22 and port not 53

    Note: This is useful when doing a packet capture on a VMkernel interface when that same interface is also being used for an active SSH session.

  • To save the dump in pcap format for later use with Wireshark, use the traffic.pcap option.

    # tcpdump-uw -i vmk0 -s 1514 -w traffic.pcap
  • If the trace is running for long time, you can split the trace pcap file to chunks of desired size using the-C option.

    # tcpdump-uw -i vmk0 -s 1514 -C 100M -w /var/tmp/test.pcap
  • To limit the log files to a specified number, you can use the -W option. You can use this option if a trace must be set running for a long period of time, waiting for an even to occur.

    For example:

    # tcpdump-uw -i vmk0 -s 1514 -C 100M -W 10 -w /var/tmp/test.pcap
    This command creates 10 trace files of size 100MB each. This ensures that you do not run out of space on ESX.

    Note: This option has the same effect of rotating the log files.

Traffic on a virtual internal switch must be captured in a different manner.

notes taken from here:

http://kb.vmware.com/selfservice/microsites/search.do?language=en_US&cmd=displayKC&externalId=1000880

Capturing virtual switch traffic with tcpdump and other utilities (1000880)

Details

This article provides information about capturing ESX network traffic.

There are two ways to capture traffic in an ESX environment:

Monitoring virtual switch traffic using tcpdump or other packet-capture utilities requires a port group with non-default security policies set.

Attempting to capture traffic without adjusting the security policies results in silent failure of the capture operation.

Solution

These steps describe setting up a vSwitch and/or a port group in promiscuous mode for tcpdump:

  1. To monitor traffic via VMware Service Console (SC), a port group and a vswif interface with security settings modified to promiscuous mode accept is required for capturing.
  2. To monitor traffic via the virtual machine, the virtual machine's virtual NIC must be set to promiscuous mode accept, however this step is often accomplished by the capturing utility installed on guest operating systems. The Virtual Switch (vSwitch) and port group security settings must also be modified to accept all traffic ( promiscuous mode accept).
  3. To capture all traffic of the Virtual Switch, the vSwitch security setting is set to promiscuous mode accept.
  4. To capture only the traffic of a port group, only that particular port group security setting is modified to promiscuous mode accept.
  5. A layer 3 IP address is used by the capturing utility, therefore you must have a Service Console with an IP address in the desired subnet for capturing. This also applies to guest operating systems.
  6. To monitor VMkernel Traffic, place a Service Console on the VMkernel virtual switch, and follow the procedure below.
These steps must be applied as a whole if the environment requires total dedicated virtual switch, port group, and service console, or can be used as reference to modify existing network settings. To modify only the port group, go to step 3 above.

Create a new service console portgroup named COS_tcpdump (or another name which makes sense in your environment):

  1. Connect to the ESX host using VI Client / vSphere Client.
  2. Click the ESX host, then click the Configuration tab.
  3. Click Networking under Hardware.
  4. Click Add Networking, which is located at the top right. The Add Network Wizard window appears.
  5. Click Service console, then click Next.
  6. Select Create a virtual switch and select the NIC to be associated with the virtual switch and click Next.
  7. Enter a Network Label for the server console (in this example, COS_tcpdump), and provide a VLAN ID (optional).
  8. On ESX 4.x, click Next.
  9. Assign IP information using DHCP or manually by entering an IP Address and Subnet Mask, then click Next.
  10. Click Finish to create the switch.
  11. Click Properties next to the new virtual switch to edit its properties.
  12. Highlight the newly created Service Console and click Edit to modify its properties.
  13. In the vSwitch Properties window, click the Security tab and change all three Policy exceptions to Accept and click OK.
  14. Close the Properties window. You are ready to run tcpdump on this vswif interface.