First blush experience with the Arduino supplied IDE is pretty nice. The Sketch was installed and worked with my laptop w/o any guessing.
The only thing to configure is the serial port, and on my Windows XP laptop which I use for such experiments has only the Arduino on it for this test, and it worked.
On the Mac Mavericks I have on loan, it took a bit of guesswork since there were 8 ports enumerated from the /dev directory. As it turned out it wasn't hard to find, and a youtube video below shows a modifed demo, blink running.
First mission will be to get the PDP11 running and see how it works, and if it works.
http://youtu.be/679aVAg75tQ
A youtube upload / posting will have some of the details here. More setup updates here for Sketch.
The intent is to use cross platform gcc directly next, which will be a different note.
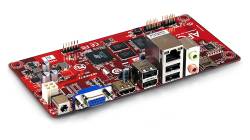
http://arduino.cc/en/Main/ArduinoBoardADK
Win:
http://arduino.googlecode.com/files/arduino-1.0.5-r2-windows.exe
Mac:
http://arduino.googlecode.com/files/arduino-1.0.5-macosx.zip
Linux:
http://arduino.googlecode.com/files/arduino-1.0.5-linux32.tgz
Source:
http://arduino.googlecode.com/files/arduino-1.0.5-src.tar.gz
Monday, January 27, 2014
Saturday, January 25, 2014
Raspbian for APC 8750 (Apricot install)
This seems to be getting hard to find.
http://thunderace94.wordpress.com/2013/06/12/apc-8750-install-raspbian-on-nand-flash/
 For memory. Adapted from this repost, original source: RoyalPanda from APC.IO forum.
The plot is simple: How to install a real GNU/Linux on the APC.io wm8750 PicoITX board. Royal Panda made a great job adapting Raspbian for the APC, he called this remix Apricot
The last release is Apricot R5, but it still lacks Video support (among others things) and Royal Panda didn't release any NAND installer. So this “tutorial” is made with the previous release: Apricot R4. The process should stay the same if there's an update one day…
Long story short: I needed to reinstall my APC board, but the kernel I had (and though was the one from the installer) lacks the UBI support, so I couldn't follow the original Howto…
http://thunderace94.wordpress.com/2013/06/12/apc-8750-install-raspbian-on-nand-flash/
Apricot R4 on NAND, for APC.io WM8750
Overview
For memory. Adapted from this repost, original source: RoyalPanda from APC.IO forum.
The plot is simple: How to install a real GNU/Linux on the APC.io wm8750 PicoITX board. Royal Panda made a great job adapting Raspbian for the APC, he called this remix Apricot
The last release is Apricot R5, but it still lacks Video support (among others things) and Royal Panda didn't release any NAND installer. So this “tutorial” is made with the previous release: Apricot R4. The process should stay the same if there's an update one day…
Long story short: I needed to reinstall my APC board, but the kernel I had (and though was the one from the installer) lacks the UBI support, so I couldn't follow the original Howto…
Steps
What you'll need
- The board itself, the original APC.io board: WM8750
- A 1 Gio MicroSD card
- An Ethernet connection
- A Serial adapter
- Screen and Keyboard might help too…
Files
- The Installer Files with a scriptcmd file (it's easier this way, but don't worry, you'll play with uBoot via Serial)
- mtd-utils deb package (so you don't have to type the URL to download it)
- mod-kernel-RaspBian.tar.gz (the Kernel to be flashed on the NAND)
- Apricot R4 MMC (for its rootfs): Here
MicroSD preparation
The easy way is to copy the Apricot R4 img on the uSD card, then add the the other files on the first partition.
Create a folder where you extract the mod-kernel-RaspBian.tar.gz archive. Mine's named modKern.
dd if=./ApricotR4-NoGUI-1G-SDCARD.img of=/dev/sdh bs=4096There should be one partition named XCP-1.6.10 Base Pack. Copy the files initrd.gz, uzImage.bin, scriptcmd, mtd-utils (DEB package) there, replace the existing files (uzImage.bin and scriptcmd)
Create a folder where you extract the mod-kernel-RaspBian.tar.gz archive. Mine's named modKern.
First boot
Insert the MicroSD card, boot the board.
The debian-installer should start (on the screen, not in serial). Choose
your language, you don't need the Network. Stop the installer as soon
as you can, and drop to a Shell. From the menu, it's the Execute a shell option.
Make sure your NAND layout is correct:
Make sure your NAND layout is correct:
cat /proc/mtdYou should see this:
  dev:    size   erasesize  name
  mtd0: 00d00000 00010000 "filesystem-SF"
  mtd1: 00280000 00010000 "kernel-SF"
  mtd2: 00050000 00010000 "u-boot-SF"
  mtd3: 00010000 00010000 "u-boot env. cfg. 1-SF"
  mtd4: 00010000 00010000 "u-boot env. cfg. 2-SF"
  mtd5: 00010000 00010000 "w-load-SF"
  mtd6: 00a00000 00100000 "kernel"
  mtd7: 7f600000 00100000 "rootfs"
If your layout is different, stop here unless you know what you're doing…
Mount the first partition of the uSD card somewhere, Flash the kernel on the NAND (mtd6)
  mkdir /mnt
  mount /dev/mmcblk0p1 /mnt
  cd /mnt/modKern
  dd if=uzImage.bin of=/dev/mtdblock6
You can try to erase the mtd partition
before flashing the kernel, but I'm not sure it'd work, and if that's
really necessary since dd does a raw copy…
Shutdown the board. Unplug the uSD card.
Second Boot
Connect your serial adapter, open with these parameters: 115200 8n1 without any flow control.
Restart the board.Interrupt the boot process in uBoot by pressing Enter. It should drop you to a uBoot shell. Enter theses lines
From now it's pretty much the same as the original HowTo. Format the mtd7 partition (the rootfs)
Restart the board.Interrupt the boot process in uBoot by pressing Enter. It should drop you to a uBoot shell. Enter theses lines
  setenv nandargs "setenv bootargs mem=460M ubi.mtd=7 root=/dev/mmcblk0p2 console=ttyS0,115200n8 console=tty0 mtdparts=WMT.nand:10m(kernel),-(rootfs)"
  setenv nandboot "nandrw r 0x0 0x1000000 0x400000;  if iminfo 0x1000000; then run nandargs; bootm 0x1000000; fi"
then
bootWhen the Kernel starts booting, insert the uSD card so it can find the rootfs. When the system is ready, you should be able to connect using SSH. Login: root, password: apricot. Use the physical screen and keyboard to find out the IP address
From now it's pretty much the same as the original HowTo. Format the mtd7 partition (the rootfs)
  mount /dev/mmcblk0p1 /mnt
  dpkg -i /mnt/mtd-utils_1.5.0-1_armhf.deb
  umount /mnt
  ubidetach -d 0
  ubiformat /dev/mtd7
  ubiattach -p /dev/mtd7
  ubimkvol /dev/ubi0 -m -N rootfs
  mount -t ubifs ubi0:rootfs /mnt
Debootstrap Time ! It ccan be quite long, so… once you've seen it's start correctly, go do something else, have a coffe, take a (short) nap, …
  apt-get install -y debootstrap
  debootstrap --no-check-gpg wheezy /chroot http://mirrordirector.raspbian.org/raspbian/
Once it's done, you can chroot in your new system !
  mount -t proc none /mnt/proc
  mount -t sysfs none /mnt/sys
  mount -o bind /dev /mnt/dev
  chroot /mnt
You should now be using the rootfs on NAND, time to setup the Raspbian distro
  mount /dev/mmcblk0p1 /mnt
  cp -R /mnt/modKern/modules /lib/
  depmod
Install uBoot tools to be able to change the uBoot parameters if/when you need
  apt-get install u-boot-tools
  echo "/dev/mtd3 0x0000 0x10000 0x10000" > /etc/fw_env.config
  echo "/dev/mtd4 0x0000 0x10000 0x10000" >> /etc/fw_env.config
  fw_printenv ## Should print the uBoot env
Make the previous setenv changes permanent:
  fw_setenv nandargs "setenv bootargs mem=460M ubi.mtd=7 root=ubi0:rootfs rootfstype=ubifs console=ttyS0,115200n8 console=tty0 mtdparts=WMT.nand:10m(kernel),-(rootfs)"
  fw_setenv nandboot "nandrw r 0x0 0x1000000 0x400000;  if iminfo 0x1000000; then run nandargs; bootm 0x1000000; fi"
Setup you debian installation
  passwd
  echo "proc /proc proc defaults 0 0" >> /etc/fstab
  echo "ubi0:rootfs / ubifs defaults 0 0" >> /etc/fstab
  echo "" >> /etc/network/interfaces
  echo "allow-hotplug eth0" >> /etc/network/interfaces
  echo "iface eth0 inet dhcp" >> /etc/network/interfaces
Install the SSH server
  apt-get update
  apt-get install openssh-server tmux
Edit the inittab to enable a serial session, just in case…
nano /etc/inittabThat should be it, you can safely poweroff the board, unplug the uSD card, then reboot.
That's all folks !
Well, you now have a working Debian Wheezy system. I haven't tested all
the graphic part, since it's running as server under my desk, but it
should work fine…
Troubleshooting
The board doesn't start ? Even with Firmware 1.2, it
seems the board sometimes needs a screen attached to complete the boot
process and connect to the network…
Monday, January 20, 2014
MTP file system setup for linux (Android device, mounted automatically)
Linux

Set up a UDEV rule via the terminal by opening the rules file
sudo nano -w /etc/udev/rules.d/51-android.rulesAnd entering the following line at the end of the file (be sure to use your user name at the end!):
SUBSYSTEM=="usb", ATTR{idVendor}=="04e8", ATTR{idProduct}=="6860", MODE="0600", OWNER="<your-username>"Now install the tools and set a mount point by entering the following commands one line at a time
Plug your Galaxy Nexus in, and enter the next line in the same terminal window:
- sudo apt-get install mtpfs
- sudo mkdir /media/GNexus
- sudo chmod 775 /media/GNexus
sudo mtpfs -o allow_other /media/GNexusDrag and drop through Nautilus, and when you're done and need to unmount, enter the following:
sudo umount mtpfsThis will have to suffice until someone writes a couple scripts or a front end. You don't have to install mtpfs, make the mount point, or chmod it after the first time. You may have to mount the device manually each time, I'll know more when I get one to play with.
http://www.androidcentral.com/ics-feature-mtp-what-it-why-use-it-and-how-set-it
ADB mode tricks
Screen recording with adb
adb shell screenrecord /sdcard/filename.mp4
Save the file to the device SDcard and press ctrl+c to stop recording.
Here is a video on a easy way to screen record. VIDEO
WHAT IS A LOGCATLogcat is the command to view the internal logs of the Android system. Viewing logs is often the best way to diagnose a problem, and is required for many issues. This way you'll find out what apps are doing in the background without you noticing.
TAKING AN LOGCAT
Now type this in the terminal
adb devices (note) to make sure devices is connected
adb logcat -v long > logcat.txt
OR
adb logcat > logcat.txt:
ADB Commands
ADB Commands
Quote:
adb devices - list all connected devicesadb push <local> <remote> - copy file/dir to device
adb pull <remote> [<local>] - copy file/dir from device
adb sync [ <directory> ] - copy host->device only if changed
(-l means list but don't copy)
(see 'adb help all')
adb shell - run remote shell interactively
adb shell <command> - run remote shell command
adb emu <command> - run emulator console command
adb logcat [ <filter-spec> ] - View device log
adb forward <local> <remote> - forward socket connections forward specs are one of: tcp:<port>
localabstract:<unix domain socket name>
localreserved:<unix domain socket name>
localfilesystem:<unix domain socket name>
dev:<character device name>
jdwp:<process pid> (remote only)
adb jdwp - list PIDs of processes hosting a JDWP transport
adb install [-l] [-r] [-s] <file> - push this package file to the device and install it
('-l' means forward-lock the app)
('-r' means reinstall the app, keeping its data)
('-s' means install on SD card instead of internal storage)
adb uninstall [-k] <package> - remove this app package from the device
('-k' means keep the data and cache directories)
adb bugreport - return all information from the device
that should be included in a bug report.
adb help - show this help message
adb version - show version num
DATAOPTS:
(no option) - don't touch the data partition
-w - wipe the data partition
-d - flash the data partition
scripting:
adb wait-for-device - block until device is online
adb start-server - ensure that there is a server running
adb kill-server - kill the server if it is running
adb get-state - prints: offline | bootloader | device
adb get-serialno - prints: <serial-number>
adb status-window - continuously print device status for a specified device
adb remount - remounts the /system partition on the device read-write
adb reboot [bootloader|recovery] - reboots the device, optionally into the bootloader or recovery program
adb reboot-bootloader - reboots the device into the bootloader
adb root - restarts the adbd daemon with root permissions
adb usb - restarts the adbd daemon listening on USB
adb tcpip <port> - restarts the adbd daemon listening on TCP on the specified port
networking:
adb ppp <tty> [parameters] - Run PPP over USB.
Note: you should not automatically start a PPP connection.
< tty> refers to the tty for PPP stream. Eg. dev:/dev/omap_csmi_tty1
[parameters] - Eg. defaultroute debug dump local notty usepeerdns
adb sync notes: adb sync [ <directory> ]
< localdir> can be interpreted in several ways:
- If <directory> is not specified, both /system and /data partitions will be updated.
- If it is "system" or "data", only the corresponding partition is updated.
environmental variables:
ADB_TRACE - Print debug information. A comma separated list of the following values
1 or all, adb, sockets, packets, rwx, usb, sync, sysdeps, transport, jdwp
ANDROID_SERIAL - The serial number to connect to. -s takes priority over this if given.
ANDROID_LOG_TAGS - When used with the logcat option, only these debug tags are printed
FAstboot commands:
Fastboot Commands
Quote: Example (fastboot flash recovery TWRP-recovery.img) then hit enter this will flash a recovery image to the device.
usage: fastboot [ <option> ] <command>commands:
update <filename> reflash device from update.zip
flashall flash boot + recovery + system
flash <partition> [ <filename> ] write a file to a flash partition
erase <partition> erase a flash partition
getvar <variable> display a bootloader variable
boot <kernel> [ <ramdisk> ] download and boot kernel
flash:raw boot <kernel> [ <ramdisk> ] create bootimage and flash it
devices list all connected devices
reboot reboot device normally
reboot-bootloader reboot device into bootloader
options:
-w erase userdata and cache
-s <serial number> specify device serial number
-p <product> specify product name
-c <cmdline> override kernel commandline
-i <vendor id> specify a custom USB vendor id
-b <base_addr> specify a custom kernel base address
-n <page size> specify the nand page size. default: 2048
from: https://sites.google.com/site/tomsgt123/adb-fastboot
Galaxy Note 2 info
https://sites.google.com/site/tomsgt123/all-videos/samsung-galaxy-note-2
Monday, January 6, 2014
Removing crapware from android
This bit was lifted from a nice blog entry (dissed in comments, but had a tidbit below that is useful).
Android phones are shipped with apps that are there toannoy help you with using your phone, and can't be disabled w/o rooting your phone and proceeding carefully.
this suggests a way to shut them off from launching at lest. They'll litter your apps button screen, but won't launch when the phone is booted at least.
Here is the link,
http://www.itworld.com/security/381716/want-protect-your-android-phone-heres-how-kill-its-crapware
here is the info:
If you've got Android 4.0 or above and want to disable the crapware without rooting the phone, here's how to do it. Note that many manufacturers have customized Android, so the instructions here might differ a bit from what you'll see on your phone. But the general instructions and principles are the same.
First, go to Settings. You'll find the Settings menu in the App Menu , or else you can get there by pulling down the notification drawer and tapping Settings. Once you're there, go to "Apps." Depending on your phone, it might be called "Manage Apps," or even "Application Manager."
Now swipe to the All apps list. Scroll to find an app you want to disable. Tap it. The App Info page appears. If the app isn't true crapware, there will be an Uninstall button. Simply tap the button to uninstall the app. But if it is crapware, an Uninstall button won't be there. There will, however, be a button that reads either "Uninstall updates" or Disable. If there's an "Uninstall updates" button, tap it. The button will change to read Disable.
Tap the Disable button. That will disable the app, and from now on, the app won't launch in the background. If you want to enable the app, head back to the All apps list. You'll find disabled apps at the bottom. Tap any you want to enable, then tap the Enable button.
Disabling the app, won't actually remove it from your system, which means it will take up hard disk space. That shouldn't be a problem. But if you absolutely, positively want to get the app off your system, you're going to have to root your phone, then use a free piece of software called NoBloat Free. There are plenty of ways to root your phone, and my suggestion is to do an Internet search. Keep in mind that it can prove to be problematic, and you'll void your phone's warranty if you do it, so make sure it's really something you want to do. A few good starting points are this page from Android Central and this page from LifeHacker. Once you've rooted the phone, run NoBloat Free.
Android phones are shipped with apps that are there to
this suggests a way to shut them off from launching at lest. They'll litter your apps button screen, but won't launch when the phone is booted at least.
Here is the link,
http://www.itworld.com/security/381716/want-protect-your-android-phone-heres-how-kill-its-crapware
here is the info:
If you've got Android 4.0 or above and want to disable the crapware without rooting the phone, here's how to do it. Note that many manufacturers have customized Android, so the instructions here might differ a bit from what you'll see on your phone. But the general instructions and principles are the same.
First, go to Settings. You'll find the Settings menu in the App Menu , or else you can get there by pulling down the notification drawer and tapping Settings. Once you're there, go to "Apps." Depending on your phone, it might be called "Manage Apps," or even "Application Manager."
Now swipe to the All apps list. Scroll to find an app you want to disable. Tap it. The App Info page appears. If the app isn't true crapware, there will be an Uninstall button. Simply tap the button to uninstall the app. But if it is crapware, an Uninstall button won't be there. There will, however, be a button that reads either "Uninstall updates" or Disable. If there's an "Uninstall updates" button, tap it. The button will change to read Disable.
Tap the Disable button. That will disable the app, and from now on, the app won't launch in the background. If you want to enable the app, head back to the All apps list. You'll find disabled apps at the bottom. Tap any you want to enable, then tap the Enable button.
Disabling the app, won't actually remove it from your system, which means it will take up hard disk space. That shouldn't be a problem. But if you absolutely, positively want to get the app off your system, you're going to have to root your phone, then use a free piece of software called NoBloat Free. There are plenty of ways to root your phone, and my suggestion is to do an Internet search. Keep in mind that it can prove to be problematic, and you'll void your phone's warranty if you do it, so make sure it's really something you want to do. A few good starting points are this page from Android Central and this page from LifeHacker. Once you've rooted the phone, run NoBloat Free.
Subscribe to:
Posts (Atom)