http://thunderace94.wordpress.com/2013/06/12/apc-8750-install-raspbian-on-nand-flash/
Apricot R4 on NAND, for APC.io WM8750
Overview
 For memory. Adapted from this repost, original source: RoyalPanda from APC.IO forum.
The plot is simple: How to install a real GNU/Linux on the APC.io wm8750 PicoITX board. Royal Panda made a great job adapting Raspbian for the APC, he called this remix Apricot
The last release is Apricot R5, but it still lacks Video support (among others things) and Royal Panda didn't release any NAND installer. So this “tutorial” is made with the previous release: Apricot R4. The process should stay the same if there's an update one day…
Long story short: I needed to reinstall my APC board, but the kernel I had (and though was the one from the installer) lacks the UBI support, so I couldn't follow the original Howto…
Steps
What you'll need
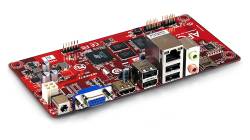
- The board itself, the original APC.io board: WM8750
- A 1 Gio MicroSD card
- An Ethernet connection
- A Serial adapter
- Screen and Keyboard might help too…
Files
- The Installer Files with a scriptcmd file (it's easier this way, but don't worry, you'll play with uBoot via Serial)
- mtd-utils deb package (so you don't have to type the URL to download it)
- mod-kernel-RaspBian.tar.gz (the Kernel to be flashed on the NAND)
- Apricot R4 MMC (for its rootfs): Here
MicroSD preparation
The easy way is to copy the Apricot R4 img on the uSD card, then add the the other files on the first partition.
Create a folder where you extract the mod-kernel-RaspBian.tar.gz archive. Mine's named modKern.
dd if=./ApricotR4-NoGUI-1G-SDCARD.img of=/dev/sdh bs=4096There should be one partition named XCP-1.6.10 Base Pack. Copy the files initrd.gz, uzImage.bin, scriptcmd, mtd-utils (DEB package) there, replace the existing files (uzImage.bin and scriptcmd)
Create a folder where you extract the mod-kernel-RaspBian.tar.gz archive. Mine's named modKern.
First boot
Insert the MicroSD card, boot the board.
The debian-installer should start (on the screen, not in serial). Choose
your language, you don't need the Network. Stop the installer as soon
as you can, and drop to a Shell. From the menu, it's the Execute a shell option.
Make sure your NAND layout is correct:
Make sure your NAND layout is correct:
cat /proc/mtdYou should see this:
  dev:    size   erasesize  name
  mtd0: 00d00000 00010000 "filesystem-SF"
  mtd1: 00280000 00010000 "kernel-SF"
  mtd2: 00050000 00010000 "u-boot-SF"
  mtd3: 00010000 00010000 "u-boot env. cfg. 1-SF"
  mtd4: 00010000 00010000 "u-boot env. cfg. 2-SF"
  mtd5: 00010000 00010000 "w-load-SF"
  mtd6: 00a00000 00100000 "kernel"
  mtd7: 7f600000 00100000 "rootfs"
If your layout is different, stop here unless you know what you're doing…
Mount the first partition of the uSD card somewhere, Flash the kernel on the NAND (mtd6)
  mkdir /mnt
  mount /dev/mmcblk0p1 /mnt
  cd /mnt/modKern
  dd if=uzImage.bin of=/dev/mtdblock6
You can try to erase the mtd partition
before flashing the kernel, but I'm not sure it'd work, and if that's
really necessary since dd does a raw copy…
Shutdown the board. Unplug the uSD card.
Second Boot
Connect your serial adapter, open with these parameters: 115200 8n1 without any flow control.
Restart the board.Interrupt the boot process in uBoot by pressing Enter. It should drop you to a uBoot shell. Enter theses lines
From now it's pretty much the same as the original HowTo. Format the mtd7 partition (the rootfs)
Restart the board.Interrupt the boot process in uBoot by pressing Enter. It should drop you to a uBoot shell. Enter theses lines
  setenv nandargs "setenv bootargs mem=460M ubi.mtd=7 root=/dev/mmcblk0p2 console=ttyS0,115200n8 console=tty0 mtdparts=WMT.nand:10m(kernel),-(rootfs)"
  setenv nandboot "nandrw r 0x0 0x1000000 0x400000;  if iminfo 0x1000000; then run nandargs; bootm 0x1000000; fi"
then
bootWhen the Kernel starts booting, insert the uSD card so it can find the rootfs. When the system is ready, you should be able to connect using SSH. Login: root, password: apricot. Use the physical screen and keyboard to find out the IP address
From now it's pretty much the same as the original HowTo. Format the mtd7 partition (the rootfs)
  mount /dev/mmcblk0p1 /mnt
  dpkg -i /mnt/mtd-utils_1.5.0-1_armhf.deb
  umount /mnt
  ubidetach -d 0
  ubiformat /dev/mtd7
  ubiattach -p /dev/mtd7
  ubimkvol /dev/ubi0 -m -N rootfs
  mount -t ubifs ubi0:rootfs /mnt
Debootstrap Time ! It ccan be quite long, so… once you've seen it's start correctly, go do something else, have a coffe, take a (short) nap, …
  apt-get install -y debootstrap
  debootstrap --no-check-gpg wheezy /chroot http://mirrordirector.raspbian.org/raspbian/
Once it's done, you can chroot in your new system !
  mount -t proc none /mnt/proc
  mount -t sysfs none /mnt/sys
  mount -o bind /dev /mnt/dev
  chroot /mnt
You should now be using the rootfs on NAND, time to setup the Raspbian distro
  mount /dev/mmcblk0p1 /mnt
  cp -R /mnt/modKern/modules /lib/
  depmod
Install uBoot tools to be able to change the uBoot parameters if/when you need
  apt-get install u-boot-tools
  echo "/dev/mtd3 0x0000 0x10000 0x10000" > /etc/fw_env.config
  echo "/dev/mtd4 0x0000 0x10000 0x10000" >> /etc/fw_env.config
  fw_printenv ## Should print the uBoot env
Make the previous setenv changes permanent:
  fw_setenv nandargs "setenv bootargs mem=460M ubi.mtd=7 root=ubi0:rootfs rootfstype=ubifs console=ttyS0,115200n8 console=tty0 mtdparts=WMT.nand:10m(kernel),-(rootfs)"
  fw_setenv nandboot "nandrw r 0x0 0x1000000 0x400000;  if iminfo 0x1000000; then run nandargs; bootm 0x1000000; fi"
Setup you debian installation
  passwd
  echo "proc /proc proc defaults 0 0" >> /etc/fstab
  echo "ubi0:rootfs / ubifs defaults 0 0" >> /etc/fstab
  echo "" >> /etc/network/interfaces
  echo "allow-hotplug eth0" >> /etc/network/interfaces
  echo "iface eth0 inet dhcp" >> /etc/network/interfaces
Install the SSH server
  apt-get update
  apt-get install openssh-server tmux
Edit the inittab to enable a serial session, just in case…
nano /etc/inittabThat should be it, you can safely poweroff the board, unplug the uSD card, then reboot.
That's all folks !
Well, you now have a working Debian Wheezy system. I haven't tested all
the graphic part, since it's running as server under my desk, but it
should work fine…
Troubleshooting
The board doesn't start ? Even with Firmware 1.2, it
seems the board sometimes needs a screen attached to complete the boot
process and connect to the network…
Hi Jim, I bought two APC 8750 when it just released, and I didn't know what to do with before today, thanks to you ! But I'm not sure to understand everything you wrote.
ReplyDeleteWhat kind of serial adapter do you mean ?
And where (with wich program) do I do the "MicroSD preparation" ?
Thanks in advance,
Martial (from France)