save
http://tinajalabs.wordpress.com/2012/09/02/raspberry-pi-as-an-xbee-wireless-sensor-network-gateway/
Gateway and useful gizmo.
Raspberry Pi as an Xbee Wireless Sensor Network Gateway
Notes about Raspberry Pi, an ARM based pc about the size of a deck of cards which costs $35. I might use it as a replacement for the Asus WL520 GU wifi modems I’ve been using as an Xbee WSN Gateway.General References
- Home Page: http://www.raspberrypi.org/
- Wiki: http://elinux.org/RaspberryPiBoard
- Quick Start: http://www.raspberrypi.org/quick-start-guide
- Verified Peripherals: http://elinux.org/RPi_VerifiedPeripherals#USB_WiFi_Adapters
- http://learn.adafruit.com/downloads/pdf/send-raspberry-pi-data-to-cosm.pdf
- OpenWRT for the Raspberry Pi- probably won’t use this as OpenWRT is focused on WiFi functionality.
- Raspberry Pi OS Downloads
OS
I started out with the 4G SD Card from Newark that was pre-loaded with wheezy-debian. Now I’m using the distro from Adafruit called Occidentalis v0.2. It includes ssh and other features that makes it easier to confugure.Copy the image to a 4G SD Card using Win32DiskImager. Basically you download an OS image to a windows machine and copy it to an SD Card. When using WinDiskImager, pay close attention to your read/write actions because it’s possible to overwite the wrong drive.
Before selecting an SD Card, look at the list in Verified Peripherals. Not all SD Cards work the same, and I spent a lot of time trying to launch the OS even though the image copy was successful. If you get to the point where you’ve successfully copied the image but it won’t boot up, cut your losses and try another SD Card.
- login as: pi, password: raspberry
- I set up a root account and did most of the installation as root
Expanding the partition on the sccard
Once installed, expand the SD Card partition to fill the 4G memory space. The image on the 4G sdcard is 1.8G. This describes how to expand the partition to fill the entire 4G.SSH
Set up SSH so you can access the Raspberry Pi from a terminal program of via Putty and/or WinSCP.ssh-keygen -t rsa -C "your_email@youremail.com"
XBee connection
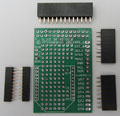
I used the CISECO daughter board kit which costs about $6 which has a GPIO connector and a place to hook up an xbee to the serial port on the GPIO. It derives the 3.3V from the GPIO and it includes an array of through holes for misc prototyping.- XBee Radio PCB daughter board- by CISECO – basically a breakout board for the GPIO connections with access to the serial port and 3.3V.
- Getting started with GPIO and PythonThis is the first of two articles showing basic GPIO on the Raspberry-Pi using the prototype area of the Slice of Pi. This covers basic details on the GPIO pins, setting up a Python library to allow access to the GPIO. There is an example circuit to build on the Slice and some code to get the outputs working. This was originally a blog post on Matts blog at http://lwk.mjhosting.co.uk
- Serial port on the GPIO connector accessed as: /dev/ttyAMA0
- More notes on serial Interfacing: http://lavalink.com/2012/03/raspberry-pi-serial-interfacing/

Raspberry Pi with XBee daughterboard, Slice of Pi
/boot/cmdline.txt
dwc_otg.lpm_enable=0 rpitestmode=1 console=tty1 root=/dev/mmcblk0p2 rootfstype=ext4 rootwait
Install Apache on Raspberry Pi
Eventually I will want to set up a web interface to allow users to edit the gateway config items, like the network protocol and to manage the various sensors, python scripts, etc. For now, I’m just going to manage it it by ssh command line.- http://tinkernut.com/wiki/page/Episode_320
- Webmin- “Webmin is a web-based interface for system administration for Unix. Using any modern web browser, you can setup user accounts, Apache, DNS, file sharing and much more. Webmin removes the need to manually edit Unix configuration files like /etc/passwd, and lets you manage a system from the console or remotely.”
- Raspcontrol- PHP based Dashboard application. More about status then configuring.
Installing Python components
Rasberry Pi, default linux install, has python already installed.I needed these modules to allow me to access various web services like Cosm (pachube), Thing Speak, Open.Sen.se, and my own SOAP based service that I wrote in C#.
pyserial
We need some extra libs to run the sensor programs.Check if python is installed and what version is installed
python -VChange directory:
cd /home/tinaja/downloads/WGet the file then unpack it:
wget http://sourceforge.net/projects/pyserial/files/pyserial/2.5/pyserial-2.5.tar.gz/download
tar -zxvf pyserial-2.5.tar.gz

cd pyserial-2.5
python setup.py install
simplejson 2.6.1
simplejson 2.6.1 is compatible with python 2.5.Change directory:
cd /home/tinaja/downloads/WGet the file then unpack it:
wget http://pypi.python.org/packages/source/s/simplejson/simplejson-2.6.1.tar.gz
tar -zxvf simplejson-2.6.1.tar.gz

cd simplejson-2.6.1
python setup.py install
suds
The suds libs provide services for SOAP calls.Need to install python’s setup tools:
apt-get install python-setuptoolsChange directory:
cd /home/tinaja/downloads/

wget https://fedorahosted.org/releases/s/u/suds/python-suds-0.4.tar.gz
tar -zxvf python-suds-0.4.tar.gz

cd python-suds-0.4/
python setup.py install
eeml
Used by Cosm (pachube)http://pypi.python.org/pypi/python-eeml/1.1.0 ? git clone git://github.com/petervizi/python-eeml.git # cd /home/tinaja/downloads/ # wget http://pypi.python.org/packages/source/p/python-eeml/python-eeml-1.2.0.tar.gz # older version - wget http://pypi.python.org/packages/any/p/python-eeml/python-eeml-1.1.0.linux-i686.tar.gz # tar python-eeml-1.2.0.tar.gz # python setup.py install
- Source code: https://github.com/petervizi/python-eeml/
Code
I’ve loaded the python code I’m using on GitHub:https://github.com/TinajaLabs/gateway_raspi
Wifi
The Raspberry Pi can be wifi enabled with a USB based wifi device. The main concern would be with power consumption; the raspberry pi runs off of a 5V (currently 700mA) supply (like a cell phone charger) and a wifi device might strain the load.For now (8.26.2012) the wired ethernet configuration works great. It can just plug into a IP provider modem.
To change the boot-up text
Did this to brand the OS as one I set up. Only for show…edit /etc/moto.tail
The programs included with the Debian GNU/Linux system are free software;
the exact distribution terms for each program are described in the
individual files in /usr/share/doc/*/copyright.

Debian GNU/Linux comes with ABSOLUTELY NO WARRANTY, to the extent
permitted by applicable law.

Type 'startx' to launch a graphical session

This version, from Adafruit's Occidentalis v0.2, set up by:
 _____ _              _         _          _
|_   _(_)_ __   __ _ (_) __ _  | |    __ _| |__  ___
  | | | | '_ \ / _` || |/ _` | | |   / _` | '_ \/ __|
  | | | | | | | (_| || | (_| | | |__| (_| | |_) \__ \
  |_| |_|_| |_|\__,_|/ |\__,_| |_____\__,_|_.__/|___/
                   |__/ TinajaLabs.com, Summer 2012
-----------------------------------------------------
To set a program to start at boot-up
To automatically run the main python script, allsensors.py, when the computer starts…Edit /etc/rc.local and add the python line shown below:
#!/bin/sh -e
#
# rc.local
#
# This script is executed at the end of each multiuser runlevel.
# Make sure that the script will "exit 0" on success or any other
# value on error.
#
# In order to enable or disable this script just change the execution
# bits.
#
# By default this script does nothing.

# Print the IP address
_IP=$(hostname -I) || true
if [ "$_IP" ]; then
  printf "My IP address is %s\n" "$_IP"
fi

# add this for Tinaja Labs sensor tracking
python /home/tinaja/allsensors.py &

exit 0
To set up Tomcat Server
At some point I might want to set up a Tomcat server and use it with some Java apps. Later.Java
- JDK for Linux ARM, JRE for Mac OS X: http://www.raspberrypi.org/phpBB3/viewtopic.php?f=34&t=14635
To watch the message log file
This allows you to see the system messages generated by the script as it sends various sensor readings to the web services.cd /var/log/ tail -f messages
To kill the Tinaja python script
Look for the process id of the python script with this command:ps aux # for a full list ps aux | grep python # to see only python processesTake note of the process id number and issue this command:
kill 9999 # where 9999 is the process id numberThat’s all I have for now, hope you found something useful here.
**********************************************
another example page
http://www.desert-home.com/2013/09/raspberry-pi-and-xbee.html
I used pip to install xbee and got version 2.1.0 the command was: sudo pip install xbee Then you can use pip to tell you where it wound up. Once you get it installed, you can just import it and start using it.
promiscuous mode monitor:
http://www.desert-home.com/2012/10/monitoring-my-xbee-network.html
**********************************
Another Xbee python tool: Skinner
http://jeffskinnerbox.wordpress.com/2012/12/22/selecting-xbee-radios-and-supporting-softwaretools/
**********************************
Earlier xbee effort with breadboard buildup for Xbee
http://lookmanowire.blogspot.com/2012/07/raspberry-pi-and-xbee.html
corollary, enabling Raspberry Pi for
No comments:
Post a Comment