Friday, August 18, 2023
notes on attempting to install vmesxi vsphere client (from vmesxi 6 level) under wine on linux
Friday, September 24, 2021
ESXI 6.5 on Intel Nuc (another install)
With VMware vSphere 6.5 released recently, I decided to rebuild my Intel NUC based homelab. My preferred method is to create a bootable USB drive with the ESXi install media on it. Then install from the ESXi USB to the dedicated NUC’s boot USB. This method avoids non-unique ESXi installs, which is a common issue with the VMware Workstation pre-install method.
Prerequisites
In order to create our Intel NUC specific ESXi install media, we need to gather the necessary files. Make sure to grab the newest versions of the following:
- vSphere ESXi 6.5 Offline Bundle
- This is a collection of all the components and packages that make up ESXi. You need the Offline Bundle, not the ISO, for this exercise.
- SATA AHCI driver
- This driver is for the Intel NUC SATA controller. Even if your NUC doesn’t have a SATA disk or even the controller, it doesn’t hurt to add this driver.
- USB 3.0 Ethernet driver from William Lam
- Add more NICs to your NUC via USB 3.0. Like the storage driver, if you don’t have a USB 3 ethernet adapter, it doesn’t hurt to add this driver.
- ESXi-Customizer-PS PowerShell script from Andreas Peets
- This script will do all the heavy lifting, combining the offline bundle and driver VIBs into an ISO for us.
Create ISO
First, let’s create a project directory for our files. Let’s call it C:\esxi-nuc .
Copy the ESXi 6.5 offline bundle ZIP file (ex. VMware-ESXi-6.5.0-4564106-depot.zip ) and the ESXi-Customizer-PS script (ex. ESXi-Customizer-PS-v2.4.ps1 ) to this directory.
Create a sub-directory under our project directory to hold our VIBs. Let’s get creative and call it C:\esxi-nuc\vibs .
Copy the SATA AHCI driver VIB (ex. sata-xahci-1.38-1.x86_64.vib ) and the USB 3.0 Ethernet driver VIB (ex. vghetto-ax88179-esxi65.vib ) to this sub-directory.
If you’ve copied all the files to their respective folders properly, it should look something like this:
Now we have to run the ESXi-Customizer-PS script to pull everything together and generate an ISO file. So fire up PowerShell, navigate to our project directory which is “C:\esxi-nuc” in our example, and run the following command:
Make sure to use the version numbers that match your downloaded files. Also, don’t forget the “-nsc” flag, as that will let us ignore the unsigned driver VIBs and continue.
If everything went as planned, you should now have a new ISO file in the project directory that is an ESXi 6.5 and VIBs combination.
Next Steps
Now that we have our customized ISO, we need to turn it into a bootable USB and then install it on our NUCs. We’ll do just that in part two.
In the first post, we created an ISO image of VMware ESXi 6.5 to install on our Intel NUC. Now we turn that ISO into a bootable USB and do the install.
Make Bootable USB
We’re going to use an application called Rufus to create our bootable USB, so download and install it. Now start Rufus.
First, make sure that your to select your target USB flash drive in the Device drop down menu. Then, change the “Create a bootable disk using” drop down menu to “ISO Image” (call-out 1). Then click the image selection button (call-out 2) to find and open our customized ISO (ex. ESXi-6.5.0-4564106-standard-customized.iso ).
You should now see an updated new volume label which matches the ISO image you chose. Click the Start button to begin building the bootable USB (call-out 3).
A warning may pop up about an older version of the ‘menu.c32’ file. This file is part of Syslinux and helps make the ISO/USB bootable. If we don’t replace the older version of the file then our USB won’t boot properly, so click Yes (call-out 4).
Rufus will remind you, forcefully, that you’re about to wipe out all the data on the target USB drive. You backed up anything on the flash drive that you wanted to keep, right? If you’re sure you’re ready to continue, click OK (call-out 5).
The bootable USB will now be built by Rufus. Rufus basically does a bit of work to make the USB drive bootable, and then extracts the contents of the ISO file to it.
When finished, you’ll see that the device name has changed at the top, the green progress bar is full, and the status reads “READY”. Click the Close button to exit out of Rufus (call-out 6).
Now you can eject your USB drive as it’s ready for use as a vSphere ESXi installation drive.
Install ESXi on NUC
If you’ve installed ESXi before, this should be really straight forward, and I won’t bother with all the details. Essentially you need to make sure to connect your Intel NUC to a monitor and keyboard, and that the drive that you want to install ESXi into is either installed or plugged in. Remember that in my home lab example, that I’ll be installing ESXi on a USB drive. This means that both the USB drive that we’ve built to install ESXi from and the USB drive that we’ll be installing ESXi to have to be plugged into the NUC.
As a reminder, F10 will allow you to select your boot device on the Intel NUC.
In order to get the USB Ethernet adapter to work, we need to enable the ESXi Shell, login, and run the following command:
Then log out of the shell, disable it again and reboot the host.
Bigger and Better Things
Now that we have successfully installed ESXi 6.5 onto our NUC, we can begin to do some fun and interesting things. Like, say, install ESXi on some more NUCs and then create a vSAN cluster. Stay tuned.
Wednesday, September 15, 2021
Vmware Player for Ubuntu 20.04
Saturday, June 1, 2019
notes on accessing vmware esxi remotely
SSH remote access
- Generate public/private keys. For more information, see the OpenBSD Reference Manual section in the OpenBSD.
Note: The preceding link was valid as of June 22, 2016. If you find the link to be broken, provide feedback on the article and a VMware employee will update the article as necessary.
Notes:- These instructions generate two files in ~/.ssh: id_rsa and id_rsa.pub.
- In ESXi 5.x, the ssh-keygen command is located at /usr/lib/vmware/openssh/bin.
- On the remote host, store the public key content, id_rsa.pubin ~/.ssh/authorized_keys.
Notes:
- For ESXi 5.x, 6.0 and 6.5, the authorized_keys is located at: /etc/ssh/keys-<username>/authorized_keys
- More than one key can be stored in this file.
- To allow root access, change PermitRootLogin no to PermitRootLogin yes in the /etc/ssh/sshd_config file.
- To disable password login, ensure that the ChallengeResponseAuthentication and PasswordAuthentication are set to no.
- Reload the service:
- For ESXi, run the command:
/etc/init.d/SSH restart
- For ESX, run the command:
service sshd reload
- For ESXi, run the command:
https://kb.vmware.com/s/article/1002866
Accessing process information (ps command)
https://kb.vmware.com/s/article/1010993
- Run the minimalized ps command:
ps -Tcjstv
The output shows information such PID, command-line used, and state.
- To generate output for certain processes and maintain a title row, run this command:
ps -Tcjstv | egrep "WID|{proc-name}"
- The esxcfg-info
command can offer some detail on process memory and CPU and is
contained in the vm-support dumps. Process information in esxcfg-info is
contained in sections called Groups, but the groups can be cumbersome
to sift through.
Grep these groups for information on process memory and CPU with the command:
esxcfg-info | egrep -A85 "Group Id" | egrep "Group Name|Group Id|Total CPU|Total Memory|Used Time|Parent Id|----Active\.\.\.\." | less
- To check for file-system issues, run this command:
stat –f {filesystem}
Note: This checks inode use, from which a runaway process can sometimes be determined (even if you do not know exactly what files are involved).
To check across all filesystems, run this command:
stat -f `df | grep -v "Filesystem" | awk '{print $6}'` | egrep "File|Inodes"
- To view network connection (socket) details, run this command:
esxcli network connection list
Note: For ESXi 5.x and later, run this command:
esxcli network ip connection list
--30--
Thursday, June 7, 2018
Force bios mode during boot on Vmware player
Vmware player has notoriously made it impossible to catch the bios boot for some reason, somehow thinking that will make one buy vmware workstation, maybe.
This is how to force the boot on vmware player as of jun 2018, anyway
Edit the virtual machines VMX file and add this
to make it easier to access the BIOS setup screen, edit the configuration (
.vmx) of the virtual machine and add or edit one of these options: bios.forceSetupOnce = "TRUE"
This forces entry to the BIOS setup at startup.
bios.bootDelay = "xxxx"
This adds a delay to the initial POST screen, showing it for longer and giving you more time to access the BIOS setup, where xxxx is the number of milliseconds to show the POST screen (There are 1000 milliseconds in a second.). The maximum value for the boot delay is 10000 milliseconds or 10 seconds.
https://kb.vmware.com/s/article/1004129
-30-
Tuesday, March 7, 2017
vmx network setting notes
Vmware notes on selecting network adapters
https://kb.vmware.com/selfservice/microsites/search.do?language=en_US&cmd=displayKC&externalId=1001805
Advanced network settings
VMX-file parameters
Basic setup
MAC address handling
ESX - specific
VMware-tools related Wake on LAN
Advanced setup - experts only Advanced MAC address handling - experts only
other parameters related to network
| Basic setup - see basic table for reasonable blocks |
| ethernet0.present = "false" | Main-switch: set to "true"
to enable the device. This parameter works like a mainswitch - if it is set to "true" all other parameters related to the same device are parsed. If it is set to "false" the other parameters are ignored. |
| ethernet0.startConnected = "true" | Silently defaults to "true"
set ito "false" f you don't want the nic to be connected at boot |
| ethernet0.virtualDev
= "vlance" ethernet0.virtualDev = "vmxnet" ethernet0.virtualDev = "e1000" |
On current VMware-versions you can
use any of these 3 e1000 performs best but your OS may not come with the drivers vmxnet needs drivers that come with the VMware-tools vlance should work on all older OS without additional drivers |
| ethernet0.connectionType
= "bridged" ethernet0.connectionType = "hostonly" ethernet0.connectionType = "nat" ethernet0.connectionType = "custom" ethernet0.connectionType = "monitor_dev" |
Sets the connection type. Silently defaults to "bridged" also see additional notes |
| ethernet0.vnet = "vmnet0" ... ethernet0.vnet = "vmnet9" |
Sets the number of the used vmnet. Only use with connection type "custom" also see additional notes |
top
| MAC-address handling |
ethernet0.addressType
= "generated"
ethernet0.generatedAddress = "00:0c:29:40:7e:22" ethernet0.generatedAddressOffset = "0" |
This lines are added automatically
on first start of a VM. If you need a different MAC delete this lines and use those from the next block |
ethernet0.addressType = "static" ethernet0.address = "00:50:56:3e:86:29" |
This settings have to be used to
configure a MAC-address manually. Valid range: 00:50:56:00:00:00 00:50:56:3f:ff:ff |
ethernet0.addressType = "static" ethernet0.addressType = "generated" ethernet0.addressType = "vpx" |
top
| advanced MAC-address handling |
ethernet0.ignoreMACAddressConflict
= "false"
|
I think this is another silent default - usually a Nic will not come up if the same Mac exists on the network. |
ethernet0.noPromisc = "true"
|
This disables - well have a guess
- yes , this disables promiscous-mode. On Linux hosts you must be root to set nics into promiscous mode - read more |
ethernet0.noForgedSrcAddr = "true"
|
This disables spoofing of Mac-address |
ethernet0.reassignMAConResume
= "true"
|
I guess this is another silent default - usually VMware tries to assign the same MAC after resume as it was used before resume. |
| ethernet0.checkMACAddress = "FALSE" | ESX and WS 6.5 - allows to set a MAC outside the usual range (experimental) |
ethernet0.downWhenAddrMismatch
= "false"
|
see knowledgebase |
top
| Tools related settings |
| ethernet0.allowGuestConnectionControl = "false" | Disallow control of connection from
inside the guest. (Only works with guests that have VMware tols installed) Silent default is "true" |
ethernet0.disableMorphToVmxnet
= "false"
|
Vlance-nics magically morph to VMXnet
nics after tools-install. Don't use ... |
top
| Wake on Lan |
ethernet0.wakeOnPcktRcv = "false"
|
Workstation 6 and higher only
Set to "true" to enable WakeOnLan functions Don't specify unless you really need it. |
top
| ESX specific ? |
ethernet0.devName
ethernet0.exclusive ethernet0.pvnID ethernet0.networkName Ethernet0.connectionType = "monitor_dev" Ethernet0.devName = "vmnic0" Ethernet0.networkName = "sciquestprod" |
ESX - specific ? |
top
| Advanced
setup WARNING: don't use this unless you kow what you are doing |
ethernet0.numRecvBuffers
ethernet0.numXmitBuffers ethernet0.rxbw.limit ethernet0.rxbw.queuesize ethernet0.rxfi.droprate ethernet0.rxfi.dropsize ethernet0.txbw.limit ethernet0.txbw.queuesize ethernet0.txfi.droprate ethernet0.txfi.dropsize ethernet0.noReceiveAfterSend ethernet0.yieldAfterSend ethernet0.flashWriteable ethernet0.forcedToBridged |
Fine-tuning: don't ask me |
ethernet0.features
="0"
|
Do you get poor UDP-performance with
vmxnet-device ? Try this - see forumpost May speed up performance when running ghost ... |
ethernet0.allow64bitVmxnet = "true" ethernet0.allow64bitVlance = "true" |
ON 64-bit hosts VMware likes to
assign E1000 - but you can force it to use different adapters by
useing this lines along with the appropriate virtualDev-entries. |
ethernet0.opromsize
= ?
|
Boot ROM size - don't know details |
ethernet0.features = "0x2"
|
Enable TCP Segmentation Offloading
(TSO) for a Windows virtual machine on ESX 2.x Reference: knowledgebase 1465 |
top
| related parameters These parameters are somehow related but not dependant on the main-switch that |
| vlance.noOprom =
"true" vmxnet.noOprom = "true" |
Recent VMware-versions allow Network-boot.
If you know that you don't need this, you can free some memory by using this |
ethernet.e1000.available
= "true"
ethernet.vlance.available = "true" ethernet.morphNICs = "true" ethernet.perfMonInterval = ? |
Don't use |
vnet.dontProbe = "false"
|
Sometimes Windows-guests have problems
to probe the virtual Nics at boot-time: try this Don't use it if you don't need it - it affects performance |
top
There are two different ways to assign Virtual Nets: The easy way uses one out of three options: ethernet0.connectionType = "bridged" ethernet0.connectionType = "hostonly" ethernet0.connectionType = "nat" The expert way uses a combination of 'connectionType' and "vnet" ethernet0.connectionType = "custom" and the exact number of the VNET you want - like ethernet0.vnet = "vmnet0" Lets have an example: you have two bridged networks on Player: vmnet0 and vmnet2 If you use ethernet0.connectionType = "bridged" ethernet1.connectionType = "bridged" the second ethernet device will not come up. If you use ethernet0.connectionType = "custom" ethernet0.vnet = "vmnet0" ethernet1.connectionType = "custom" ethernet1.vnet = "vmnet2" instead - both devices will come up. http://sanbarrow.com/vmx/vmx-network-advanced.html |
Wednesday, February 15, 2017
Launching vmware clients on Linux host using VMware VIX libraries
How to launch VMware Player VMs without GUI
While you can use X11 forwarding over SSH to launch VMware player's GUI from remote locations, it will be rather inconvenient if the SSH connection is slow. Furthermore, the VM launched inside VMware Player's GUI window will automatically be stopped when you close the VMware Player window.
If you would like to start or stop VMware Player VMs without GUI, you can use vmrun which is a command-line utility which one can use to automate operations on VMware virtual machines (VMs). vmrun is contained in VMware VIX API libraries which are freely downloadable from VMware website. You can follow the instructions below to manage VMware Player VMs remotely.
It is assumed that you have already created a VM using VMware Player, and so have *.vmx files ready somewhere. Now you want to start/stop the VM using vmrun. You don't need root permission to use vmrun command.
First, download VMware VIX for Linux, and then install it on the VMware host as follows.
$ sudo ./VMware-VIX-1.11.0-471780.x86_64
Thursday, January 26, 2017
USB drives on VMware ESXI6 servers
http://www.virten.net/2015/10/usb-devices-as-vmfs-datastore-in-vsphere-esxi-6-0/
Information archived below:
USB Devices as VMFS Datastore in vSphere ESXi 6.0
[Update: If you are looking for USB VMFS Datastores in vSphere 6.5, read this article.]
Create VMFS Datastore on USB drives
- Connect to the ESXi host with SSH
- Stop the USB arbitrator service. This service is used to passthrough
USB device from an ESX/ESXi host to a virtual machine. (When disabling
it, you can no longer passthrough USB devices to VMs)
~ # /etc/init.d/usbarbitrator stop
- (optional) Use this command to permanently disable the USB arbitrator service after reboot.
~ # chkconfig usbarbitrator off
- Plug in the USB Device to your ESXi host
- Get the device identifier (mpx.vmhbaXX). You should see the USB Device in /dev/disks/:
~ # ls /dev/disks/
- Write a GPT label to the device (Assuming that the Device ID is mpx.vmhba36)
~ # partedUtil mklabel /dev/disks/mpx.vmhba36\:C0\:T0\:L0 gpt
- To create a partition you need to know the start sector, end sector, which depends on the device size and the GUID.
The start sector is always 2048
The GUID for VMFS is AA31E02A400F11DB9590000C2911D1B8
The end sector can be calculated with the following formula (Use the numbers from getptbl):~ # partedUtil getptbl /dev/disks/mpx.vmhba36\:C0\:T0\:L0 gpt 1947 255 63 31293440
1947 * 255 * 63 - 1 = 31278554
You can also calculate the endsector with the following command:
~ # eval expr $(partedUtil getptbl /dev/disks/mpx.vmhba36\:C0\:T0\:L0 | tail -1 | awk '{print $1 " \\* " $2 " \\* " $3}') - 1 31278554 - Create the VMFS partition (Replace with your endsector)
~ # partedUtil setptbl /dev/disks/mpx.vmhba36\:C0\:T0\:L0 gpt "1 2048 31278554 AA31E02A400F11DB9590000C2911D1B8 0"
- Format the partition with VMFS5
~ # vmkfstools -C vmfs5 -S USB-Stick /dev/disks/mpx.vmhba36\:C0\:T0\:L0:1
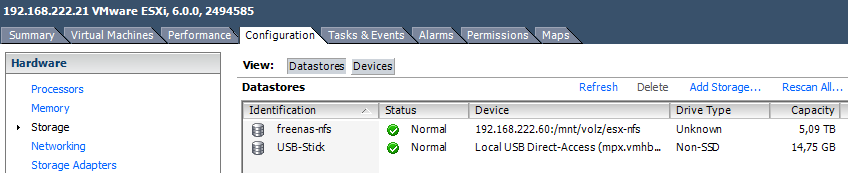
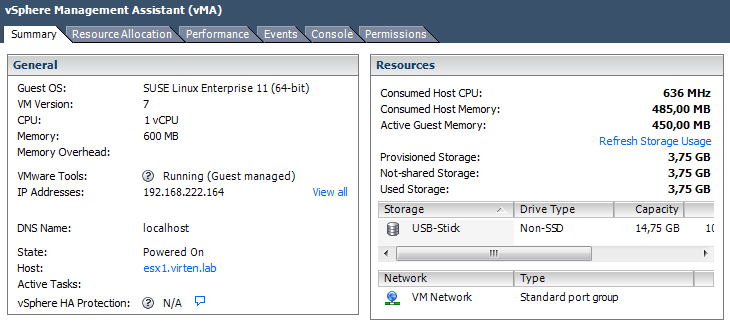
And the final proof is a virtual machine running on it:

This is how your command output should look like:
~ # partedUtil mklabel /dev/disks/mpx.vmhba43\:C0\:T0\:L0 gpt
~ # eval expr $(partedUtil getptbl /dev/disks/mpx.vmhba43\:C0\:T0\:L0 | tail -1 | awk '{print $1 " \\* " $2 " \\* " $3}') - 1
31278554
~ # partedUtil setptbl /dev/disks/mpx.vmhba43\:C0\:T0\:L0 gpt "1 2048 31278554 AA31E02A400F11DB9590000C2911D1B8 0"
gpt
0 0 0 0
1 2048 31278554 AA31E02A400F11DB9590000C2911D1B8 0
~ # vmkfstools -C vmfs5 -S USB-Stick /dev/disks/mpx.vmhba43\:C0\:T0\:L0:1
create fs deviceName:'/dev/disks/mpx.vmhba43:C0:T0:L0:1', fsShortName:'vmfs5', fsName:'USB-Stick'
deviceFullPath:/dev/disks/mpx.vmhba43:C0:T0:L0:1 deviceFile:mpx.vmhba43:C0:T0:L0:1
ATS on device /dev/disks/mpx.vmhba43:C0:T0:L0:1: not supported
.
Checking if remote hosts are using this device as a valid file system. This may take a few seconds...
Creating vmfs5 file system on "mpx.vmhba43:C0:T0:L0:1" with blockSize 1048576 and volume label "USB-Stick".
Successfully created new volume: 56226b60-118f2e3f-04ba-001b2193b3b0
[Update: October 19. 2015 - Figured out why devices are detected as USB 2. Devices now with full USB 3.0 performance. Performance test results updated.]
http://www.virten.net/2015/10/usb-3-0-devices-detected-as-usb-2-in-esxi-6-0-and-5-5/
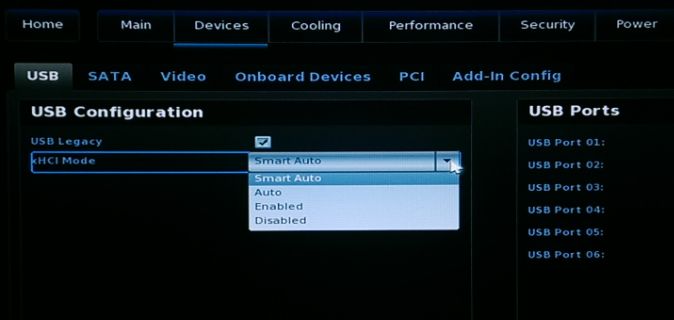
USB 3.0 devices detected as USB 2 in ESXi 6.0 and 5.5

Within the UEFI the xHCI mode is configurable with a default of "Smart Auto". According to the documentation, in "Smart Auto" mode the USB 3.0 port acts like a 2.0 port before OS USB 3.0 drivers are loaded. For whatever reason, this does not work properly with ESXi. After setting xHCI Mode to "Enabled", all devices are correctly identified as USB 3.0.
During my tests I've use two USB 3.0 capable devices on my 5th Gen Intel NUC (NUC5i5MYHE):
- External 1TB 2.5" HDD (Seagate RSS LLC FreeAgent GoFlex USB 3.0)
- USB 3.0 to mSATA SSD Enclosure (ASMedia Technology Inc.)
Both devices are connected to "Bus 001", which is the 2.0 root hub:
~ # vmware -v VMware ESXi 6.0.0 build-3073146 ~ # lsusb Bus 001 Device 007: ID 0bc2:5031 Seagate RSS LLC FreeAgent GoFlex USB 3.0 Bus 001 Device 006: ID 174c:1153 ASMedia Technology Inc. Bus 001 Device 003: ID 0930:6545 Toshiba Corp. Kingston DataTraveler 102 Flash Drive / HEMA Flash Drive 2 GB / PNY Attache 4GB Stick Bus 001 Device 002: ID 8087:8001 Intel Corp. Bus 003 Device 001: ID 1d6b:0003 Linux Foundation 3.0 root hub Bus 002 Device 001: ID 1d6b:0002 Linux Foundation 2.0 root hub Bus 001 Device 001: ID 1d6b:0002 Linux Foundation 2.0 root hub ESXi 5.5 with xHCI Mode "Smart Auto"
Same problem here. Both devices on "Bus 001".
~ # vmware -v VMware ESXi 5.5.0 build-3116895 ~ # lsusb Bus 001 Device 008: ID 0bc2:5031 Seagate RSS LLC FreeAgent GoFlex USB 3.0 Bus 001 Device 007: ID 174c:1153 ASMedia Technology Inc. Bus 001 Device 003: ID 0930:6545 Toshiba Corp. Kingston DataTraveler 102 Flash Drive / HEMA Flash Drive 2 GB / PNY Attache 4GB Stick Bus 001 Device 002: ID 8087:8001 Intel Corp. Bus 003 Device 001: ID 1d6b:0003 Linux Foundation 3.0 root hub Bus 002 Device 001: ID 1d6b:0002 Linux Foundation 2.0 root hub Bus 001 Device 001: ID 1d6b:0002 Linux Foundation 2.0 root hub You can also use the lsusb -v command to see a verbose output containing the USB version (2.10):
~ # lsusb -v Bus 001 Device 008: ID 0bc2:5031 Seagate RSS LLC FreeAgent GoFlex USB 3.0 Device Descriptor: bLength 18 bDescriptorType 1 bcdUSB 2.10 bDeviceClass 0 (Defined at Interface level) [...] Bus 001 Device 007: ID 174c:1153 ASMedia Technology Inc. Device Descriptor: bLength 18 bDescriptorType 1 bcdUSB 2.10 [...] The problem described here applies only if you see a USB 3.0 root hub but devices are connected to the wrong hub. If you do not see the USB 3.0 hub you have to verify that the xhci module is enabled and loaded with:
~ # esxcli system module list |grep xhci Name Is Loaded Is Enabled xhci true true To enable it (Load it automatically on boot):
~ # esxcli system module set -e true -m xhci To load it while ESXi is running:
~ # vmkload_mod xhci xHCI Mode "Enabled"
After setting the xHCI Mode to "Enabled" in the UEFI, both devices are connected to the USB 3.0 hub:
~ # vmware -v VMware ESXi 5.5.0 build-3116895 ~ # lsusb Bus 002 Device 002: ID 174c:1153 ASMedia Technology Inc. Bus 002 Device 004: ID 0bc2:5031 Seagate RSS LLC FreeAgent GoFlex USB 3.0 Bus 001 Device 002: ID 0930:6545 Toshiba Corp. Kingston DataTraveler 102 Flash Drive / HEMA Flash Drive 2 GB / P Attache 4GB Stick Bus 002 Device 001: ID 1d6b:0003 Linux Foundation 3.0 root hub Bus 001 Device 001: ID 1d6b:0002 Linux Foundation 2.0 root hub ~ # vmware -v VMware ESXi 6.0.0 build-3073146 ~ # lsusb Bus 002 Device 002: ID 174c:1153 ASMedia Technology Inc. Bus 002 Device 004: ID 0bc2:5031 Seagate RSS LLC FreeAgent GoFlex USB 3.0 Bus 001 Device 002: ID 0930:6545 Toshiba Corp. Kingston DataTraveler 102 Flash Drive / HEMA Flash Drive 2 GB / PNY Attache 4GB Stick Bus 002 Device 001: ID 1d6b:0003 Linux Foundation 3.0 root hub Bus 001 Device 001: ID 1d6b:0002 Linux Foundation 2.0 root hub lsusb -v Bus 002 Device 003: ID 174c:1153 ASMedia Technology Inc. Device Descriptor: bLength 18 bDescriptorType 1 bcdUSB 3.00 [...]
Sunday, January 8, 2017
vmware convert virtual ide to virtual scsi disk image
https://kb.vmware.com/selfservice/microsites/search.do?language=en_US&cmd=displayKC&externalId=1016192
- Virtual machine contains an IDE virtual disk as the primary operating system bootable disk after conversion from physical source.
- Virtual machine has an IDE virtual disk but the additional secondary virtual disks are SCSI with an LSI or Bus Logic controller.
- Virtual machine fails to start with only a black screen after conversion with possible underscore. The primary disk is an IDE virtual disk but LSI or Bus Logic was selected during conversion.
- After conversion using P2V, the virtual machine fails to start.
- Virtual machines created after P2V fails to start between 95% and 99%.
- After powering off a virtual machine, you are unable to increase the size of its hard disk(s) when the disk is not SCSI based.
- Increasing the size of hard disk when the disk that is not SCSI based fails with the error:
Failed to extend disk : The file specified is not a virtual disk
Solution:
When converting a physical machine to a virtual machine using VMware Converter or vCenter Converter Enterprise, if an adapter type is not selected during the initial customization the resulting virtual machine may contain an IDE disk as the primary operating system disk.
You must convert the IDE disk to SCSI to get the best performance. If the primary disk is an IDE virtual disk, the newly converted virtual machine may fail to start because the guest operating system does not support the driver. This issue may occur because, in ESX 4.x the default disk type for Windows XP 32-bit virtual machine creation is IDE. This default value can be manually changed during the virtual machine creation wizard by selecting the custom option. Windows XP 64 bit will still use SCSI by default.
To convert the IDE disk to SCSI:
- Download the driver (LSI20320-R controller) from the Avago.
Note: The preceding link was correct as of April 22, 2015. If you find the link is broken, provide a feedback and a VMware employee will update the link. - Power off the virtual machine.
- From the Edit Settings menu for this virtual machine:
- Go to Add > Hard Disk > Create New Virtual Disk.
- Change the Capacity to 1 GB and click Next.
- Ensure that the Virtual Device Node is set to SCSI.
- Complete the wizard and select the New SCSI Controller.
- If the current type is not LSI Logic Parallel Select Change Type, change the type to LSI Logic Parallel.
- Click OK.
- Choose the same controller as in Step 4 as the adapter type. The SCSI ID should read SCSI 0:0.
- Power on the virtual machine.
- Follow the Found New Hardware wizard or in the Windows device manager inside the Windows guest and select the unknown device.
- Right-click Update Driver and select the LSILogic SCSI controller driver downloaded earlier. This installs the drivers for the LSILogic SCSI controller inside the guest operating system.
- Power off the virtual machine.
- Locate the datastore path where the virtual machine resides.
For example:
# cd /vmfs/volumes/datastore_name/vm_name/
- From the ESX Service Console, open the primary disk (.vmdk) using the vi editor. For more information, see Editing files on an ESX host using vi or nano (1020302).
- Look for the line:
ddb.adapterType = "ide"
- To change the adapter type to LSI Logic change the line to:
ddb.adapterType = "lsilogic"
To change the adapter type to Bus Logic change the line to:
ddb.adapterType = "buslogic"
In some instances the entry appears as ddb.adapterType = "legacyESX". In this case change the line to:
ddb.adapterType = "lsilogic"
- Save the file.
- From VMware Infrastructure/vSphere Client:
- Click Edit Settings for the virtual machine.
- Select the IDE virtual disk.
- Choose to Remove the Disk from the virtual machine.
- Click OK.
Caution: Do not choose delete from disk.
- From the Edit Settings menu for this virtual machine:
- Go to Add > Hard Disk > Use Existing Virtual Disk.
- Navigate to the location of the disk and select to add it into the virtual machine.
- Choose the same controller as in Step 9 as the adapter type. The SCSI ID should read SCSI 0:0.
- If a CDROM device exists in the virtual machine it may need to have the IDE channel adjusted from IDE 0:1 to IDE 0:0. If this option is greyed out, remove the CD-ROM from the virtual machine and add it back. This sets it to IDE 0:0.