Good example of how to secure mongodb internally. The server is secured from the internet in case any mischief tries to burrow in directly. Also secures inside the house paths.
https://www.cyberciti.biz/faq/how-to-secure-mongodb-nosql-production-database/
Additional link in the article with other securing tips:
https://www.cyberciti.biz/tips/linux-security.html
Info copied here in case above link dies.
MongoDB ransom attacks are in Wild. I am
using it for storing data on my public facing cloud server powered by
Ubuntu Linux. How do I protect and secure my MongoDB nosql server on
Linux or Unix operating system?
MongoDB is a free and open-source NoSQL document database server. It is
used by web application for storing data on a public facing server.
Securing MongoDB is critical. Crackers and hackers are accessing
insecure MongoDB for stealing data and deleting data from unpatched or
badly-configured databases. In this tutorial you will learn about
how to secure a MongoDB instance or server running cloud server.
MongoDB config
- The default file is located at /etc/mongodb.conf
- The default port is TCP 27017
- MongoDB server version: 3.4.1
Limit network exposure
Edit the /etc/mongodb.conf or /usr/local/etc/mongodb.conf file, enter:
$ sudo vi /etc/mongodb.conf
If your web-app and MongoDB (mongod server) installed on the same
machine, set the IP address of MongoDB to 127.0.0.1. This cuts
communication directly from the internets:
# network interfaces
net:
  port: 27017
  bindIp: 127.0.0.1
However, it is possible that you have two or more servers as follows:
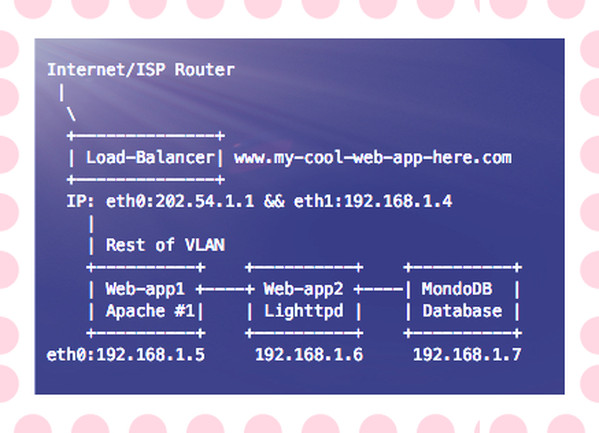
Fig.01: A sample modern web-app with MonoDB running inside your VLAN
You need to bind mongod to 192.168.1.7 so that it can be only accessed over VLAN:
bindIp: 192.168.1.7
The
bind_ip directive Ensure that MongoDB runs in a trusted network
environment and limit the interfaces on which MongoDB instances listen
for incoming connections.
Change the default port
You can also change the default port if you want. In this example set it to 2727:
port: 2727
Save and close the file. You need to restart MongoDB, enter:
$ sudo systemctl restart mongod OR if you are using FreeBSD Unix:
# service mongod restart Verify open ports with netstat command:
$ netstat -tulpn
 $ ss -tulpn
 $ sockstat #freebsd unix command
 $ ss -tulpn | grep 27017
 $ netstat -tulpn | grep 27017
Sample outputs:
tcp 0 0 127.0.0.1:27017 0.0.0.0:* LISTEN 6818/mongod
Setup access control
You
need to add a user administrator to a MongoDB instance running without
access control and then enables access control. By default anyone can
connect to the MongoDB and this is not a good idea. For example:
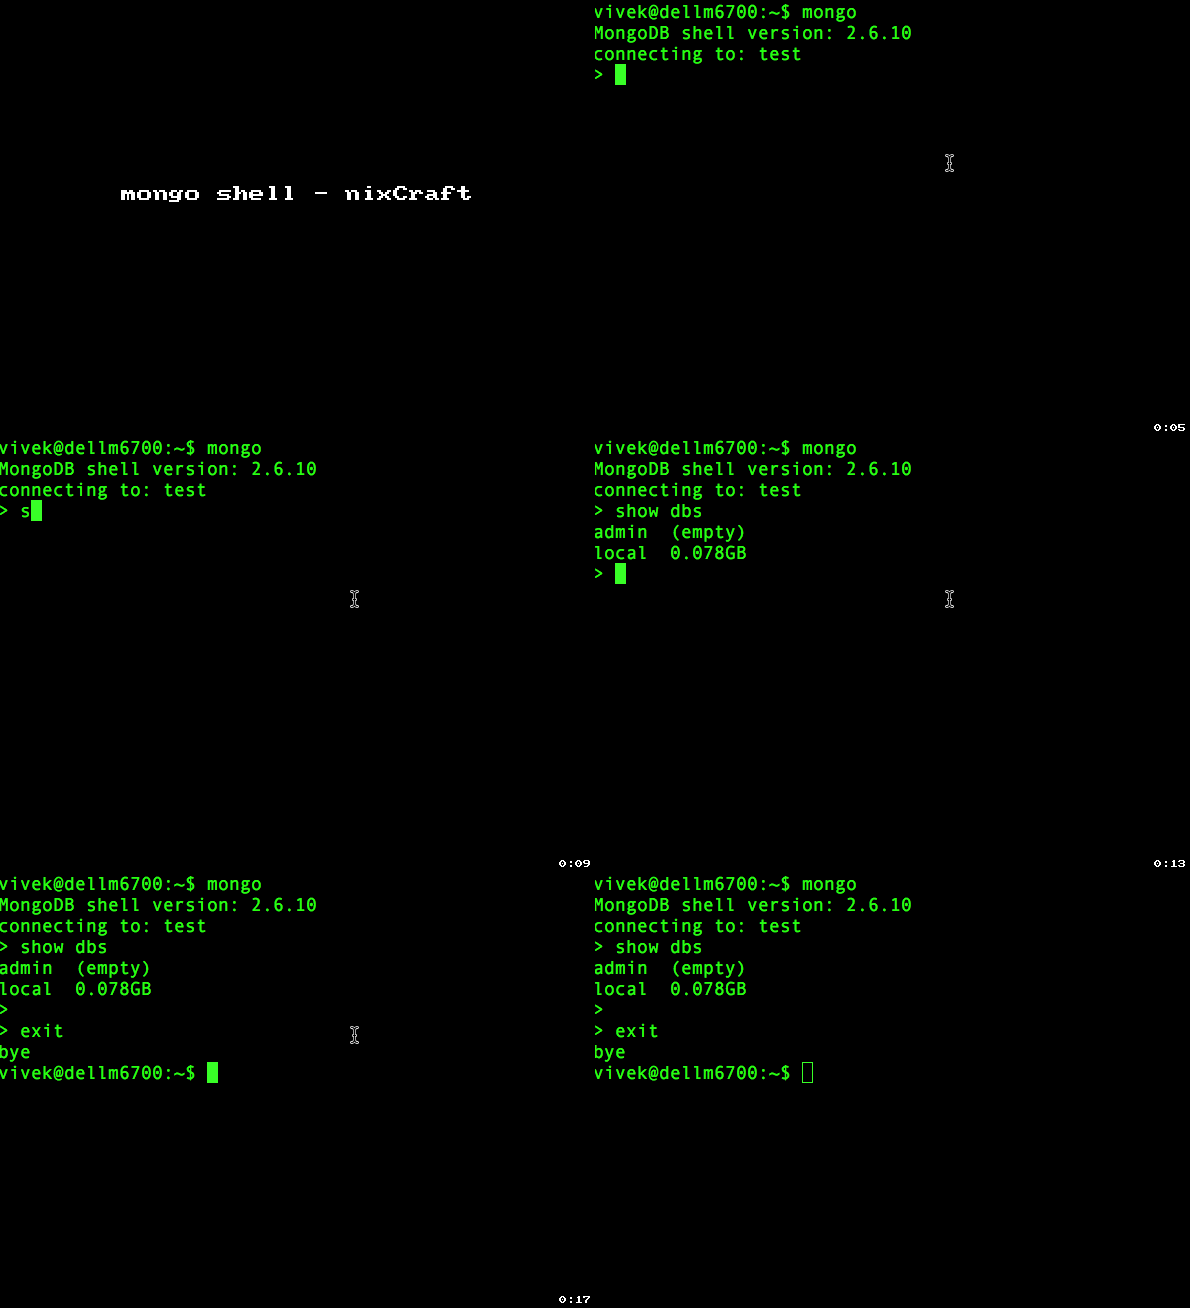
Animated gif 01: Connect a mongo shell to the instance with any sort of authentication
Connect to the DB instance
$ mongo
 ## or ##
 $ mongo --port 2727
 MongoDB shell version: 2.6.10
 connecting to: test
Create the user administrator
Warning: Create user with strong password. For demo purpose I am using ‘mySuperSecretePasswordHere’ but you should use strong password.
You need to use admin database. Type the following command at > prompt to create your superuser:
> use admin
 switched to db admin
Next creates the user vivek in the admin database with the userAdminAnyDatabase role:
> db.createUser({user:"vivek",pwd:"mySuperSecretePasswordHere", roles:[{role:"userAdminAnyDatabase",db:"admin"}]}) Sample outputs:
Successfully added user: {
 "user" : "vivek",
 "roles" : [
  {
   "role" : "userAdminAnyDatabase",
   "db" : "admin"
  }
 ]
}
Disconnect the mongo shell by typing the following command:
> exit
 bye
 $
Re-start the MongoDB instance
Edit the /etc/mongodb.conf or /usr/local/etc/mongodb.conf file, enter:
$ sudo vi /etc/mongodb.conf Turn on security:
security:
  authorization: enabled
Save and close the file. Re-start the MongoDB instance:
$ sudo systemctl restart mongodb OR if you are using FreeBSD Unix:
# service mongod restart To authenticate during connection using user vivek and password for the admin database:
$ mongo -u vivek -p mySuperSecretePasswordHere --authenticationDatabase admin Add additional user to your DB. First create a new database called “nixcraft”:
> use nixcraft
 switched to db nixcraft
Create a user named ‘nixdbuser’ with a password named ‘myKoolPassowrd’ for nixcraft db:
   db.createUser(
     {
       USER: "nixdbuser",
       pwd: "myKoolPassowrd",
       roles: [ { ROLE: "readWrite", db: "nixcraft" },
                { ROLE: "read", db: "reporting" } ]
     }
   )
|
Sample outputs:
Successfully added user: {
 "user" : "nixdbuser",
 "roles" : [
  {
   "role" : "readWrite",
   "db" : "nixcraft"
  },
  {
   "role" : "read",
   "db" : "reporting"
  }
 ]
}
You can now connect to nixcraft db as follows:
$ mongo --port 27017 -u "nixdbuser" -p "myKoolPassowrd" --authenticationDatabase "nixcraft"
This make sure only authorized admin user named ‘vivek’ can execute
commands or nixdbuser can do read/write operation on nixcraft db. You
can verify it as follows by inserting records:
> use nixcraft
 > db
 > db.names.insert({"title":"Mr", "last":"Gite", "First":"Vivek"})
 > db.names.find()
 > show dbs
Sample outputs:
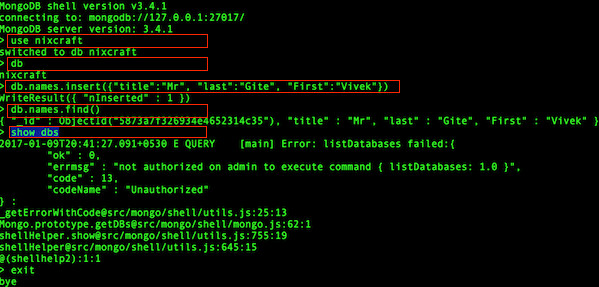
Fig.02: Enabled access control and enforce authentication
Use firewall
Use firewalls to restrict which other entities are allowed to connect to your mongodb server. In this example only
allow your application servers access to the database using ufw on Ubuntu or Debian Linux:
$ sudo ufw allow proto tcp from 192.168.1.5 to 192.168.1.7 port 27017
 $ sudo ufw allow proto tcp from 192.168.1.6 to 192.168.1.7 port 27017
Enable SSL
Use
SSL between your MongoDB client and server when connecting to your
Mongodb server over the internet. Otherwise your session is open for the
“man in the middle” attack. My setup is as follows:
  mongodb-server: 127.0.0.1
  mongodb-client: 127.0.0.1
  Common Name (e.g. server FQDN or YOUR name) []: 127.0.0.1
  The PEM pass phrase for server: mongodb_server_test_ssl
  The password/passphrase for client: mongodb_client_test_ssl
Type the following command the server certificate
$ sudo mkdir /etc/ssl/mongodb/
 $ cd /etc/ssl/mongodb/
 $ sudo openssl req -new -x509 -days 365 -out mongodb-server-cert.crt -keyout mongodb-server-cert.key
Sample outputs:
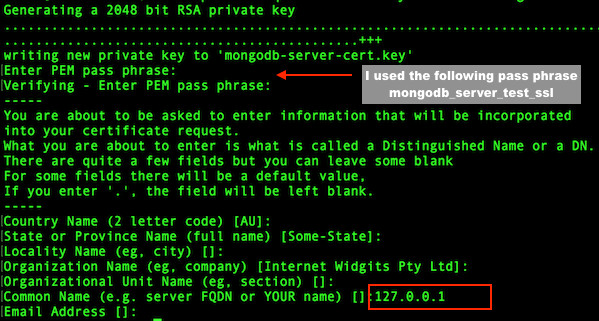
Fig.03: MongoDB SSL setup server certificate
Create the server .pem file with both key and certificate:
$ cd /etc/ssl/mongodb/
 $ sudo bash -c 'cat mongodb-server-cert.key mongodb-server-cert.crt > mongodb-server.pem'
Type the following command the client certificate
$ cd /etc/ssl/mongodb/
 $ sudo openssl req -new -x509 -days 365 -out mongodb-client-cert.crt -keyout mongodb-client-cert.key
Sample outputs:
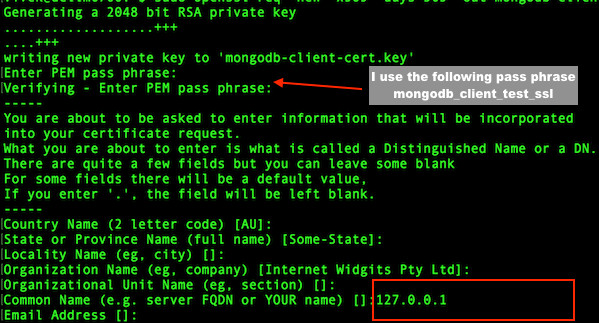
Fig.04: MongoDB SSL setup client certificate
Create the client .pem file with both key and certificate:
$ cd /etc/ssl/mongodb/
 $ sudo bash -c 'cat mongodb-client-cert.key mongodb-client-cert.crt > mongodb-client.pem'
Configure mongod and mongos for TLS/SSL server
Edit the /etc/mongodb.conf or /usr/local/etc/mongodb.conf file, enter:
$ sudo vi /etc/mongodb.conf Update the config file as follows:
# network interfaces
net:
  port: 27017
  bindIp: 127.0.0.1
  ssl:
     mode: requireSSL
     PEMKeyFile: /etc/ssl/mongodb/mongodb-server.pem
     CAFile: /etc/ssl/mongodb/mongodb-client.pem
     PEMKeyPassword: mongodb_server_test_ssl
|
Save and close the file. Re-start the MongoDB instance:
$ sudo systemctl restart mongodb OR if you are using FreeBSD Unix:
# service mongod restart
TLS/SSL Configuration for MongoDB clients
The syntax is as follows for mongo shell interface:
$ mongo --ssl --sslCAFile /etc/ssl/mongodb/mongodb-server.pem \
 --sslPEMKeyFile /etc/ssl/mongodb/mongodb-client.pem \
 --sslPEMKeyPassword mongodb_client_test_ssl \
 --host 127.0.0.1 --port 27017 \
 --u "nixdbuser" -p "myKoolPassowrd" --authenticationDatabase "nixcraft"
Sample outputs:
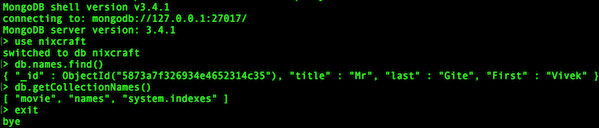
Fig.05: MongoDB SSL client connection using SSL certificate
And here is a Python client for connection to SSL enabled MongoDB:
client = pymongo.MongoClient('127.0.0.1', ssl=True)
|
OR
client = pymongo.MongoClient('127.0.0.1',
                              ssl=True,
                              ssl_certfile='/etc/ssl/mongodb/mongodb-client.pem',
                              ssl_keyfile='/etc/ssl/mongodb/mongodb-server.pem',
                              ssl_pem_passphrase=mongodb_client_test_ssl)
|
Patch and run updated version of your OS and MongoDB
Applying
security patches is an important part of maintaining Linux or Unix
server. Linux provides all necessary tools to keep your system updated,
and also allows for easy upgrades between versions. See “
20 Linux Server Hardening Security Tips” for more information.
