Showing posts with label esxi 6. Show all posts

Friday, September 12, 2025

Command line commands on esxi 6 and other esxi

Networking and esxcli on esxi command line
 
 
~ # esxcli network ip 
Usage: esxcli network ip {cmd} [cmd options]

Available Namespaces:
  dns                   Operations pertaining to Domain Name Server configuration.
  interface             Operations having to do with the creation, management and deletion of VMkernel network interfaces (vmknic).
  ipsec                 Operations on Internet Protocol Security
  route                 Operations pertaining to route configuration
  connection            List active tcpip connections
  neighbor              Operations that can be performed on arp tables

 # esxcli network ip interface list
vmk0
   Name: vmk0
   MAC Address: 6c:62:6d:a3:2e:c2
   Enabled: true
   Portset: vSwitch0
   Portgroup: Management Network
   VDS Name: N/A
   VDS UUID: N/A
   VDS Port: N/A
   VDS Connection: -1
   MTU: 1500
   TSO MSS: 65535
   Port ID: 33554436
 # esxcli network ip interface ipv4 get
Name  IPv4 Address    IPv4 Netmask   IPv4 Broadcast  Address Type  DHCP DNS
----  --------------  -------------  --------------  ------------  --------
vmk0  172.16.0.10     255.255.255.0  172.16.0.255    STATIC           false
 
~ # esxcli network ip neighbor list
Neighbor                   Mac Address        Vmknic    Expiry  State    
-------------------------  -----------------  ------  --------  ---------
172.16.0.2                 00:1f:ca:88:96:8c  vmk0    1139 sec           
fe80::6e62:6dff:fea3:2ec2  6c:62:6d:a3:2e:c2  vmk0       0 sec  Reachable
~ # esxcli network ip route ipv4 list
Network       Netmask        Gateway       Interface  Source
------------  -------------  ------------  ---------  ------
default       0.0.0.0        172.16.200.2  vmk0       MANUAL
172.16.200.0  255.255.255.0  0.0.0.0       vmk0       MANUAL
 # esxcfg-route
VMkernel default gateway is 172.16.200.2

To make routing changes on the command line use the esxcli network ip route ipv4 add command.

https://knowledge.broadcom.com/external/article/324496/link-state-up-or-down-for-a-vmnic-interf.html

https://blog.technodrone.cloud/2011/09/netstat-for-esxi.html

-30-- 

Friday, September 24, 2021

vmware esxi problems some solutions redirect to serial for boot, or merge modules. Intel NUC as server


System:
**********
install ESXi, stop on "Relocating modules and starting up the kernel" 
My computer is Intel NUC5PPYH, the processor is a 14nm Pentium n3700.

**********

serial port info

I came across the same problem on a bay-trail based system.  I had to do the following:

1) set BIOS "max cpuid value limit" to disable

2) Redirect the Direct Console to a Serial Port by Setting the Boot Options Manually

     - At startup press Shift+O and append the following boot options

     "gdbPort=none logPort=none tty2Port=com1";

3) connect a null modem cable from the esxi host pc to another pc.  This will allow you to finish the install and see further messages if there are more issues.

4) after installation completes, boot up the host and repeat steps 3 and 4 (if the screen continues to show the "relocating modules" mesg)

- the relocating modules message has something with ESXI not liking the video card.  Anyways, this just means you won't be able to use the local display to manage ESXI but you can still use vshpere client to manage the system remotely.

5) setup your management ip and launch the vsphere client to manage your new esxi host.

Hope this helps.  Good luck!


************************

esxi 6.5


I successfully installed VMware ESXi 6.5 on my NUC5PPYH (Intel Pentium N3700, 8GB RAM, 256GB SSD) using these steps on Windows 10:

  • Configured a static DHCP lease on my router for the MAC address of the NUC
  • Updated BIOS to latest version 0059, loading BIOS defaults
  • Downloaded and installed VMware-PowerCLI-6.5.0-4624819.exe
  • Downloaded ESXi-Customizer-PS-v2.5.ps1
  • Downloaded and installed rufus-2.12.exe
  • Downloaded ESXi drivers for onboard network and SATA : net55-r8168-8.039.01-napi.x86_64.vib, sata-xahci-1.39-1.x86_64.vib
  • Created an empty C:\Temp directory and put the .vib files in there
  • Ran the customizer PS script like so: .\ESXi-Customizer-PS-v2.5.ps1 -pkgDir C:\Temp
  • Wrote the created ESXi-6.5.0-20170104001-standard-customized.iso on a USB stick using Rufus
  • Wrote a kickstart file (see below) and copied it as ks.cfg on the USB stick
  • Ejected the USB stick from Windows, put it in the NUC and booted it
  • Pressed Shift + O when the ESXi installer started booting up
  • Changed the command line to: > runweasel ks=usb:/ks.cfg
  • Waited for about 15 minutes for the installer to finish

Since the system is lacking support for the Braswell graphic chip you wont see anything on the screen happening besides that last line "Relocating modules and starting up the kernel...".

Just ignore it. :smileycool:

Please note that the ks.cfg script will erase all contents of the drive inside the NUC!

----<snip>----

# ks.cfg: scripted installation file for ESXi 6.5 installation

# Accept the VMware End User License Agreement

vmaccepteula

# Set the root password for the DCUI and Tech Support Mode

rootpw mypassword

# Install on the first local disk available on machine

clearpart --firstdisk --overwritevmfs

install --firstdisk=local --overwritevmfs

# Set the network to DHCP on the first network adapter

network --bootproto=dhcp

# reboots the host after the scripted installation is completed

reboot

# enable SSH and the ESXi shell

%firstboot --interpreter=busybox

vim-cmd hostsvc/enable_ssh

vim-cmd hostsvc/start_ssh

vim-cmd hostsvc/enable_esx_shell

vim-cmd hostsvc/start_esx_shell

----<snap>----


**************************************

This description Worked for me on my Intel NUC5PPYH

But I made a minor change in the ks.cfg:

# Set the network to DHCP on the first network adapter

network --bootproto=dhcp --device=vmnic0


**************************************

Another formula

**************************************

I had to try several times until I got it working:

THIS IS A GUIDE TO INSTALL ESXI FROM - AND INSTALL ONTO THE SAME -  USB-STICK

1.)  BIOS: reset to default ! and DISABLE UEFI boot - leave only legacy usb (if you leave uefi the shift+o commands will be ignored)

2.)  Remove ANY HDD/SSD/WHATEVER from the NUC - you will add it again later

3.)  Make the aforementioned boot stick from rhoenies post.

4.)  Make a ks.cfg file on the stick with the following content

----<snip>----

vmaccepteula

rootpw whatever

network --bootproto=dhcp

clearpart --firstdisk --overwritevmfs

install --firstdisk --overwritevmfs --novmfsondisk

reboot

----<snap>----

5.) Plug the stick into your NUC and press Shift+O at the ESXI bootloader

6.) Type:     >runweasel ks=usb:/ks.cfg ignoreHeadless=TRUE            and press Enter

7.) ESXi will now be installed (takes about 15 Minutes) - then the machine will reboot

8.) After reboot your NUC will complain: "no disk found" - reboot and enter BIOS

9.) Enable UEFI boot and check the box at "Boot usb disk first". Check "suppress alert messages" too.

11.) Save bios and shutdown -> Now you can reinstall your HDD/SSD

12.) Remove the stick from your NUC, plug it into you computer and make following change inside BOOT.CFG: "kernelopt= installerDiskDumpSlotSize=2560 no-auto-partition ignoreHeadless=TRUE"

13.) Now plug your stick back in and enjoy your fully working ESXi host by just acccessing it over https://IP-ADDRESS/ui

14.) After trying every bios option possible I gave up: you can't run a NUC5PPYH without a monitor or a vga dummy connected. So if you plan on running your NUC complete headless I recommend ordering a 5$ hdmi dummy.

If you encounter Problems it is usually related to your USB-Stick. You can try this:

>runweasel ks=usb:/ks.cfg ignoreHeadless=TRUE preferVmklinux=TRUE

But if it doesn't help try a different USB-Stick. I recommend not to use a USB 3.0 capable one.


******************************

--30--

Saturday, June 1, 2019

notes on accessing vmware esxi remotely

Notes on monitoring ESXI 6

SSH remote access

  1. Generate public/private keys. For more information, see the OpenBSD Reference Manual section in the OpenBSD.

    Note: The preceding link was valid as of June 22, 2016. If you find the link to be broken, provide feedback on the article and a VMware employee will update the article as necessary.

    Notes:
    • These instructions generate two files in ~/.ssh: id_rsa and id_rsa.pub.
    • In ESXi 5.x, the ssh-keygen command is located at /usr/lib/vmware/openssh/bin.
       
  2. On the remote host, store the public key content, id_rsa.pubin ~/.ssh/authorized_keys.

    Notes:
     
    • For ESXi 5.x, 6.0 and 6.5, the authorized_keys is located at: /etc/ssh/keys-<username>/authorized_keys
    • More than one key can be stored in this file.
       
  3. To allow root access, change PermitRootLogin no to PermitRootLogin yes in the /etc/ssh/sshd_config file.
  4. To disable password login, ensure that the ChallengeResponseAuthentication and PasswordAuthentication are set to no.
  5. Reload the service:
     
    • For ESXi, run the command:

      /etc/init.d/SSH restart
       
    • For ESX, run the command:

      service sshd reload

https://kb.vmware.com/s/article/1002866

Accessing process information (ps command)

https://kb.vmware.com/s/article/1010993

  1. Run the minimalized ps command:
    ps -Tcjstv
    The output shows information such PID, command-line used, and state.
  2. To generate output for certain processes and maintain a title row, run this command:

    ps -Tcjstv | egrep "WID|{proc-name}"
  3. The esxcfg-info command can offer some detail on process memory and CPU and is contained in the vm-support dumps. Process information in esxcfg-info is contained in sections called Groups, but the groups can be cumbersome to sift through.
    Grep these groups for information on process memory and CPU with the command:
    esxcfg-info | egrep -A85 "Group Id" | egrep "Group Name|Group Id|Total CPU|Total Memory|Used Time|Parent Id|----Active\.\.\.\." | less
  4. To check for file-system issues, run this command:

    stat –f {filesystem}

    Note:
    This checks inode use, from which a runaway process can sometimes be determined (even if you do not know exactly what files are involved).
    To check across all filesystems, run this command:

    stat -f `df | grep -v "Filesystem" | awk '{print $6}'` | egrep "File|Inodes"
  5. To view network connection (socket) details, run this command:

    esxcli network connection list
    Note: For ESXi 5.x and later, run this command:

    esxcli network ip connection list


--30--

Tuesday, March 7, 2017

vmx network setting notes


Vmware notes on selecting network adapters


https://kb.vmware.com/selfservice/microsites/search.do?language=en_US&cmd=displayKC&externalId=1001805

Advanced network settings
VMX-file parameters

Basic setup
MAC address handling
ESX - specific
VMware-tools related Wake on LAN
Advanced setup - experts only Advanced MAC address handling - experts only

other parameters related to network


Basic setup - see basic table for reasonable blocks

ethernet0.present = "false" Main-switch: set to "true" to enable the device.
This parameter works like a mainswitch - if it is set to "true" all other parameters related to the same device are parsed. If it is set to "false" the other parameters are ignored.

ethernet0.startConnected = "true" Silently defaults to "true"
set ito "false" f you don't want the nic to be connected at boot

ethernet0.virtualDev = "vlance"
ethernet0.virtualDev = "vmxnet"
ethernet0.virtualDev = "e1000"
On current VMware-versions you can use any of these 3
e1000 performs best but your OS may not come with the drivers
vmxnet needs drivers that come with the VMware-tools
vlance should work on all older OS without additional drivers

ethernet0.connectionType = "bridged"
ethernet0.connectionType = "hostonly"
ethernet0.connectionType = "nat"
ethernet0.connectionType = "custom"

ethernet0.connectionType = "monitor_dev"
Sets the connection type.
Silently defaults to "bridged"

also see additional notes

ethernet0.vnet = "vmnet0"
...
ethernet0.vnet = "vmnet9"
Sets the number of the used vmnet.
Only use with connection type "custom"
also see additional notes

top


MAC-address handling

ethernet0.addressType = "generated"
ethernet0.generatedAddress = "00:0c:29:40:7e:22"
ethernet0.generatedAddressOffset = "0"
This lines are added automatically on first start of a VM.
If you need a different MAC delete this lines and use those from the next block


ethernet0.addressType = "static"
ethernet0.address = "00:50:56:3e:86:29"
This settings have to be used to configure a
MAC-address manually.

Valid range:
00:50:56:00:00:00
00:50:56:3f:ff:ff


ethernet0.addressType = "static"
ethernet0.addressType = "generated"
ethernet0.addressType = "vpx"

top


advanced MAC-address handling

ethernet0.ignoreMACAddressConflict = "false"
I think this is another silent default - usually a Nic will not come up if the same Mac exists on the network.

ethernet0.noPromisc = "true"
This disables - well have a guess - yes , this disables promiscous-mode.
On Linux hosts you must be root to set nics into promiscous mode - read more

ethernet0.noForgedSrcAddr = "true"
This disables spoofing of Mac-address

ethernet0.reassignMAConResume = "true"
I guess this is another silent default - usually VMware tries to assign the same MAC after resume as it was used before resume.

ethernet0.checkMACAddress = "FALSE"
ESX and WS 6.5 - allows to set a MAC outside the usual range (experimental)
ethernet0.downWhenAddrMismatch = "false"
see knowledgebase

top


Tools related settings

ethernet0.allowGuestConnectionControl = "false" Disallow control of connection from inside the guest.
(Only works with guests that have VMware tols installed)
Silent default is "true"

ethernet0.disableMorphToVmxnet = "false"
Vlance-nics magically morph to VMXnet nics after tools-install.
Don't use ...

top


Wake on Lan

ethernet0.wakeOnPcktRcv = "false"
Workstation 6 and higher only
Set to "true" to enable WakeOnLan functions
Don't specify unless you really need it.

top


ESX specific ?

ethernet0.devName
ethernet0.exclusive
ethernet0.pvnID
ethernet0.networkName

Ethernet0.connectionType = "monitor_dev"
Ethernet0.devName = "vmnic0"
Ethernet0.networkName = "sciquestprod"
ESX - specific ?

top


Advanced setup
WARNING: don't use this unless you kow what you are doing

ethernet0.numRecvBuffers
ethernet0.numXmitBuffers

ethernet0.rxbw.limit
ethernet0.rxbw.queuesize
ethernet0.rxfi.droprate
ethernet0.rxfi.dropsize

ethernet0.txbw.limit
ethernet0.txbw.queuesize
ethernet0.txfi.droprate
ethernet0.txfi.dropsize

ethernet0.noReceiveAfterSend
ethernet0.yieldAfterSend

ethernet0.flashWriteable
ethernet0.forcedToBridged
Fine-tuning: don't ask me

ethernet0.features ="0"
Do you get poor UDP-performance with vmxnet-device ?
Try this - see forumpost
May speed up performance when running ghost ...


ethernet0.allow64bitVmxnet = "true"
ethernet0.allow64bitVlance = "true"
ON 64-bit hosts VMware likes to assign E1000 - but you can force it to use different adapters by useing this lines
along with the appropriate virtualDev-entries.

ethernet0.opromsize = ?
Boot ROM size - don't know details

ethernet0.features = "0x2"
Enable TCP Segmentation Offloading (TSO) for a Windows virtual machine on ESX 2.x
Reference: knowledgebase 1465

top


related parameters

These parameters are somehow related but not dependant on the main-switch that

vlance.noOprom = "true"
vmxnet.noOprom = "true"
Recent VMware-versions allow Network-boot.
If you know that you don't need this, you can free some memory by using this

ethernet.e1000.available = "true"
ethernet.vlance.available = "true"
ethernet.morphNICs = "true"
ethernet.perfMonInterval = ?
Don't use

vnet.dontProbe = "false"
Sometimes Windows-guests have problems to probe the
virtual Nics at boot-time: try this


Don't use it if you don't need it - it affects performance

top


There are two different ways to assign Virtual Nets:
The easy way uses one out of three options:
ethernet0.connectionType = "bridged"

ethernet0.connectionType = "hostonly"
ethernet0.connectionType = "nat"

The expert way uses a combination of 'connectionType' and "vnet"
ethernet0.connectionType = "custom"
and the exact number of the VNET you want - like
ethernet0.vnet = "vmnet0"
Lets have an example: you have two bridged networks on Player: vmnet0 and vmnet2
If you use
ethernet0.connectionType = "bridged"
ethernet1.connectionType = "bridged"
the second ethernet device will not come up.

If you use
ethernet0.connectionType = "custom" ethernet0.vnet = "vmnet0"
ethernet1.connectionType = "custom"
ethernet1.vnet = "vmnet2"
instead - both devices will come up.


http://sanbarrow.com/vmx/vmx-network-advanced.html
 

Thursday, January 26, 2017

USB drives on VMware ESXI6 servers


http://www.virten.net/2015/10/usb-devices-as-vmfs-datastore-in-vsphere-esxi-6-0/

Information archived below:

USB Devices as VMFS Datastore in vSphere ESXi 6.0

In the last years I've seen many requests in forums and blogs where people are trying to use USB devices like USB sticks or external hard disks as VMFS formatted datastore. It was actually possible in vSphere 5, but very picky. Some USB flash drives were working, others not. In vSphere 6, this behavior has been changed obviously. This post explains how you can use USB devices as datastore on your ESXi host. Of course, this is neither a supported, nor a performant storage solution, so use at your own risk.
[Update: If you are looking for USB VMFS Datastores in vSphere 6.5, read this article.]

Create VMFS Datastore on USB drives

  1. Connect to the ESXi host with SSH
  2. Stop the USB arbitrator service. This service is used to passthrough USB device from an ESX/ESXi host to a virtual machine. (When disabling it, you can no longer passthrough USB devices to VMs)
    ~ # /etc/init.d/usbarbitrator stop
  3. (optional) Use this command to permanently disable the USB arbitrator service after reboot.
    ~ # chkconfig usbarbitrator off
  4. Plug in the USB Device to your ESXi host
  5. Get the device identifier (mpx.vmhbaXX). You should see the USB Device in /dev/disks/:
    ~ # ls /dev/disks/
  6. Write a GPT label to the device (Assuming that the Device ID is mpx.vmhba36)
    ~ # partedUtil mklabel /dev/disks/mpx.vmhba36\:C0\:T0\:L0 gpt
  7. To create a partition you need to know the start sector, end sector, which depends on the device size and the GUID.
    The start sector is always 2048
    The GUID for VMFS is AA31E02A400F11DB9590000C2911D1B8
    The end sector can be calculated with the following formula (Use the numbers from getptbl):
    ~ # partedUtil getptbl /dev/disks/mpx.vmhba36\:C0\:T0\:L0
    gpt
    1947 255 63 31293440
    1947 * 255 * 63 - 1 = 31278554
    You can also calculate the endsector with the following command:
    ~ # eval expr $(partedUtil getptbl /dev/disks/mpx.vmhba36\:C0\:T0\:L0 | tail -1 | awk '{print $1 " \\* " $2 " \\* " $3}') - 1
    31278554
  8. Create the VMFS partition (Replace with your endsector)
    ~ # partedUtil setptbl /dev/disks/mpx.vmhba36\:C0\:T0\:L0 gpt "1 2048 31278554 AA31E02A400F11DB9590000C2911D1B8 0"
  9. Format the partition with VMFS5
    ~ # vmkfstools -C vmfs5 -S USB-Stick /dev/disks/mpx.vmhba36\:C0\:T0\:L0:1
The USB-Stick should now appear in your datastores view.
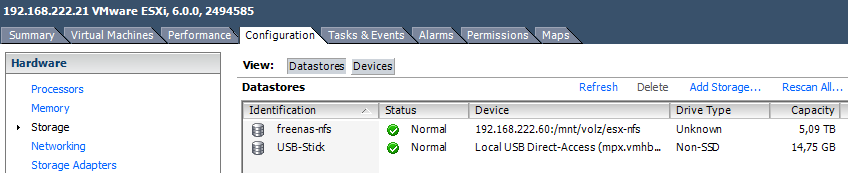
vmfs-formatted-usb-stick
And the final proof is a virtual machine running on it:
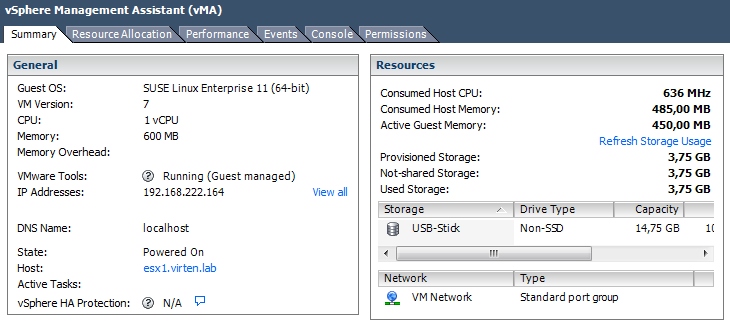
vm-running-on-usb-stick
This is how your command output should look like:
~ # partedUtil mklabel /dev/disks/mpx.vmhba43\:C0\:T0\:L0 gpt
~ # eval expr $(partedUtil getptbl /dev/disks/mpx.vmhba43\:C0\:T0\:L0 | tail -1 | awk '{print $1 " \\* " $2 " \\* " $3}') - 1
31278554
~ # partedUtil setptbl /dev/disks/mpx.vmhba43\:C0\:T0\:L0 gpt "1 2048 31278554 AA31E02A400F11DB9590000C2911D1B8 0"
gpt
0 0 0 0
1 2048 31278554 AA31E02A400F11DB9590000C2911D1B8 0
~ # vmkfstools -C vmfs5 -S USB-Stick /dev/disks/mpx.vmhba43\:C0\:T0\:L0:1
create fs deviceName:'/dev/disks/mpx.vmhba43:C0:T0:L0:1', fsShortName:'vmfs5', fsName:'USB-Stick'
deviceFullPath:/dev/disks/mpx.vmhba43:C0:T0:L0:1 deviceFile:mpx.vmhba43:C0:T0:L0:1
ATS on device /dev/disks/mpx.vmhba43:C0:T0:L0:1: not supported
.
Checking if remote hosts are using this device as a valid file system. This may take a few seconds...
Creating vmfs5 file system on "mpx.vmhba43:C0:T0:L0:1" with blockSize 1048576 and volume label "USB-Stick".
Successfully created new volume: 56226b60-118f2e3f-04ba-001b2193b3b0


[Update: October 19. 2015 - Figured out why devices are detected as USB 2. Devices now with full USB 3.0 performance. Performance test results updated.]
 
http://www.virten.net/2015/10/usb-3-0-devices-detected-as-usb-2-in-esxi-6-0-and-5-5/ 

USB 3.0 devices detected as USB 2 in ESXi 6.0 and 5.5

In my latest post USB Devices as VMFS Datastore in vSphere ESXi 6.0 I had a problem with USB 3.0 devices that are detected as USB 2 in ESXi. I know that USB 3.0, also known as eXtensible Host Controller Interface (xHCI), is supported in ESXi 6.0 and ESXi 5.5 Build 2143827 or later. Unfortunately all of my devices are detected as USB 2.1, despite the USB 3 hub was visible. This problem applies to both, USB devices in path-through mode, and USB devices mounted from the command line with usbarbitrator disabled. The solution was quite simple and not related to an ESXi, but to a UEFI configuration.
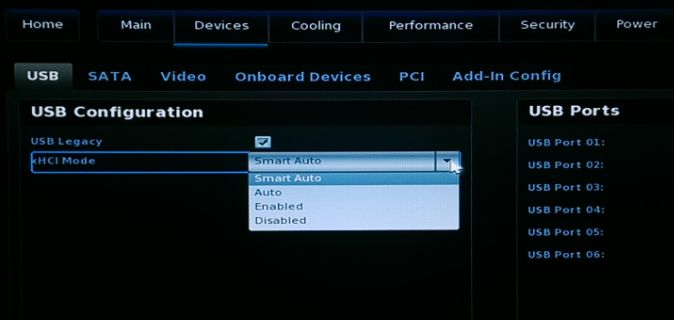
xhci-smart-auto

Within the UEFI the xHCI mode is configurable with a default of "Smart Auto". According to the documentation, in "Smart Auto" mode the USB 3.0 port acts like a 2.0 port before OS USB 3.0 drivers are loaded. For whatever reason, this does not work properly with ESXi. After setting xHCI Mode to "Enabled", all devices are correctly identified as USB 3.0.
During my tests I've use two USB 3.0 capable devices on my 5th Gen Intel NUC (NUC5i5MYHE):
  • External 1TB 2.5" HDD (Seagate RSS LLC FreeAgent GoFlex USB 3.0)
  • USB 3.0 to mSATA SSD Enclosure (ASMedia Technology Inc.)
ESXi 6.0 with xHCI Mode "Smart Auto"
Both devices are connected to "Bus 001", which is the 2.0 root hub:
~ # vmware -v VMware ESXi 6.0.0 build-3073146 ~ # lsusb Bus 001 Device 007: ID 0bc2:5031 Seagate RSS LLC FreeAgent GoFlex USB 3.0 Bus 001 Device 006: ID 174c:1153 ASMedia Technology Inc. Bus 001 Device 003: ID 0930:6545 Toshiba Corp. Kingston DataTraveler 102 Flash Drive / HEMA Flash Drive 2 GB / PNY Attache 4GB Stick Bus 001 Device 002: ID 8087:8001 Intel Corp. Bus 003 Device 001: ID 1d6b:0003 Linux Foundation 3.0 root hub Bus 002 Device 001: ID 1d6b:0002 Linux Foundation 2.0 root hub Bus 001 Device 001: ID 1d6b:0002 Linux Foundation 2.0 root hub ESXi 5.5 with xHCI Mode "Smart Auto"
Same problem here. Both devices on "Bus 001".
~ # vmware -v VMware ESXi 5.5.0 build-3116895 ~ # lsusb Bus 001 Device 008: ID 0bc2:5031 Seagate RSS LLC FreeAgent GoFlex USB 3.0 Bus 001 Device 007: ID 174c:1153 ASMedia Technology Inc. Bus 001 Device 003: ID 0930:6545 Toshiba Corp. Kingston DataTraveler 102 Flash Drive / HEMA Flash Drive 2 GB / PNY Attache 4GB Stick Bus 001 Device 002: ID 8087:8001 Intel Corp. Bus 003 Device 001: ID 1d6b:0003 Linux Foundation 3.0 root hub Bus 002 Device 001: ID 1d6b:0002 Linux Foundation 2.0 root hub Bus 001 Device 001: ID 1d6b:0002 Linux Foundation 2.0 root hub You can also use the lsusb -v command to see a verbose output containing the USB version (2.10):
~ # lsusb -v Bus 001 Device 008: ID 0bc2:5031 Seagate RSS LLC FreeAgent GoFlex USB 3.0 Device Descriptor: bLength 18 bDescriptorType 1 bcdUSB 2.10 bDeviceClass 0 (Defined at Interface level) [...] Bus 001 Device 007: ID 174c:1153 ASMedia Technology Inc. Device Descriptor: bLength 18 bDescriptorType 1 bcdUSB 2.10 [...] The problem described here applies only if you see a USB 3.0 root hub but devices are connected to the wrong hub. If you do not see the USB 3.0 hub you have to verify that the xhci module is enabled and loaded with:
~ # esxcli system module list |grep xhci Name Is Loaded   Is Enabled xhci true true To enable it (Load it automatically on boot):
~ # esxcli system module set -e true -m xhci To load it while ESXi is running:
~ # vmkload_mod xhci xHCI Mode "Enabled"
After setting the xHCI Mode to "Enabled" in the UEFI, both devices are connected to the USB 3.0 hub:
~ # vmware -v VMware ESXi 5.5.0 build-3116895 ~ # lsusb Bus 002 Device 002: ID 174c:1153 ASMedia Technology Inc. Bus 002 Device 004: ID 0bc2:5031 Seagate RSS LLC FreeAgent GoFlex USB 3.0 Bus 001 Device 002: ID 0930:6545 Toshiba Corp. Kingston DataTraveler 102 Flash Drive / HEMA Flash Drive 2 GB / P Attache 4GB Stick Bus 002 Device 001: ID 1d6b:0003 Linux Foundation 3.0 root hub Bus 001 Device 001: ID 1d6b:0002 Linux Foundation 2.0 root hub ~ # vmware -v VMware ESXi 6.0.0 build-3073146 ~ # lsusb Bus 002 Device 002: ID 174c:1153 ASMedia Technology Inc. Bus 002 Device 004: ID 0bc2:5031 Seagate RSS LLC FreeAgent GoFlex USB 3.0 Bus 001 Device 002: ID 0930:6545 Toshiba Corp. Kingston DataTraveler 102 Flash Drive / HEMA Flash Drive 2 GB / PNY Attache 4GB Stick Bus 002 Device 001: ID 1d6b:0003 Linux Foundation 3.0 root hub Bus 001 Device 001: ID 1d6b:0002 Linux Foundation 2.0 root hub lsusb -v Bus 002 Device 003: ID 174c:1153 ASMedia Technology Inc. Device Descriptor: bLength 18 bDescriptorType 1 bcdUSB 3.00 [...]

Thursday, October 13, 2016

Vmware ESXI 5.5 on core i5 Nuc


This page has some interesting notes employed in installing vmware esxi 5.5 on core i5 NUC.  Though that is an older than the latest release, this has some good techniques for esxi, including package installation.

http://www.virten.net/2015/02/how-to-install-esxi-on-5th-gen-intel-nuc-nic-and-ahci-workaround/


Intel has begun to deliver their 5th Gen Broadwell NUCs. At the moment, only NUCs with i3 CPUs are available. NUCs with faster CPUs are available in the next few weeks. I could get my hands on the NUC5i3MYHE. That’s the version with a 2.5″ HDD slot and without integrated WLAN. This post quickly explains how to get ESXi running on the 5th Gen NUC. As known from 3th and 4th gen NUCs, it is not possible to use the ESXi Installer provided by VMware.esxi-on-5th-gen-NUC5i3MYHE
I’m confident that this guide will also work for i5 and i7 NUCs, as from what I’ve seen in the documentation they have identical controllers:
  • Intel NUC5i7RYH
  • Intel NUC5i5RYH
  • Intel NUC5i5MYHE
  • Intel NUC5i5RYK
  • Intel NUC5i3RYH
  • Intel NUC5i3MYHE
  • Intel NUC5i3RYK
I’ve used the following configuration:
To not have compatibility issues, check the following:
  • NUC has a Mini HDMI and Mini DisplayPort. Make sure to have an adapter.
  • Supported M.2 SSD sizes are 22×24, 22×60 and 22×80
  • NUC requires 1.35V SODIMM Memory
When you try to install ESXi 5.5 to the NUC, the installation fails with the following error message:
No Network Adapters
No network adapters were detected. Either no network adapters are physically connected to the system, or a suitable driver could not be located. A third party driver may be required.
Ensure that there is at least one network adapter physically connected to the system before attempting installation. If the problem persists, consult the VMware Knowledge Base.
You have to create a customized ESXi Image. The custom driver has been created about a year ago by GLRoman and is available at VMware Community or at the vibsdepot from VMware Front Experience.
You can either download ESXi and the e1000 driver manually, or simply use the following PowerCLI commands to create a customized ISO. This will download all required files automatically.

Add-EsxSoftwareDepot https://hostupdate.vmware.com/software/VUM/PRODUCTION/main/vmw-depot-index.xml
Add-EsxSoftwareDepot http://vibsdepot.v-front.de
New-EsxImageProfile -CloneProfile "ESXi-5.5.0-20150204001-standard" -name "ESXi-5.5.0-20150204001-NUC" -Vendor "virten.net" -AcceptanceLevel "CommunitySupported"
Add-EsxSoftwarePackage -ImageProfile "ESXi-5.5.0-20150204001-NUC" -SoftwarePackage "net-e1000e"
Add-EsxSoftwarePackage -ImageProfile "ESXi-5.5.0-20150204001-NUC" -SoftwarePackage "sata-xahci"
Export-ESXImageProfile -ImageProfile "ESXi-5.5.0-20150204001-NUC" -ExportToISO -filepath ESXi-5.5.0-20150204001-NUC.iso

If you are unfamiliar with PowerCLI, read this post for a more detailed guide.
With this image you should be able to install ESXi 5.5 on a USB flash drive connected to the NUC.

esxi-5-5-on-NUC5i3MYHE

At this point, ESXi does not detect the storage controller, so you are not able to use local storage. ESXi 5.5 does not detect local storage controllers because the PCI ID is not mapped to the AHCI driver. This workaround is no longer required as Andreas Peetz has added the PCI ID to his sata-xahci package.

esxi-5-5-on-nuc-no-storage


No problem, we can fix that. First step is to determine the PCI ID:
~ # lspci -v | grep storage -A 1
0000:00:1f.2 SATA controller Mass storage controller: Intel Corporation Wildcat Point-LP SATA Controller [AHCI Mode]
     Class 0106: 8086:9c83
The numbers we are looking for are 8086:9c83. We have to add that to the AHCI driver map (/etc/vmware/driver.map.d/ahci.map). Unfortunately we can’t edit this file while ESXi is running. The changes have to be made to the file that is loaded during ESXi startup (/bootbank/sata_ahc.v00). Convert the file with vmtar, extract it, change the driver map and rebuild it to /bootbank/. To do that, SSH to the ESXi and run the following commands:

cd /tmp 
mkdir ahci
cd ahci
vmtar -x /bootbank/sata_ahc.v00 -o sata_ahc.tar 
tar xvf sata_ahc.tar
rm sata_ahc.tar
echo "regtype=linux,bus=pci,id=8086:9c83 0000:0000,driver=ahci,class=storage" >> etc/vmware/driver.map.d/ahci.map
tar cvf sata_ahc.tar etc usr
vmtar -c sata_ahc.tar -o sata_ahc.vgz 
mv sata_ahc.vgz /bootbank/sata_ahc.v00

Reboot ESXi and have fun with your 5th Gen NUC running ESXi 5.5

esxi-5-5-on-NUC5i3MYHE-with-local-storage

Additional Note: I’ve also tried to install ESXi 6.0 RC to the NUC. It was not required to create a custom ISO. The network card was detected during installation with the ISO provided by VMware. The AHCI workaround was still required. Please note that this was tested with beta software and might change when 6.0 is GA