http://www.virten.net/2015/10/usb-devices-as-vmfs-datastore-in-vsphere-esxi-6-0/
Information archived below:
USB Devices as VMFS Datastore in vSphere ESXi 6.0
[Update: If you are looking for USB VMFS Datastores in vSphere 6.5, read this article.]
Create VMFS Datastore on USB drives
- Connect to the ESXi host with SSH
- Stop the USB arbitrator service. This service is used to passthrough
USB device from an ESX/ESXi host to a virtual machine. (When disabling
it, you can no longer passthrough USB devices to VMs)
~ # /etc/init.d/usbarbitrator stop
- (optional) Use this command to permanently disable the USB arbitrator service after reboot.
~ # chkconfig usbarbitrator off
- Plug in the USB Device to your ESXi host
- Get the device identifier (mpx.vmhbaXX). You should see the USB Device in /dev/disks/:
~ # ls /dev/disks/
- Write a GPT label to the device (Assuming that the Device ID is mpx.vmhba36)
~ # partedUtil mklabel /dev/disks/mpx.vmhba36\:C0\:T0\:L0 gpt
- To create a partition you need to know the start sector, end sector, which depends on the device size and the GUID.
The start sector is always 2048
The GUID for VMFS is AA31E02A400F11DB9590000C2911D1B8
The end sector can be calculated with the following formula (Use the numbers from getptbl):~ # partedUtil getptbl /dev/disks/mpx.vmhba36\:C0\:T0\:L0 gpt 1947 255 63 31293440
1947 * 255 * 63 - 1 = 31278554
You can also calculate the endsector with the following command:
~ # eval expr $(partedUtil getptbl /dev/disks/mpx.vmhba36\:C0\:T0\:L0 | tail -1 | awk '{print $1 " \\* " $2 " \\* " $3}') - 1 31278554 - Create the VMFS partition (Replace with your endsector)
~ # partedUtil setptbl /dev/disks/mpx.vmhba36\:C0\:T0\:L0 gpt "1 2048 31278554 AA31E02A400F11DB9590000C2911D1B8 0"
- Format the partition with VMFS5
~ # vmkfstools -C vmfs5 -S USB-Stick /dev/disks/mpx.vmhba36\:C0\:T0\:L0:1
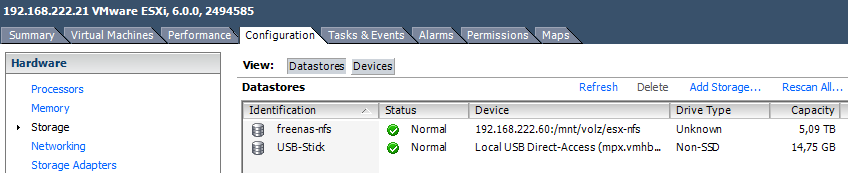
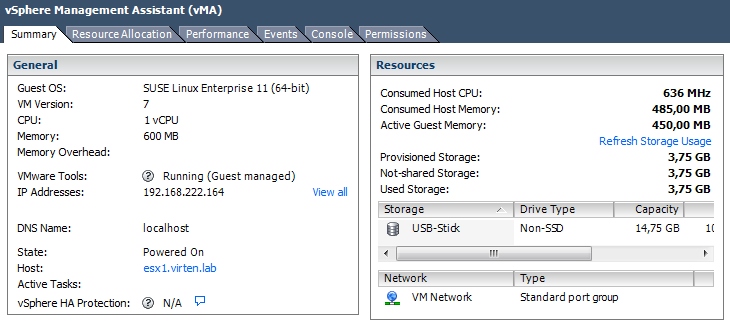
And the final proof is a virtual machine running on it:
This is how your command output should look like:
~ # partedUtil mklabel /dev/disks/mpx.vmhba43\:C0\:T0\:L0 gpt
~ # eval expr $(partedUtil getptbl /dev/disks/mpx.vmhba43\:C0\:T0\:L0 | tail -1 | awk '{print $1 " \\* " $2 " \\* " $3}') - 1
31278554
~ # partedUtil setptbl /dev/disks/mpx.vmhba43\:C0\:T0\:L0 gpt "1 2048 31278554 AA31E02A400F11DB9590000C2911D1B8 0"
gpt
0 0 0 0
1 2048 31278554 AA31E02A400F11DB9590000C2911D1B8 0
~ # vmkfstools -C vmfs5 -S USB-Stick /dev/disks/mpx.vmhba43\:C0\:T0\:L0:1
create fs deviceName:'/dev/disks/mpx.vmhba43:C0:T0:L0:1', fsShortName:'vmfs5', fsName:'USB-Stick'
deviceFullPath:/dev/disks/mpx.vmhba43:C0:T0:L0:1 deviceFile:mpx.vmhba43:C0:T0:L0:1
ATS on device /dev/disks/mpx.vmhba43:C0:T0:L0:1: not supported
.
Checking if remote hosts are using this device as a valid file system. This may take a few seconds...
Creating vmfs5 file system on "mpx.vmhba43:C0:T0:L0:1" with blockSize 1048576 and volume label "USB-Stick".
Successfully created new volume: 56226b60-118f2e3f-04ba-001b2193b3b0
[Update: October 19. 2015 - Figured out why devices are detected as USB 2. Devices now with full USB 3.0 performance. Performance test results updated.]
http://www.virten.net/2015/10/usb-3-0-devices-detected-as-usb-2-in-esxi-6-0-and-5-5/
USB 3.0 devices detected as USB 2 in ESXi 6.0 and 5.5
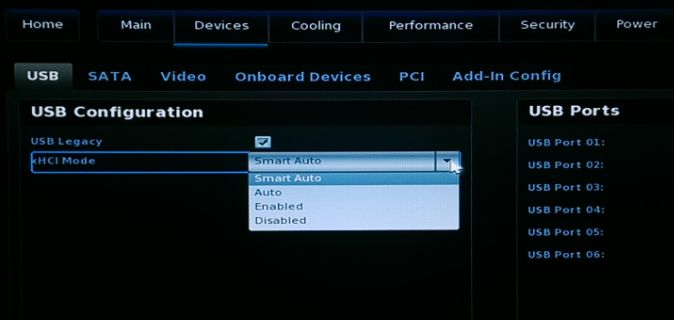
Within the UEFI the xHCI mode is configurable with a default of "Smart Auto". According to the documentation, in "Smart Auto" mode the USB 3.0 port acts like a 2.0 port before OS USB 3.0 drivers are loaded. For whatever reason, this does not work properly with ESXi. After setting xHCI Mode to "Enabled", all devices are correctly identified as USB 3.0.
During my tests I've use two USB 3.0 capable devices on my 5th Gen Intel NUC (NUC5i5MYHE):
- External 1TB 2.5" HDD (Seagate RSS LLC FreeAgent GoFlex USB 3.0)
- USB 3.0 to mSATA SSD Enclosure (ASMedia Technology Inc.)
Both devices are connected to "Bus 001", which is the 2.0 root hub:
~ # vmware -v VMware ESXi 6.0.0 build-3073146 ~ # lsusb Bus 001 Device 007: ID 0bc2:5031 Seagate RSS LLC FreeAgent GoFlex USB 3.0 Bus 001 Device 006: ID 174c:1153 ASMedia Technology Inc. Bus 001 Device 003: ID 0930:6545 Toshiba Corp. Kingston DataTraveler 102 Flash Drive / HEMA Flash Drive 2 GB / PNY Attache 4GB Stick Bus 001 Device 002: ID 8087:8001 Intel Corp. Bus 003 Device 001: ID 1d6b:0003 Linux Foundation 3.0 root hub Bus 002 Device 001: ID 1d6b:0002 Linux Foundation 2.0 root hub Bus 001 Device 001: ID 1d6b:0002 Linux Foundation 2.0 root hub ESXi 5.5 with xHCI Mode "Smart Auto"
Same problem here. Both devices on "Bus 001".
~ # vmware -v VMware ESXi 5.5.0 build-3116895 ~ # lsusb Bus 001 Device 008: ID 0bc2:5031 Seagate RSS LLC FreeAgent GoFlex USB 3.0 Bus 001 Device 007: ID 174c:1153 ASMedia Technology Inc. Bus 001 Device 003: ID 0930:6545 Toshiba Corp. Kingston DataTraveler 102 Flash Drive / HEMA Flash Drive 2 GB / PNY Attache 4GB Stick Bus 001 Device 002: ID 8087:8001 Intel Corp. Bus 003 Device 001: ID 1d6b:0003 Linux Foundation 3.0 root hub Bus 002 Device 001: ID 1d6b:0002 Linux Foundation 2.0 root hub Bus 001 Device 001: ID 1d6b:0002 Linux Foundation 2.0 root hub You can also use the lsusb -v command to see a verbose output containing the USB version (2.10):
~ # lsusb -v Bus 001 Device 008: ID 0bc2:5031 Seagate RSS LLC FreeAgent GoFlex USB 3.0 Device Descriptor: bLength 18 bDescriptorType 1 bcdUSB 2.10 bDeviceClass 0 (Defined at Interface level) [...] Bus 001 Device 007: ID 174c:1153 ASMedia Technology Inc. Device Descriptor: bLength 18 bDescriptorType 1 bcdUSB 2.10 [...] The problem described here applies only if you see a USB 3.0 root hub but devices are connected to the wrong hub. If you do not see the USB 3.0 hub you have to verify that the xhci module is enabled and loaded with:
~ # esxcli system module list |grep xhci Name Is Loaded Is Enabled xhci true true To enable it (Load it automatically on boot):
~ # esxcli system module set -e true -m xhci To load it while ESXi is running:
~ # vmkload_mod xhci xHCI Mode "Enabled"
After setting the xHCI Mode to "Enabled" in the UEFI, both devices are connected to the USB 3.0 hub:
~ # vmware -v VMware ESXi 5.5.0 build-3116895 ~ # lsusb Bus 002 Device 002: ID 174c:1153 ASMedia Technology Inc. Bus 002 Device 004: ID 0bc2:5031 Seagate RSS LLC FreeAgent GoFlex USB 3.0 Bus 001 Device 002: ID 0930:6545 Toshiba Corp. Kingston DataTraveler 102 Flash Drive / HEMA Flash Drive 2 GB / P Attache 4GB Stick Bus 002 Device 001: ID 1d6b:0003 Linux Foundation 3.0 root hub Bus 001 Device 001: ID 1d6b:0002 Linux Foundation 2.0 root hub ~ # vmware -v VMware ESXi 6.0.0 build-3073146 ~ # lsusb Bus 002 Device 002: ID 174c:1153 ASMedia Technology Inc. Bus 002 Device 004: ID 0bc2:5031 Seagate RSS LLC FreeAgent GoFlex USB 3.0 Bus 001 Device 002: ID 0930:6545 Toshiba Corp. Kingston DataTraveler 102 Flash Drive / HEMA Flash Drive 2 GB / PNY Attache 4GB Stick Bus 002 Device 001: ID 1d6b:0003 Linux Foundation 3.0 root hub Bus 001 Device 001: ID 1d6b:0002 Linux Foundation 2.0 root hub lsusb -v Bus 002 Device 003: ID 174c:1153 ASMedia Technology Inc. Device Descriptor: bLength 18 bDescriptorType 1 bcdUSB 3.00 [...]
