Showing posts with label ssl. Show all posts

Thursday, January 12, 2017


Good example of how to secure mongodb internally.  The server is secured from the internet in case any mischief tries to burrow in directly.  Also secures inside the house paths.

https://www.cyberciti.biz/faq/how-to-secure-mongodb-nosql-production-database/

Additional link in the article with other securing tips:

https://www.cyberciti.biz/tips/linux-security.html

Info copied here in case above link dies.

MongoDB ransom attacks are in Wild. I am using it for storing data on my public facing cloud server powered by Ubuntu Linux. How do I protect and secure my MongoDB nosql server on Linux or Unix operating system?

MongoDB is a free and open-source NoSQL document database server. It is used by web application for storing data on a public facing server. Securing MongoDB is critical. Crackers and hackers are accessing insecure MongoDB for stealing data and deleting data from unpatched or badly-configured databases. In this tutorial you will learn about how to secure a MongoDB instance or server running cloud server.

MongoDB config

  1. The default file is located at /etc/mongodb.conf
  2. The default port is TCP 27017
  3. MongoDB server version: 3.4.1

Limit network exposure

Edit the /etc/mongodb.conf or /usr/local/etc/mongodb.conf file, enter:
$ sudo vi /etc/mongodb.conf
If your web-app and MongoDB (mongod server) installed on the same machine, set the IP address of MongoDB to 127.0.0.1. This cuts communication directly from the internets:
# network interfaces
net:
  port: 27017
  bindIp: 127.0.0.1
However, it is possible that you have two or more servers as follows:
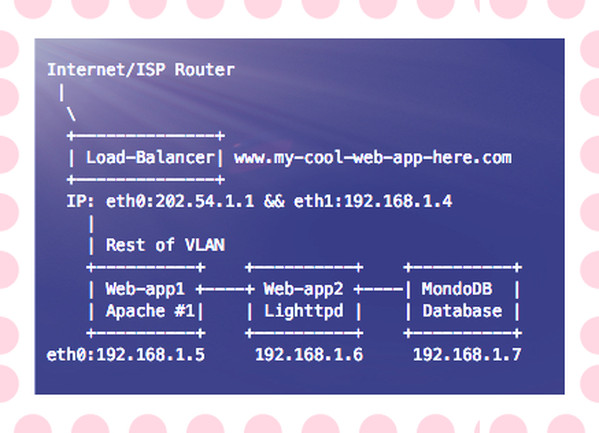
Fig.01: A sample modern web-app with MonoDB running inside your VLAN

You need to bind mongod to 192.168.1.7 so that it can be only accessed over VLAN:
  bindIp: 192.168.1.7
The bind_ip directive Ensure that MongoDB runs in a trusted network environment and limit the interfaces on which MongoDB instances listen for incoming connections.

Change the default port

You can also change the default port if you want. In this example set it to 2727:
port: 2727
Save and close the file. You need to restart MongoDB, enter:
$ sudo systemctl restart mongod
OR if you are using FreeBSD Unix:
# service mongod restart
Verify open ports with netstat command:
$ netstat -tulpn
$ ss -tulpn
$ sockstat #freebsd unix command
$ ss -tulpn | grep 27017
$ netstat -tulpn | grep 27017

Sample outputs:
tcp        0      0 127.0.0.1:27017         0.0.0.0:*               LISTEN      6818/mongod

Setup access control

You need to add a user administrator to a MongoDB instance running without access control and then enables access control. By default anyone can connect to the MongoDB and this is not a good idea. For example:
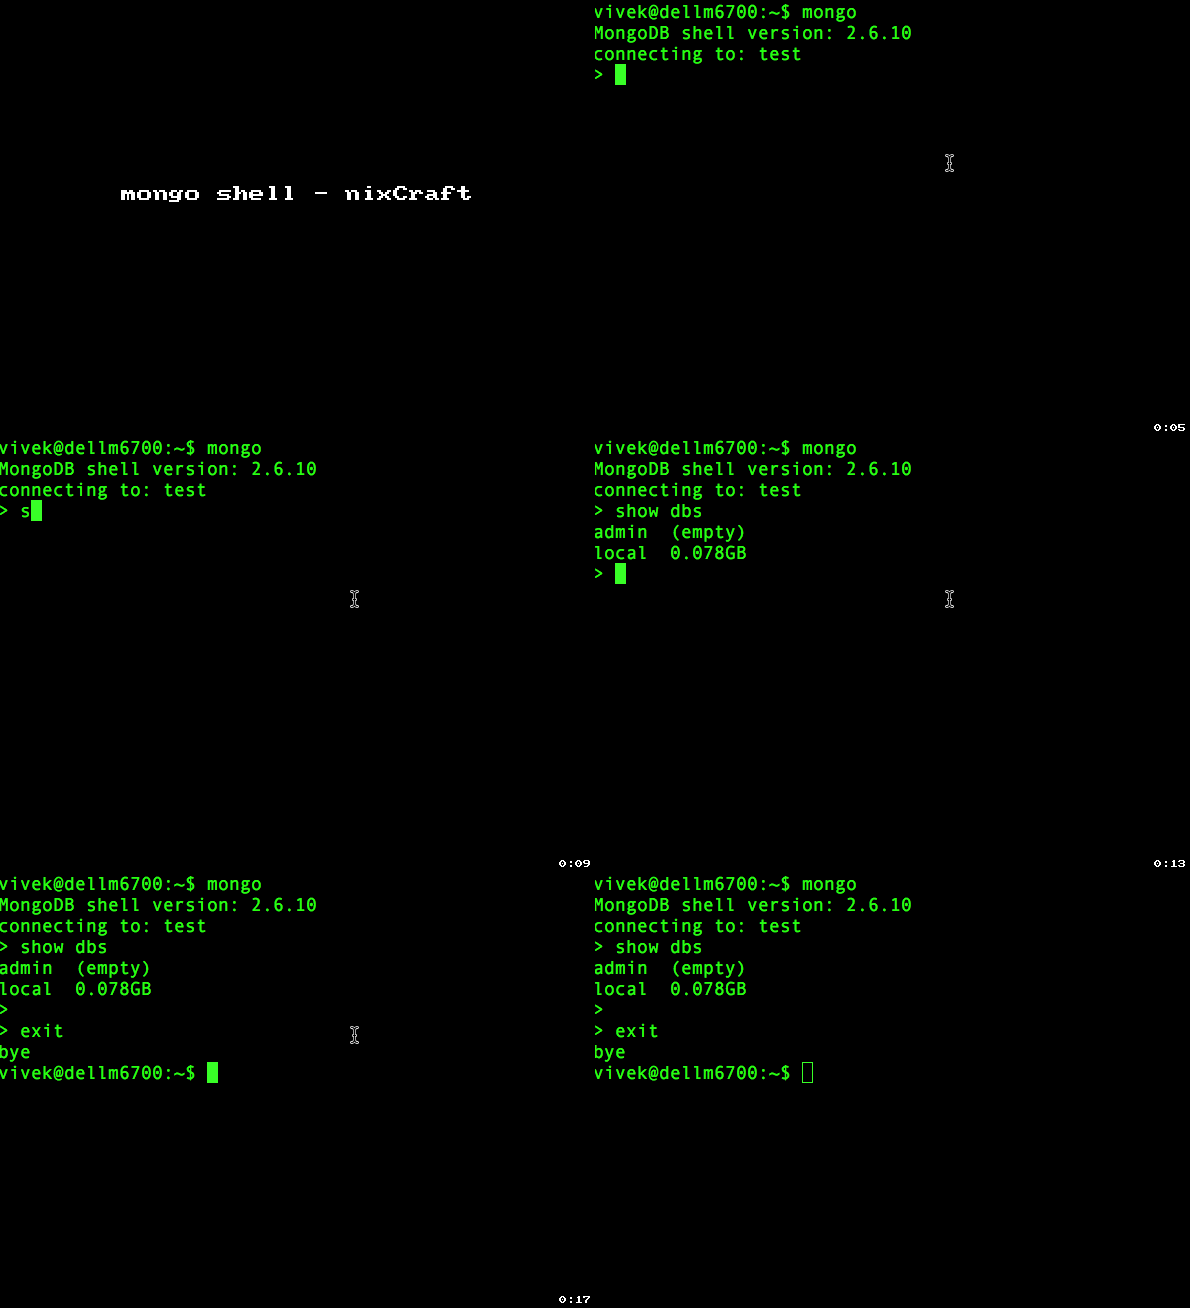
Animated gif 01:  Connect a mongo shell to the instance with any sort of authentication
Animated gif 01: Connect a mongo shell to the instance with any sort of authentication

Connect to the DB instance

$ mongo
## or ##
$ mongo --port 2727
MongoDB shell version: 2.6.10
connecting to: test

Create the user administrator

Warning: Create user with strong password. For demo purpose I am using ‘mySuperSecretePasswordHere’ but you should use strong password.
You need to use admin database. Type the following command at > prompt to create your superuser:
> use admin
switched to db admin

Next creates the user vivek in the admin database with the userAdminAnyDatabase role:
> db.createUser({user:"vivek",pwd:"mySuperSecretePasswordHere", roles:[{role:"userAdminAnyDatabase",db:"admin"}]})
Sample outputs:
Successfully added user: {
 "user" : "vivek",
 "roles" : [
  {
   "role" : "userAdminAnyDatabase",
   "db" : "admin"
  }
 ]
}
Disconnect the mongo shell by typing the following command:
> exit
bye
$

Re-start the MongoDB instance

Edit the /etc/mongodb.conf or /usr/local/etc/mongodb.conf file, enter:
$ sudo vi /etc/mongodb.conf
Turn on security:
security:
  authorization: enabled
Save and close the file. Re-start the MongoDB instance:
$ sudo systemctl restart mongodb
OR if you are using FreeBSD Unix:
# service mongod restart
To authenticate during connection using user vivek and password for the admin database:
$ mongo -u vivek -p mySuperSecretePasswordHere --authenticationDatabase admin
Add additional user to your DB. First create a new database called “nixcraft”:
> use nixcraft
switched to db nixcraft

Create a user named ‘nixdbuser’ with a password named ‘myKoolPassowrd’ for nixcraft db:
   db.createUser(
     {
       USER: "nixdbuser",
       pwd: "myKoolPassowrd",
       roles: [ { ROLE: "readWrite", db: "nixcraft" },
                { ROLE: "read", db: "reporting" } ]
     }
   )
Sample outputs:
Successfully added user: {
 "user" : "nixdbuser",
 "roles" : [
  {
   "role" : "readWrite",
   "db" : "nixcraft"
  },
  {
   "role" : "read",
   "db" : "reporting"
  }
 ]
}
You can now connect to nixcraft db as follows:
$ mongo --port 27017 -u "nixdbuser" -p "myKoolPassowrd" --authenticationDatabase "nixcraft"
This make sure only authorized admin user named ‘vivek’ can execute commands or nixdbuser can do read/write operation on nixcraft db. You can verify it as follows by inserting records:
> use nixcraft
> db
> db.names.insert({"title":"Mr", "last":"Gite", "First":"Vivek"})
> db.names.find()
> show dbs

Sample outputs:
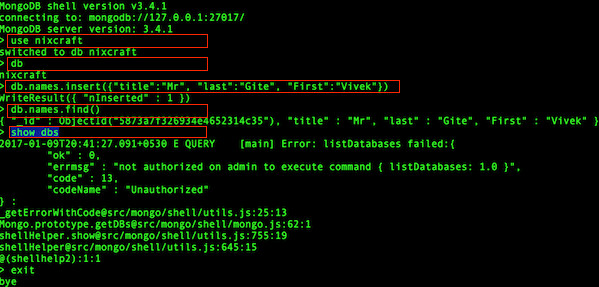
Fig.02: Enabled access control and enforce authentication

Use firewall

Use firewalls to restrict which other entities are allowed to connect to your mongodb server. In this example only allow your application servers access to the database using ufw on Ubuntu or Debian Linux:
$ sudo ufw allow proto tcp from 192.168.1.5 to 192.168.1.7 port 27017
$ sudo ufw allow proto tcp from 192.168.1.6 to 192.168.1.7 port 27017

Enable SSL

Use SSL between your MongoDB client and server when connecting to your Mongodb server over the internet. Otherwise your session is open for the “man in the middle” attack. My setup is as follows:
  mongodb-server: 127.0.0.1
  mongodb-client: 127.0.0.1
  Common Name (e.g. server FQDN or YOUR name) []: 127.0.0.1
  The PEM pass phrase for server: mongodb_server_test_ssl
  The password/passphrase for client: mongodb_client_test_ssl

Type the following command the server certificate

$ sudo mkdir /etc/ssl/mongodb/
$ cd /etc/ssl/mongodb/
$ sudo openssl req -new -x509 -days 365 -out mongodb-server-cert.crt -keyout mongodb-server-cert.key

Sample outputs:
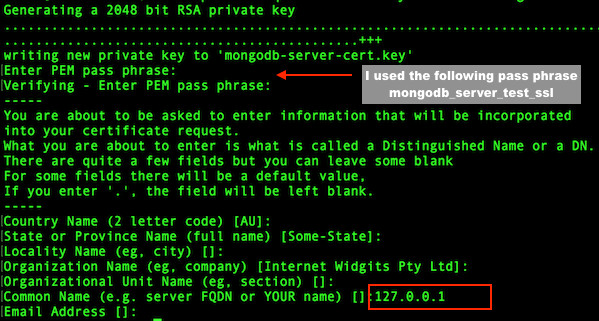
Fig.03: MongoDB SSL setup server certificate

Create the server .pem file with both key and certificate:
$ cd /etc/ssl/mongodb/
$ sudo bash -c 'cat mongodb-server-cert.key mongodb-server-cert.crt > mongodb-server.pem'

Type the following command the client certificate

$ cd /etc/ssl/mongodb/
$ sudo openssl req -new -x509 -days 365 -out mongodb-client-cert.crt -keyout mongodb-client-cert.key

Sample outputs:
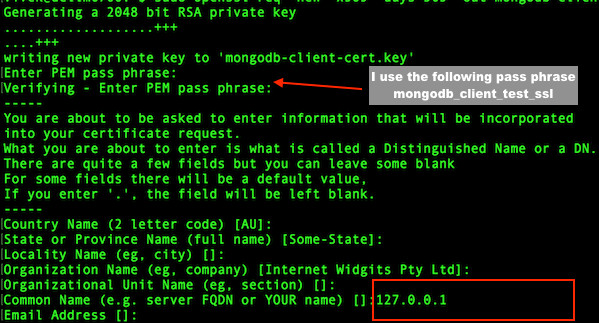
Fig.04: MongoDB SSL setup client certificate

Create the client .pem file with both key and certificate:
$ cd /etc/ssl/mongodb/
$ sudo bash -c 'cat mongodb-client-cert.key mongodb-client-cert.crt > mongodb-client.pem'

Configure mongod and mongos for TLS/SSL server

Edit the /etc/mongodb.conf or /usr/local/etc/mongodb.conf file, enter:
$ sudo vi /etc/mongodb.conf
Update the config file as follows:
# network interfaces
net:
  port: 27017
  bindIp: 127.0.0.1
  ssl:
     mode: requireSSL
     PEMKeyFile: /etc/ssl/mongodb/mongodb-server.pem
     CAFile: /etc/ssl/mongodb/mongodb-client.pem
     PEMKeyPassword: mongodb_server_test_ssl
Save and close the file. Re-start the MongoDB instance:
$ sudo systemctl restart mongodb
OR if you are using FreeBSD Unix:
# service mongod restart

TLS/SSL Configuration for MongoDB clients

The syntax is as follows for mongo shell interface:
$ mongo --ssl --sslCAFile /etc/ssl/mongodb/mongodb-server.pem \
--sslPEMKeyFile /etc/ssl/mongodb/mongodb-client.pem \
--sslPEMKeyPassword mongodb_client_test_ssl \
--host 127.0.0.1 --port 27017 \
--u "nixdbuser" -p "myKoolPassowrd" --authenticationDatabase "nixcraft"

Sample outputs:
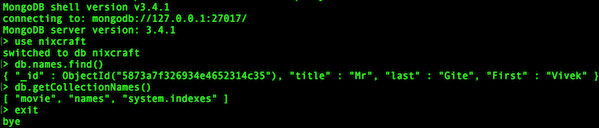
Fig.05: MongoDB SSL  client connection using SSL certificate
Fig.05: MongoDB SSL client connection using SSL certificate

And here is a Python client for connection to SSL enabled MongoDB:
client = pymongo.MongoClient('127.0.0.1', ssl=True)
OR
client = pymongo.MongoClient('127.0.0.1',
                              ssl=True,
                              ssl_certfile='/etc/ssl/mongodb/mongodb-client.pem',
                              ssl_keyfile='/etc/ssl/mongodb/mongodb-server.pem',
                              ssl_pem_passphrase=mongodb_client_test_ssl)

Patch and run updated version of your OS and MongoDB

Applying security patches is an important part of maintaining Linux or Unix server. Linux provides all necessary tools to keep your system updated, and also allows for easy upgrades between versions. See “20 Linux Server Hardening Security Tips” for more information.


Thursday, May 12, 2016

using ssl purchased cert with ipfire


This posting covers a problem with installing a cert and verifying it on ipfire, since the port 80 and 444 ports are used for the firewall.  The service this guy used needed those ports open to do the cert install.

However it is useful to note that it names the method used for moving those ports out of the way as well from other posts here.

Also the site letsencrypt has free certs.  Looks like possibly only one cert for a server is required to convert to using https regardless of how many servers one has on a site.  need to investigate.

https://gpcn.org/?tag=ipfire-certificate

IPFire versus SSLCerts

so I decided to purchase a ‘real’ SSL certificate for my IPFire installation and as it was the cheapest one I could find I went with ssls.com… so far so good.
But, if you follow the instructions, one problem remains: if you chose to upload the verification file any confirmation will fail as IPFire uses ports 81 and 444 for the webinterface. To resolve that issue, at least temporarily we will excute the following steps:
(1) if you contact the firewall from the ‘outside world’ make sure you add exceptions for ports 80 and 443
(2) upload the provided file to /srv/web/ipfire/html/
now the fun starts…
modify the ports in
/etc/httpd/conf.d/vhosts.d/ipfire-interface.conf and ipfire-interface-ssl.conf
now our apache would not know, which ports it is configured for, however, unless you change the
/etc/httpd/conf/listen.conf
as well nothing will happen…
Now execute a /etc/init.d/apache restart
once your certificate is ready, replace the certs in /etc/httpd, change back the ports and reload the service… your purchased cert should now be used.

Update: IPfire seems to replace der server.crt sometimes when being updated… in that case you might have to overwrite the certificate again and restart apache.

Wednesday, March 30, 2016

Securing Webmin with SSL


This discusses after the fact addition of SSL to webmin.  Installation and support may already be present.

http://hints.macworld.com/article.php?story=20020226235050467

Secure Connection Failed when accessing webmin

Webmin may have 1024 SSL certificates.

SSL_ERROR_WEAK_SERVER_CERT_KEY

Upgrade Webmin certificate to 2048 bit

You can replace your webmin certificate with a new one by running this command:
file=/etc/webmin/miniserv.pem
openssl req -x509 -newkey rsa:2048 -keyout $file  -out $file \
 -days 3650 -nodes -subj \
 "/C=US/ST=Denial/L=Springfield/O=Dis/CN=www.example.com" 
openssl x509 -x509toreq -in $file -signkey $file >> $file
/etc/init.d/webmin restart
This command will create a 'pem' file with both the private key and self-signed certificate in the same file.  -nodes will let you create the file without a passphrase.  The -subj option saves you having to manually enter certificate details.

http://blog.rimuhosting.com/2014/11/18/webmin-sec-err-invalid-key/

Thursday, January 5, 2012

testing ssl wireshark capture

http://wirewatcher.wordpress.com/2010/07/20/decrypting-ssl-traffic-with-wireshark-and-ways-to-prevent-it/

How to decrypt SSL with Wireshark

Step one – set up an SSL-protected server to use as a testbed
To illustrate the process, we’re going to use OpenSSL to generate a certificate and act as a web server running HTTP over SSL (aka HTTPS) – it’s quite straightforward.
To begin with, we need to get ourselves a self-signed certificate that our HTTPS server can use. We can do this with a single command:
openssl req -x509 -nodes -newkey rsa:1024 -keyout testkey.pem -out testcert.pem
OpenSSL will ask you for some input to populate your certificate with; once you’ve answered all the questions, the output of this command is two files, testkey.pem (containing a 1024 bit RSA private key) and testcert.pem (containing a self signed certificate). PEM (Privacy Enhanced Mail) format files are plaintext, and consist of a BASE64 encoded body with header and footer lines. You can look at the contents of your key and certificate files in more detail like this:
openssl rsa -in testkey.pem -text -noout (output here)
openssl x509 -in testcert.pem -text -noout (output here; more info here)
We need to perform one tiny tweak to the format of the private key file (Wireshark will use this later on, and it won’t work properly until we’ve done this):
openssl rsa -in testkey.pem -out testkey.pem
Now we’re ready to fire up our HTTPS server:
openssl s_server -key testkey.pem -cert testcert.pem -WWW -cipher RC4-SHA -accept 443

The -key and -cert parameters to the s_server command reference the files we’ve just created, and the -WWW parameter (this one is case sensitive) causes OpenSSL to act like a simple web server capable of retrieving files in the current directory (I created a simple test file called myfile.html for the purposes of the test).
The -cipher parameter tells the server to use a particular cipher suite – I’m using RC4-SHA because that’s what’s used when you go to https://www.google.com. The RC4-SHA cipher suite will use RSA keys for authentication and key exchange, 128-bit RC4 for encryption, and SHA1 for hashing.
Having got our server up and running, we can point a browser at https://myserver/myfile.html and retrieve our test file via SSL (you can ignore any warnings about the validity of the certificate). If you’ve got this working, we can move on to…
Step two – capture some traffic with Wireshark
Fire up Wireshark on the server machine, ideally with a capture filter like “tcp port 443″ so that we don’t capture any unnecessary traffic. Once we’re capturing, point your browser (running on a different machine) at https://myserver/myfile.html and stop the capture once it’s complete.
Right-click on any of the captured frames and select “Follow TCP stream” – a window will pop up that’s largely full of SSL-protected gobbledegook:

Step three – configuring Wireshark for decryption
Close the TCP Stream window and select Preferences from Wireshark’s Edit menu. Expand the “Protocols” node in the tree on the left and scroll down to SSL (in newer versions of Wireshark, you can open the node and type SSL and it will take you there).
Once SSL is selected, there’s an option on the right to enter an “RSA keys list”. Enter something like this:
10.16.8.5,443,http,c:\openssl-win32\bin\testkey.pem
You’ll need to edit the server IP address and path to testkey.pem as appropriate. If this has worked, we’ll notice two things:
  • Wireshark’s SSL dissector can look into otherwise encrypted SSL packets and dissect the protocol inside:
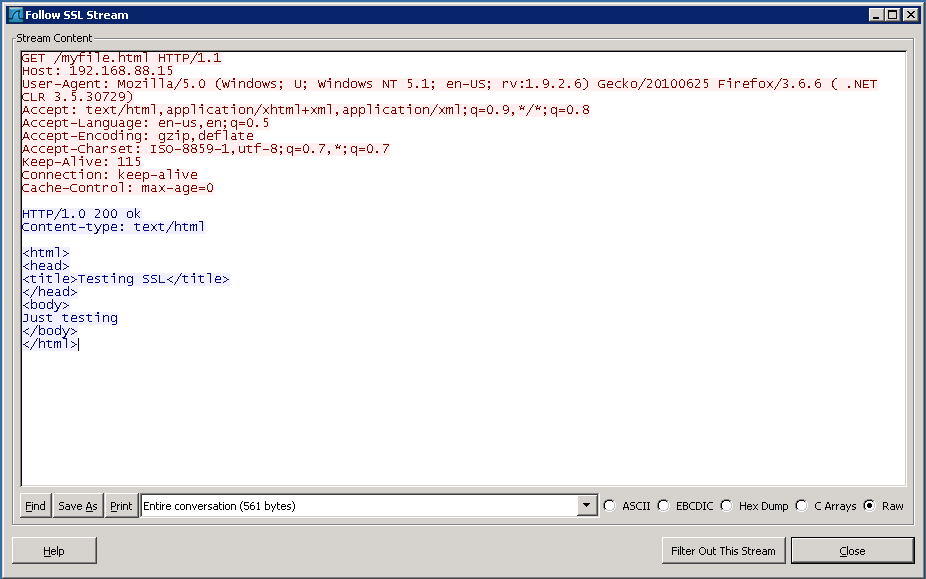
  • We can right-click on any of the captured frames that are listed as SSL or TLS and select “Follow SSL stream”:
Nice :)
You can read about this step in the Wireshark Wiki here.

Why it works

So, why does this work? Our test server, in common with a very large proportion of HTTP-over-SSL webservers, is using RSA to exchange the symmetric session key that will be used by the encryption algorithm (RC4 in this case). Below is an extract from RFC2246:
F.1.1.2. RSA key exchange and authentication
With RSA, key exchange and server authentication are combined. The public key may be either contained in the server’s certificate or may be a temporary RSA key sent in a server key exchange message.
After verifying the server’s certificate, the client encrypts a pre_master_secret with the server’s public key.
The server can of course decrypt the pre_master_secret passed to it by the client (by using the server’s private key in testkey.pem), and subsequently both the client and the server derive the master_secret from it – this is the symmetric key that both parties will use with RC4 to encrypt the session.
But the server isn’t the only one with the private key that corresponds to the public key in the server’s certificate – Wireshark has it as well. This means it is able to decrypt the pre_master_secret on its way from the client to the server, and thereafter derive the master_secret needed to decrypt the traffic.