--30--
Showing posts with label system install. Show all posts
Showing posts with label system install. Show all posts
Tuesday, March 3, 2026

Wednesday, May 9, 2018
Installing lamp on a linux server (of course, the L is for that).
There is what seems to be a good page on this subject here
https://linoxide.com/linux-how-to/install-lamp-stack-ubuntu/
Saturday, November 11, 2017
save and restore of putty session definitions from machine to machine
Putty sessions are saved in the registry entries for the Putty application. That entry for the user must be backed up and restored to transfer the session information between machines.
Saving:
This incantation will back up the registry entries for a user to a file.
This saves the session entries in a Desktop file putty-registry.reg
File names on machine on restore (Merge):
In each Session entry there will be a location for any sessions which have a key file set for SSH preshared key. It is not a good idea to save and transfer the preshared keys between machines, unless they are ones you have generated, and know what you are doing.
"PublicKeyFile" will be the path to the preshared key, and will need to point at the location for the preshared private key file on the new machine. This should be done before merging and restoring onto the machine.
Restore (Merge):
This incantation will allow one to restore them on another machine.
The saved file will need to be located on a drive with a drive letter. Otherwise the restore will not work. Copying the putty-registry.reg file back to the new machine Desktop would be a good way to ensure this (it will be on C:).
Double clicking on the reg file once transferred to the other machine will restore those registry keys, and they should appear on the next invocation of putty.
You can also run regedit (from the run feature of the start menu) and select to import the file.
https://www.cyberciti.biz/tips/putty-session.html
stackoverflow article method here
Only sessions:
Note: do not replace
Note: It will create a
Note: It will not export related SSH keys.
https://stackoverflow.com/questions/13023920/how-to-export-putty-sessions-list
30
Saving:
This incantation will back up the registry entries for a user to a file.
regedit /e "%userprofile%\desktop\putty-registry.reg" HKEY_CURRENT_USER\Software\Simontatham
This saves the session entries in a Desktop file putty-registry.reg
File names on machine on restore (Merge):
In each Session entry there will be a location for any sessions which have a key file set for SSH preshared key. It is not a good idea to save and transfer the preshared keys between machines, unless they are ones you have generated, and know what you are doing.
"PublicKeyFile" will be the path to the preshared key, and will need to point at the location for the preshared private key file on the new machine. This should be done before merging and restoring onto the machine.
Restore (Merge):
This incantation will allow one to restore them on another machine.
The saved file will need to be located on a drive with a drive letter. Otherwise the restore will not work. Copying the putty-registry.reg file back to the new machine Desktop would be a good way to ensure this (it will be on C:).
Double clicking on the reg file once transferred to the other machine will restore those registry keys, and they should appear on the next invocation of putty.
You can also run regedit (from the run feature of the start menu) and select to import the file.
https://www.cyberciti.biz/tips/putty-session.html
stackoverflow article method here
Export
cmd.exe, require elevated prompt:
Only sessions:regedit /e "%USERPROFILE%\Desktop\putty-sessions.reg" HKEY_CURRENT_USER\Software\SimonTatham\PuTTY\Sessions
regedit /e "%USERPROFILE%\Desktop\putty.reg" HKEY_CURRENT_USER\Software\SimonTatham
Powershell:
Only sessions:reg export HKCU\Software\SimonTatham\PuTTY\Sessions ([Environment]::GetFolderPath("Desktop") + "\putty-sessions.reg")
reg export HKCU\Software\SimonTatham ([Environment]::GetFolderPath("Desktop") + "\putty.reg")
Import
Double-click on the*.reg file and accept the import.Alternative ways:
cmd.exe, require elevated command prompt:
regedit /i putty-sessions.reg
regedit /i putty.reg
PowerShell:
reg import putty-sessions.reg
reg import putty.reg
Note: do not replace
SimonTatham with your username.Note: It will create a
reg file on the Desktop of the current user.Note: It will not export related SSH keys.
https://stackoverflow.com/questions/13023920/how-to-export-putty-sessions-list
30
Saturday, August 26, 2017
Raspberry pi zero headless setup
5/21/2019, another setup for headless. Includes how to do multiple WIFI ssids
https://core-electronics.com.au/tutorials/raspberry-pi-zerow-headless-wifi-setup.html
Note: at end of this, remember to change power save setting
https://www.gaggl.com/2017/08/set-up-a-raspberry-pi-zero-headless/
credit to leo gaggl
If you are using the GUI (Raspian full download) and want to connect your RPi Zero to a keyboard and monitor there are probably easier ways to do this. These notes are for people that want to use a headless (no monitor and GUI) setup ready to connect to your RPi after first boot via SSH from another terminal.
Download link: https://www.raspberrypi.org/downloads/raspbian/
After this step there should be 2 additional mounts (if not mount the 2 SD card partitions manually).
Add the following to the new file (if you want to use DHCP – change to static if you want to fix the IP):
Check the file and ensure the network settings are as per the Wireless Network you are connecting to.
You could use the clear-text PSK passphrase but I prefer not to do that in configuration files. Create a PSK hash using ‘wpa_passphrase‘ this older article
There could be other config values you might need depending on the network you are connecting to. More info: https://linux.die.net/man/5/wpa_supplicant.conf.
Add the following to the new file (or your own nameservers):
Default login details are
UID: pi
PWD: rasbperry
My normal further setup steps for RPi 3 are here.
EDIT [2017-08-21]: One of the things necessary on later RPi’s is to turn off power saving mode on the WLAN interface.
https://hackernoon.com/raspberry-pi-headless-install-462ccabd75d0
https://core-electronics.com.au/tutorials/raspberry-pi-zerow-headless-wifi-setup.html
Note: at end of this, remember to change power save setting
https://www.gaggl.com/2017/08/set-up-a-raspberry-pi-zero-headless/
credit to leo gaggl
If you are using the GUI (Raspian full download) and want to connect your RPi Zero to a keyboard and monitor there are probably easier ways to do this. These notes are for people that want to use a headless (no monitor and GUI) setup ready to connect to your RPi after first boot via SSH from another terminal.
Download Raspbian Lite
wget -O raspbian-lite-latest.zip https://downloads.raspberrypi.org/raspbian_lite_latestDownload link: https://www.raspberrypi.org/downloads/raspbian/
Write Image to SD Card
dd bs=4M if=2017-08-16-raspbian-stretch-lite.img of=/dev/sdbAfter this step there should be 2 additional mounts (if not mount the 2 SD card partitions manually).
Set up network interfaces
Create a new config file for the wireless interface.cd etc/network/interfaces.d/
vim wlan0.confAdd the following to the new file (if you want to use DHCP – change to static if you want to fix the IP):
auto wlan0

allow-hotplug wlan0

iface wlan0 inet dhcp

    wpa-conf /etc/wpa_supplicant/wpa_supplicant.conf
Set up connection details for local wireless network
vim etc/wpa_supplicant/wpa_supplicant.confCheck the file and ensure the network settings are as per the Wireless Network you are connecting to.
country=AU

ctrl_interface=DIR=/var/run/wpa_supplicant GROUP=netdev

update_config=1

network={

        ssid="SSID"

        psk=HASHED_PSK_VALUE

}
country=US
ctrl_interface=DIR=/var/run/wpa_supplicant GROUP=netdev
update_config=1

network={
    ssid="your_real_wifi_ssid"
    scan_ssid=1
    psk="your_real_password"
    key_mgmt=WPA-PSK
}
You could use the clear-text PSK passphrase but I prefer not to do that in configuration files. Create a PSK hash using ‘wpa_passphrase‘ this older article
There could be other config values you might need depending on the network you are connecting to. More info: https://linux.die.net/man/5/wpa_supplicant.conf.
Ensure there are DNS Servers configured
sudo vim etc/resolv.confAdd the following to the new file (or your own nameservers):
# Google's public DNS servers

nameserver 8.8.8.8

nameserver 8.8.4.4
Enable SSH Access
Create an ssh empty file in the mounted boot partition. This is necessary to enable SSH access as SSH is by default disabled on more recent versions of Raspbian.cd boot/
sudo touch sshBoot RPi
Boot the Rpi by powering up and after ~30secs you should be able to connect to the IP assigned. Check your router or ise ‘nmap’ or similar to check the assigned IP:sudo nmap -p22 -sV 10.1.1.0/24Default login details are
UID: pi
PWD: rasbperry
My normal further setup steps for RPi 3 are here.
EDIT [2017-08-21]: One of the things necessary on later RPi’s is to turn off power saving mode on the WLAN interface.
sudo iw dev wlan0 set power_save offRaspberry Pi forum entry link for headless setuphttps://www.raspberrypi.org/forums/viewtopic.php?t=191252 Another headless setup page
https://hackernoon.com/raspberry-pi-headless-install-462ccabd75d0
--30--Thursday, April 27, 2017
Ubuntu 16.04 exfat mount with ntfs. 128gb SD cards example
How to Mount EXFAT partition on Ubuntu 16.04 LTS
$ sudo apt-get install exfat-fuse exfat-utils
If you need to mount it from the command line, you could do
$ sudo mkdir /media/exfat
$ sudo mount -t exfat /dev/sdxx /media/exfat
where /dev/sdxx could be /dev/sda1 or /dev/sda2, or so on.
If you are not sure whether the exfat partition you are looking for is /dev/sda1 or /dev/sda2, then you could also run
$ sudo lsblk -o NAME,FSTYPE,SIZE,MOUNTPOINT,LABEL
http://unixnme.blogspot.com/2016/04/how-to-mount-exfat-partition-in-ubuntu.html
The ghome-disks utility can also be used to start and mount this. Since it is /dev/mmc and not /dev/sd, the system will probably have it assumed to be system owned, and will mount under root ownership only.
You can follow the above, but will then have to do a lot of crap with permissions to the mount. If it were or is a fixed mount and not the automount /media mechanism one can do that once. However it will be reset on every mount and be inconvenient.
Solution might be to use gnome-disks. That has a problem however. The FUSE exfat driver and the above asset is root owned. Gnome-disks will not access and mount it due to the system ownership problem
So use a utility to run gnome kit stuff from a command line as su root.
apt-get -y install gksu
installs the gksudo and other stuff.
gksudo gnome-disks will mount the device and make it properly available.
Note that sudo gnome-disks makes the thing root owned again, since you are running as root user in the desktop. gksudo will run as root, but effectivly as the user desktop user id.
Saturday, March 4, 2017
Chrome Browser additions
Several extensions which are useful are listed here. These may filter in on other Chrome instances via google login. Listed here in case they don't.
Blank New Tab Page
https://chrome.google.com/webstore/detail/blank-new-tab-page/jonikckfpolfcdcgdficelkfffkloemh/related?hl=en-US
Chrono Download Manager
https://www.google.com/search?q=chrono+download+manager&oq=chrono+downl&aqs=chrome.0.0j69i57j0l2j69i60j0.2561j0j4&sourceid=chrome&ie=UTF-8
Go Back with Backspace
https://chrome.google.com/webstore/detail/go-back-with-backspace/eekailopagacbcdloonjhbiecobagjci?hl=en
RightScale SSH (support ssh:// protocol)
https://chrome.google.com/webstore/detail/rightscale-ssh/pfmkeekfkpfecccgbliieogmgmijklpm?hl=en
Sunday, January 8, 2017
supporting scsi system disks on vmware for windows xp
Windows xp default drivers never supported scsi disks by default. You had to add drivers to support adaptec and the like. Seldom were systems built up in early configurations w/o some ide support, and especially the chipsets always had ide.
However if you are building up an install from scratch on vmware esxi, you may find that the ide drives are not supported.
Here is a vmware hardware support page showing how to install drivers the old fashioned way by inserting a floppy and F6 and the like during the initial phases of the install of the OS.
Haven't' found a note on how to get to a system which needs them and if it is even possible to add them after the fact on a vmware image of xp that runs on a vmware host program, such as vmware workstation or player, or on esxi 4 or esxi5 which have IDE.
https://kb.vmware.com/selfservice/microsites/search.do?language=en_US&cmd=displayKC&externalId=1000863
copying the verbiage here from vmware for safekeeping on this note.
- When installing Windows XP in a virtual machine on VMware ESX, Windows setup fails to detect hard disks in the virtual machine
- You see the error:
Setup did not find any hard disk drives installed in your computer.
To resolve this issue, supply the correct drive during setup to proceed with installation.
When installing Windows XP in a virtual machine setup is unable to
find the hard drives because no compatible disk controller driver is
shipped on the Windows XP setup disc. You must supply the correct drive
during setup to proceed with installation.
To ensure you supply the correct drive:
- When creating the new virtual machine, select the BusLogic option for the Virtual SCSI Controller mode.
- Attach the VMware SCSI driver floppy image and connect the virtual floppy drive to the virtual machine.
- If you are using an ESX host and the Virtual Infrastructure client:
- Right-click the virtual machine from the Inventory pane.
- Click Edit settings.
- Click the virtual floppy drive and select Connected.
- Select Use floppy image.
- Browse to the location /vmimages.
- Select the file vmscsi-1.2.x.x.flp.
Note: If the file is missing, download the floppy image from: http://download3.vmware.com/software/vmscsi-1.2.0.4.flp.
- If you are using VMware Lab Manager the file is available from the media library.
To insert the floppy disk into the virtual machine:
- From the virtual machine console window, move the pointer over the virtual machine name and click Insert Floppy.
- From the Media Library menu, select (LMStorage1) vmscsi-1.2.0.4.flp.
- Click Use.
- If you are using an ESX host and the Virtual Infrastructure client:
- Attach or insert the Windows XP installation media and connect it to the virtual machine.
- Power on the virtual machine and open a console view of the virtual machine.
- Click the console to assign keyboard control to the virtual machine.
- When the blue Windows setup screen appears, press F6 when prompted.
- When prompted for additional drivers, press S .
- Press Enter to select the VMware SCSI Controller driver, and then Enter again to continue setup.
- Complete Windows XP setup normally from this point.
Note: When setup has completed the first phase of installation and restarts the virtual machine, you may need to disconnect or unassign the virtual floppy drive or the virtual machine may attempt to boot from the floppy image.
For detailed instructions, see the PDF document attached to this article. For more information on installing Windows XP, see the VMware Guest Operating System Installation Guide .
Driver image stored locally with above file name on vmware download under winxp scsi driver
Thursday, October 13, 2016
Vmware ESXI 5.5 on core i5 Nuc
This page has some interesting notes employed in installing vmware esxi 5.5 on core i5 NUC. Though that is an older than the latest release, this has some good techniques for esxi, including package installation.
http://www.virten.net/2015/02/how-to-install-esxi-on-5th-gen-intel-nuc-nic-and-ahci-workaround/
Intel has begun to deliver their 5th Gen Broadwell NUCs. At the moment, only NUCs with i3 CPUs are available. NUCs with faster CPUs are available in the next few weeks. I could get my hands on the NUC5i3MYHE. That’s the version with a 2.5″ HDD slot and without integrated WLAN. This post quickly explains how to get ESXi running on the 5th Gen NUC. As known from 3th and 4th gen NUCs, it is not possible to use the ESXi Installer provided by VMware.

I’m confident that this guide will also work for i5 and i7 NUCs, as from what I’ve seen in the documentation they have identical controllers:
- Intel NUC5i7RYH
- Intel NUC5i5RYH
- Intel NUC5i5MYHE
- Intel NUC5i5RYK
- Intel NUC5i3RYH
- Intel NUC5i3MYHE
- Intel NUC5i3RYK
- NUC5i3MYHE ($300,-)
- Crucial 16GB Kit DDR3 1600 1.35V ($110,-)
- Transcend MTS600 M.2 SSD 128GB ($60,-)
- 2.5″ SanDisk SSD (Reused from older tests)
- 8GB Kingston Digital DataTraveler
- NUC has a Mini HDMI and Mini DisplayPort. Make sure to have an adapter.
- Supported M.2 SSD sizes are 22×24, 22×60 and 22×80
- NUC requires 1.35V SODIMM Memory
No Network AdaptersYou have to create a customized ESXi Image. The custom driver has been created about a year ago by GLRoman and is available at VMware Community or at the vibsdepot from VMware Front Experience.
No network adapters were detected. Either no network adapters are physically connected to the system, or a suitable driver could not be located. A third party driver may be required.
Ensure that there is at least one network adapter physically connected to the system before attempting installation. If the problem persists, consult the VMware Knowledge Base.
You can either download ESXi and the e1000 driver manually, or simply use the following PowerCLI commands to create a customized ISO. This will download all required files automatically.
Add-EsxSoftwareDepot https://hostupdate.vmware.com/software/VUM/PRODUCTION/main/vmw-depot-index.xml
Add-EsxSoftwareDepot http://vibsdepot.v-front.de
New-EsxImageProfile -CloneProfile "ESXi-5.5.0-20150204001-standard" -name "ESXi-5.5.0-20150204001-NUC" -Vendor "virten.net" -AcceptanceLevel "CommunitySupported"
Add-EsxSoftwarePackage -ImageProfile "ESXi-5.5.0-20150204001-NUC" -SoftwarePackage "net-e1000e"
Add-EsxSoftwarePackage -ImageProfile "ESXi-5.5.0-20150204001-NUC" -SoftwarePackage "sata-xahci"
Export-ESXImageProfile -ImageProfile "ESXi-5.5.0-20150204001-NUC" -ExportToISO -filepath ESXi-5.5.0-20150204001-NUC.iso
If you are unfamiliar with PowerCLI, read this post for a more detailed guide.
With this image you should be able to install ESXi 5.5 on a USB flash drive connected to the NUC.


No problem, we can fix that. First step is to determine the PCI ID:
~ # lspci -v | grep storage -A 1
0000:00:1f.2 SATA controller Mass storage controller: Intel Corporation Wildcat Point-LP SATA Controller [AHCI Mode]
     Class 0106: 8086:9c83
The numbers we are looking for are 8086:9c83. We
have to add that to the AHCI driver map
(/etc/vmware/driver.map.d/ahci.map). Unfortunately we can’t edit this
file while ESXi is running. The changes have to be made to the file that
is loaded during ESXi startup (/bootbank/sata_ahc.v00). Convert the
file with vmtar, extract it, change the driver map and rebuild it to
/bootbank/. To do that, SSH to the ESXi and run the following commands:cd /tmp mkdir ahci cd ahci vmtar -x /bootbank/sata_ahc.v00 -o sata_ahc.tar tar xvf sata_ahc.tar rm sata_ahc.tar echo "regtype=linux,bus=pci,id=8086:9c83 0000:0000,driver=ahci,class=storage" >> etc/vmware/driver.map.d/ahci.map tar cvf sata_ahc.tar etc usr vmtar -c sata_ahc.tar -o sata_ahc.vgz mv sata_ahc.vgz /bootbank/sata_ahc.v00
Reboot ESXi and have fun with your 5th Gen NUC running ESXi 5.5
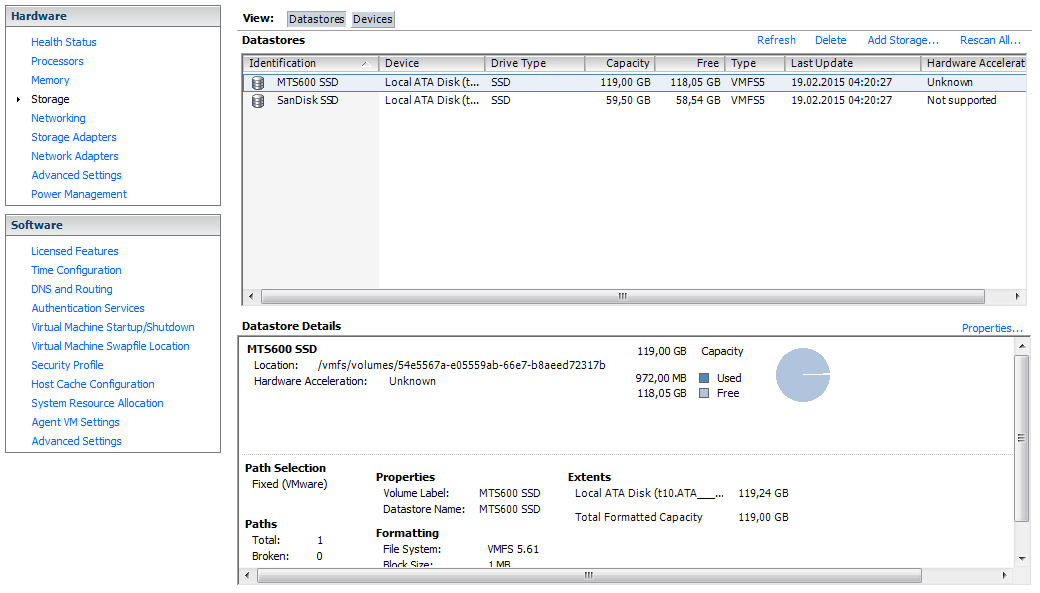
Additional Note: I’ve also tried to install ESXi 6.0 RC to the NUC. It was not required to create a custom ISO. The network card was detected during installation with the ISO provided by VMware. The AHCI workaround was still required. Please note that this was tested with beta software and might change when 6.0 is GA
Tuesday, September 20, 2016
Windows 7 setup notes
set up printers:
HP 4500 printer, need hp driver:
http://support.hp.com/us-en/drivers/selfservice/HP-Officejet-4500-All-in-One-Printer-Series---G5/3919445/model/3919446
HP 2015 printer installs from the ip of the printer on 7, 8.1 and win 10
Install firefox extensions
Install Putty, games, firefox, set up remote desktops
Install vmware client manager 5, or 6 for appropriate host for install.
Thursday, September 15, 2016
windows group policy editing
https://support.microsoft.com/en-us/kb/968264
This is a note about a specific polity, but shows how to get into policy editing
To work around this behavior, follow these steps:
- On the Management Server, click Start, click Run, type gpedit.msc, and then click OK.
- Under Computer Configuration, expand Windows Settings, expand Security Settings, expand Local Policies, and then expand Security Options.
- In the Policy pane, right-click Network access: Do not allow storage of credentials or .NET Passports for network authentication, click Properties, click Disabled, and then click OK.
Monday, September 12, 2016
Freya OS notes
Freya is a modified Ubuntu. Some notes on changing the desktop and adding tools to make it useful are here.
Chrome:
https://johnsdeveloperblog.wordpress.com/2015/04/22/some-things-to-do-after-installing-elementary-os-freya/
XRDP setup:
sudo apt-get update
sudo apt-get install xfce4
echo xfce4-session >~/.xsession
sudo service xrdp restart
xx
xx
Chrome:
https://johnsdeveloperblog.wordpress.com/2015/04/22/some-things-to-do-after-installing-elementary-os-freya/
XRDP setup:
sudo apt-get update
sudo apt-get install xfce4
echo xfce4-session >~/.xsession
sudo service xrdp restart
xx
xx
Monday, September 5, 2016
Raspberry pi 3 Bluetooth
https://www.cnet.com/how-to/how-to-setup-bluetooth-on-a-raspberry-pi-3/
If you're pairing a keyboard, you will need to enter a six-digit string of numbers. You will see that the device has been paired, but it may not have connected. To connect the device, type connect XX:XX:XX:XX:XX:XX
Example from local pi:
Example from local pi:
pi@raspberrypi:~ $ sudo bluetoothctl
[NEW] Controller B8:27:EB:2B:C8:3A raspberrypi [default]
[NEW] Device C6:0A:5E:74:80:9E Flex
[NEW] Device 00:18:AC:38:76:BE Bluetooth Keyboard
[bluetooth]# agent on
Agent registered
[bluetooth]# default-agent
Default agent request successful
[bluetooth]# scan on
Discovery started
[CHG] Controller B8:27:EB:2B:C8:3A Discovering: yes
[NEW] Device FC:58:FA:F7:08:36 AUVIO4000449
[bluetooth]# pair FC:58:FA:F7:08:36
Attempting to pair with FC:58:FA:F7:08:36
[CHG] Device FC:58:FA:F7:08:36 Connected: yes
[CHG] Device FC:58:FA:F7:08:36 Modalias: bluetooth:v0039p13A4d0501
[CHG] Device FC:58:FA:F7:08:36 UUIDs:
00001108-0000-1000-8000-00805f9b34fb
0000110b-0000-1000-8000-00805f9b34fb
0000110c-0000-1000-8000-00805f9b34fb
0000110e-0000-1000-8000-00805f9b34fb
0000111e-0000-1000-8000-00805f9b34fb
0000112e-0000-1000-8000-00805f9b34fb
00001200-0000-1000-8000-00805f9b34fb
[CHG] Device FC:58:FA:F7:08:36 Paired: yes
Pairing successful
[CHG] Device FC:58:FA:F7:08:36 Trusted: yes
[CHG] Device FC:58:FA:F7:08:36 Connected: no
[NEW] Controller B8:27:EB:2B:C8:3A raspberrypi [default]
[NEW] Device C6:0A:5E:74:80:9E Flex
[NEW] Device 00:18:AC:38:76:BE Bluetooth Keyboard
[bluetooth]# agent on
Agent registered
[bluetooth]# default-agent
Default agent request successful
[bluetooth]# scan on
Discovery started
[CHG] Controller B8:27:EB:2B:C8:3A Discovering: yes
[NEW] Device FC:58:FA:F7:08:36 AUVIO4000449
[bluetooth]# pair FC:58:FA:F7:08:36
Attempting to pair with FC:58:FA:F7:08:36
[CHG] Device FC:58:FA:F7:08:36 Connected: yes
[CHG] Device FC:58:FA:F7:08:36 Modalias: bluetooth:v0039p13A4d0501
[CHG] Device FC:58:FA:F7:08:36 UUIDs:
00001108-0000-1000-8000-00805f9b34fb
0000110b-0000-1000-8000-00805f9b34fb
0000110c-0000-1000-8000-00805f9b34fb
0000110e-0000-1000-8000-00805f9b34fb
0000111e-0000-1000-8000-00805f9b34fb
0000112e-0000-1000-8000-00805f9b34fb
00001200-0000-1000-8000-00805f9b34fb
[CHG] Device FC:58:FA:F7:08:36 Paired: yes
Pairing successful
[CHG] Device FC:58:FA:F7:08:36 Trusted: yes
[CHG] Device FC:58:FA:F7:08:36 Connected: no
Sunday, July 31, 2016
setting up linux system for handling outbound email
http://askubuntu.com/questions/158957/how-to-set-the-fully-qualified-domain-name-in-12-04
Set fqdn
change hostname in /etc/hostname
add fqdn in /etc/hosts
say for host foo and domain pri /etc/hosts entry is:
127.0.1.1 foo.pri foo
set up exim for mail handling (from Linode example)
https://www.linode.com/docs/email/exim/sendonly-mail-server-with-exim-on-debian-6-squeeze
reconfigure exim4 script
dpkg-reconfigure exim4-config
xx
Installation of Chrome on Ubuntu
How to install real chrome broswer on Ubuntu. Useful for automating local cloud printing to local printers.
http://www.ubuntumaniac.com/2015/10/install-google-chrome-46-on-ubuntu-1510.html
http://www.ubuntumaniac.com/2015/10/install-google-chrome-46-on-ubuntu-1510.html
Friday, July 29, 2016
A couple of good vnc setup pages for Linux Ubuntu
For VNC remote desktop access via vnc server. Most times now use xvnc and microsoft remote desktop client everywhere with windows desktop.
And remmina for remotes on ubuntu / linux desktops. Remmina will access these desktops. microsoft rdp will not.
https://www.digitalocean.com/community/tutorials/how-to-install-and-configure-vnc-on-ubuntu-16-04
https://www.howtoforge.com/how-to-install-vnc-server-on-ubuntu-14.04
Tuesday, July 26, 2016
Change Workgroup or system name windows 10, with original dialog
The new cute control panel doesn't include the original dialog which could edit the workgroup if you are not a member of a Domain.
The default WORKGROUP is not great to leave a system in if you are using home type sharing and security, so it is handy to change it.
It is possible in Windows 10 without much effort to change the hostname or rather the computer name on the Windows 10 operating system.
Please start the advanced system settings in Windows 10. The quickest way is via Run in Windows 10, open this keyboard shortcut Windows logo key + R.
In Windows 10 Run just type the command sysdm.cpl!
Tuesday, July 12, 2016
Thunderbird System setup
Thunderbird Extensions. See Tools->Add-ons and search, or use links below
The message export died. use this entry to deal with filters.
Thunderbird Message Filter Import/Export Enhanced
https://addons.mozilla.org/en-US/thunderbird/addon/password-exporter/?src=search
Get rid of double spacing format in composition (new install)
https://support.mozilla.org/en-US/questions/1118727
Go to Tools > Options > Composition > General tab.
Here you need to uncheck where it says
"When using paragraph format, the enter key creates a new paragraph."
Change location of profile
It's possible to move the location of a profile folder. This could be useful if you have a backed up profile folder somewhere on your hard drive and want to tell Thunderbird to use that as your profile. This section explains how to do this.
- Shut down Thunderbird completely (File > Exit).
- Move the profile folder to the desired location. For example, on Windows XP, move the profile from
C:\Documents and Settings\[username]\Application Data\Thunderbird\Profiles\xxxxxxxx.defaulttoD:\Stuff\MyMailProfile. If you are reading these instructions because you want to restore a previously backed up profile, this step isn't necessary. Just note the current location of the profile you want to restore. - Open up
profiles.iniin a text editor. The file is located in the application data folder for Thunderbird:- On Windows Vista/XP/2000, the path is
%AppData%\Thunderbird\ - On Windows 95/98/Me, the path is usually
C:\WINDOWS\Application Data\Thunderbird\ - On Linux, the path is
~/.thunderbird/ - On Mac OS X, the path is
~/Library/Application Support/Thunderbird/
- On Windows Vista/XP/2000, the path is
- In
profiles.ini, locate the entry for the profile you've just moved. Change thePath=line to the new location. If you are using a non-relative pathname, the direction of the slashes may be relevant (this is true for Windows XP). - Change
IsRelative=1toIsRelative=0. - Save
profiles.iniand restart Thunderbird.
Monday, June 13, 2016
Ten things to turn off in Windows 10 as of 2016
Summary from article at end of this post. To get to various options, follow the tabs / screens. Some links explain more detail as a reference. This is a quick summary to make it more handy to run thru the settings for a new install, or a system which has not been adjusted.
Update sharing outside your house
Settings > Update & security > Advanced options > Choose how updates are delivered
stop-windows-10-from-using-your-pc-for-file-sharing
Advertising ID
You can turn this off by going to Settings > Privacy > General > Let my apps use my advertising ID for experiences across apps (turning this off will reset your ID).
Start menu ads:
Settings > Personalization > Start > Occasionally show suggestions in Start.
get-rid-of-ads-in-your-windows-10-start-menu
Notifications (select and turn some off)
Settings > System > Notifications & actions and turning off things like Show me tips about Windows
Cortana "getting to know you". another privacy leak to the mothership.
Settings > Privacy > Speech, inking, & typing and clicking Stop getting to know me.
Review Background Apps:
Settings > Privacy > Background apps
Disable Lock screen (where prudent)
Lock Screen
how-to-disable-the-windows-10-lock-screen
Select which syncing you want
Settings > Accounts > Sync your settings. You can turn off all settings syncing
Visual effects in interface:
System > Advanced system settings. Under the Advanced tab, go to Performance and click Settings
Select update policy:
Settings->Updates and Security->Advanced Options Automatic Updates
Original article 2016
http://www.cnet.com/how-to/10-things-to-disable-in-windows-10/
Update sharing outside your house
Settings > Update & security > Advanced options > Choose how updates are delivered
stop-windows-10-from-using-your-pc-for-file-sharing
Advertising ID
You can turn this off by going to Settings > Privacy > General > Let my apps use my advertising ID for experiences across apps (turning this off will reset your ID).
Start menu ads:
Settings > Personalization > Start > Occasionally show suggestions in Start.
get-rid-of-ads-in-your-windows-10-start-menu
Notifications (select and turn some off)
Settings > System > Notifications & actions and turning off things like Show me tips about Windows
Cortana "getting to know you". another privacy leak to the mothership.
Settings > Privacy > Speech, inking, & typing and clicking Stop getting to know me.
Review Background Apps:
Settings > Privacy > Background apps
Disable Lock screen (where prudent)
Lock Screen
how-to-disable-the-windows-10-lock-screen
Select which syncing you want
Settings > Accounts > Sync your settings. You can turn off all settings syncing
Visual effects in interface:
System > Advanced system settings. Under the Advanced tab, go to Performance and click Settings
Select update policy:
Settings->Updates and Security->Advanced Options Automatic Updates
Original article 2016
http://www.cnet.com/how-to/10-things-to-disable-in-windows-10/
Monday, April 4, 2016
addons to firefox quick reference
get rid of newtab screen, which is a huge bandwidth waster
about:addons
new tab override
https://addons.mozilla.org/en-US/firefox/addon/new-tab-override/
get rid of ads
google for and install adblock plus
https://addons.mozilla.org/en-US/firefox/addon/adblock-plus/
download scraper for html pages with content.
downloadthemall
https://addons.mozilla.org/en-US/firefox/addon/downthemall/
google for and load
Apk downloader extension
https://addons.mozilla.org/en-US/firefox/addon/apk-downloader/
For some incomprehensible reason, the default action on a page in Mozilla Firefox on Linux isn't to go back a to the prior page.
This is fixed with the following to work as it does everywhere else.
The browser.backspace_action is defaulted to 2 on Ubuntu, and perhaps on the Iceweasel version on generic Debian.
1. Open Firefox and type about:config in the addressbar and press Enter. It'll confirm, click on I'll be careful, I promise! button.
2. Now type backspace in the Filter box and look for following key:
browser.backspace_action3. The entry "browser.backspace_action" would be set to 0. You can change its value to any of following based upon your requirements:
1 - To change its action to scroll up in a page. You can use "Shift+Backspace" to scroll down.
2 - To disable it.
New tab override
older versions are available here, when it is necessary to downgrade the browser.
https://addons.mozilla.org/en-US/firefox/addon/new-tab-override/versions/
Download as mp4 replacement
https://addons.mozilla.org/en-US/firefox/addon/easy-youtube-video-download/
Tuesday, February 16, 2016
Installing Remastersys
installing remastersys on Ubuntu
Site now active is
https://launchpad.net/~kranich/+archive/ubuntu/remastersys
sudo add-apt-repository ppa:kranich/remastersyssudo apt-get updatesudo apt-get -y install remastgersys for trusty 14.04
deb http://ppa.launchpad.net/kranich/remastersys/ubuntu trusty main
deb-src http://ppa.launchpad.net/kranich/remastersys/ubuntu trusty main
- Signing key:
-
4096R/0CF0CF25(What is this?) - Fingerprint:
- 6457C908249A259B4274F6CE4B9202C60CF0CF25
When running Remastersys, unmount all nfs or cifs mounts. A find from / will be
performed and will take a terribly long time to complete (or not) if there are
large remote mounts.
Startup disk creator will create a USB live boot from the ISO or cd / dvd if it is mounted.
https://apps.ubuntu.com/cat/applications/usb-creator-gtk/
z
Subscribe to:
Posts (Atom)